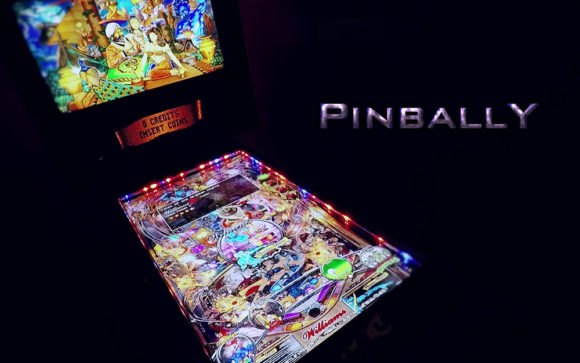
Status report: Project VPIN – Self-made „Virtual Pinball machine“
Documentation: VPIN – build your own Virtual Pinball in a old cabinet
„VPIN“ – who? what? why?…
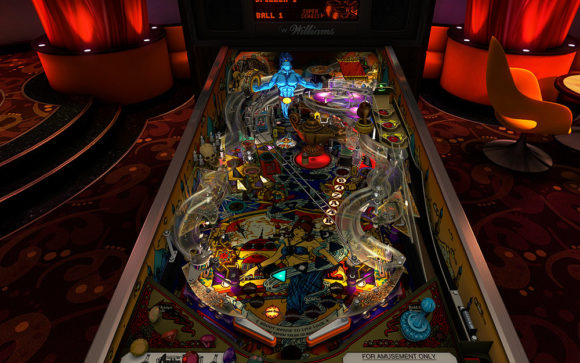
Since I was always fascinated by ‚Arcade stuff‘ and as a 70’s child, from my first impressions with „Pong“ over the Atari VCS to C64, Amiga, Atari ST, I386 until today with current PC’s I still „follow“ the topic passionately, I thought after playing the table „MARS“ of Pinball FX2:
A rotated screen would be much better and the whole thing controlled by buttons in an old pinball case would be cool too.
After many hours in boards and search engines etc. I found out that there are so called „VPINs“, virtual pinball’s in the housing of a pinball machine… and some additional variations.
So… it started… and this documentation summarizes three stages of development (thats why you see on some pictures various hardware f.e.) and there is time (duration) of about 1.25 years the whole proccess… but let´s beginn with a small video:

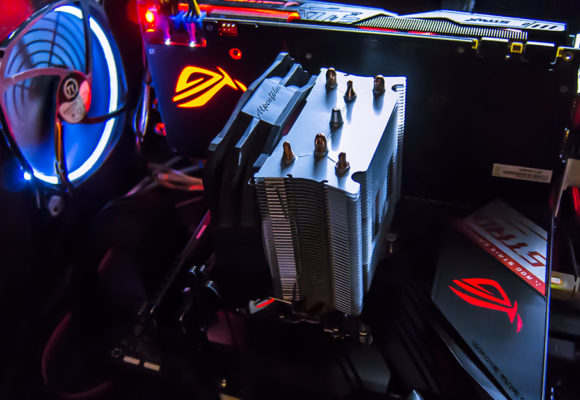


Computer/TV:
- ASUS ROG STRIX Z490-H | Alternate 240 €
- Intel® Core™ i5-10600K | Alternate 258 €
- Corsair DIMM 32GB DDR4-3200 Kit | Alternate 108 €
- ASUS STRIX-GTX1080-O8G-GAMING | Amazon 799 €
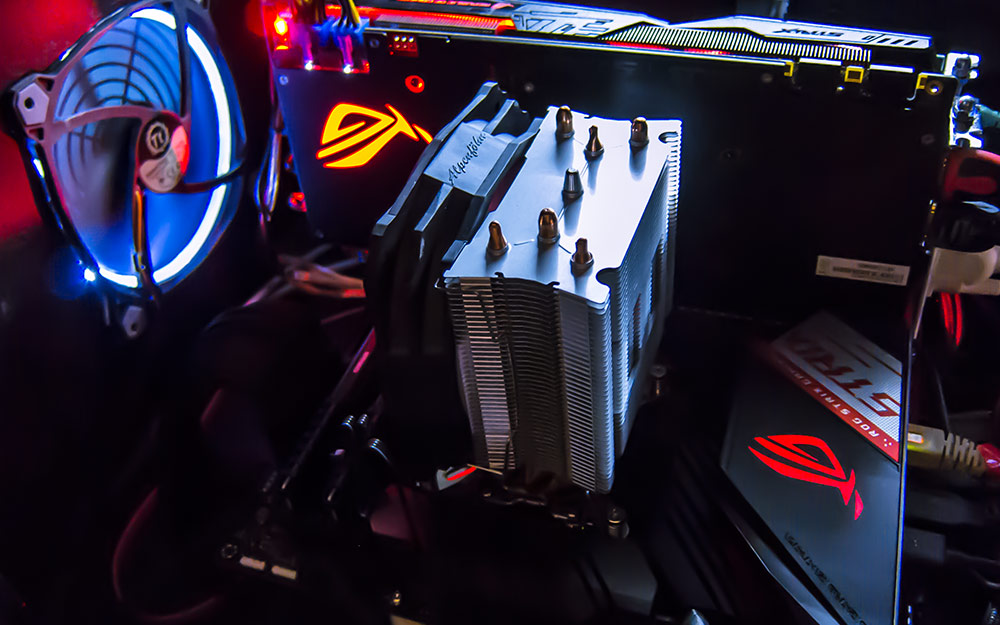
- Alpenföhn „Ben Nevis“ | Alternate 25 €
- SSD (Samsung EVO 850) 250GB | Amazon 76 €
- PROLITE X4071UHSU-B1 | Ebay 2nd Hand: 335 €
- Samsung SyncMaster S27A550H | Ebay 2nd Hand: 125 €
- HDMI 14,9″ LCD | AliExpress: 84 €
- Wavemaster Moody 2.1 | Ebay: 42 €
- HDMI/DVI und HDMI/HDMI cable| Amazon 14 €
- Be quiet! power supply (630 Watt) | Amazon 90 €
- CPU cooler | Amazon 26 €
Microcontroller
- Pinscape Starterset (Controller & Mainboard) | Arcadeclassic 125 €
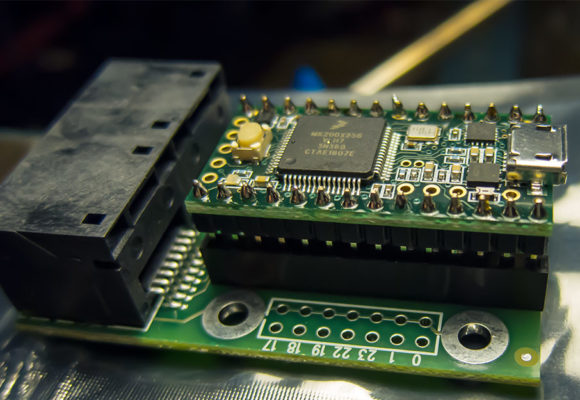
- Teensy 3.2, Octo 28, 2x Pin header, 2x Socket connector | reichelt 40 €
- Raspberry Pi 2, Power supply unit, microSDHC 16GB | Amazon 75 €
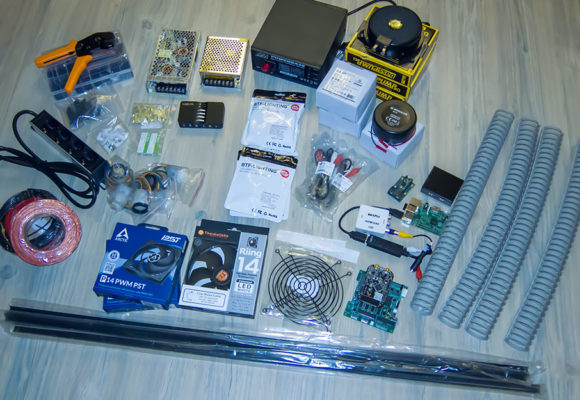
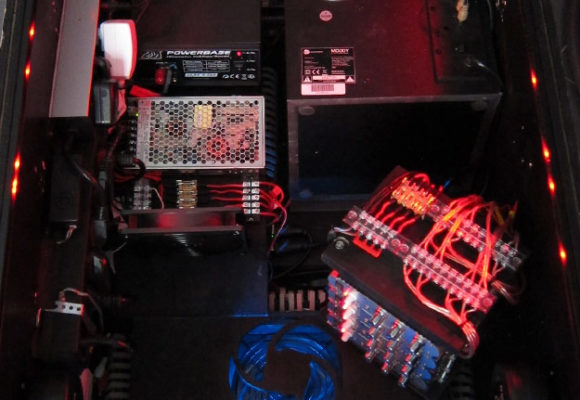
Power supply/voltage/cooling
- Power suply (MW RSP), 100 W, 5 V, 20 A (LEDs & SSF amps) | reichelt 34 €
- LED-Power supply unit 102W 12V 8,5A | Amazon 28 €
- Connection box | Amazon 6 €
- Power outlet strip 4-Fach | Amazon 12 €
- 140 mm PWM PST fan (power supply cooling) | Amazon 10 €
- 140 mm PWM PST fan (cooling of microcontroller) | Amazon 10 €
- Cooltek grid 140 black| Amazon 8 €
Plugs & Sockets
- Dupont-Plug-Set & Crimp-tool | Amazon 27 €
- JST-SM plugs & Sockets (3 pol.) | Amazon 16 €
- JST-SM plugs & Sockets (4 pol.) | Amazon 8 €
- Elektronic cable set 0,32mm² | Amazon 20 €
- Vehicle management set 2,50 mm²| Amazon 20 €
- Various Terminal blocks 4, 5, 10 and 12 | Amazon ~ 28 €
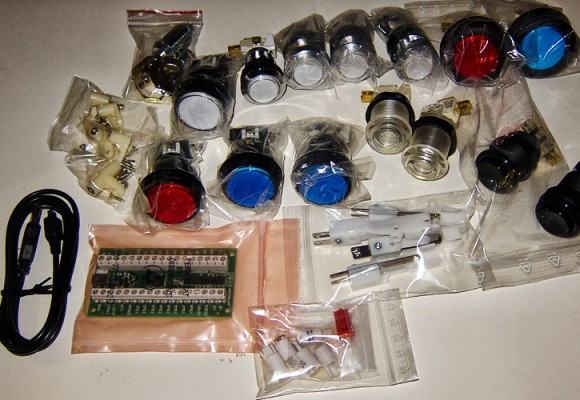
Buttons
- 4x RGB Pushbuttons | ultimarc 21 €
- 2x Halo Button, 50.5 mm, red & blue | Arcadeshop 12 €
- 4x Illuminated pushbutton ES, 34 mm, white | Arcadeshop 15 €
- 4x Illuminated pushbutton, 44 mm, blue, white & red | Arcadeshop 13 €
- 6x Arcade button red (5V LED) | Ebay 17 €
- 20x Leds 5 volts (red, white, blue) | Ebay 18 €
Various
- Plunger Poti & mounting | Arcadeclassic.de 30 €
- 2A Eska fuse lazy | Amazon 8 €
- Fuseholder for size 5×20| Amazon 10 €
- Old PinBall Champ82 Case | 2nd hand from Flippermarkt.de 50 €
- Pinball Legs and Plunger | 2nd hand from Flippermarkt.de 42 €
- Inspection door | Amazon 40 €
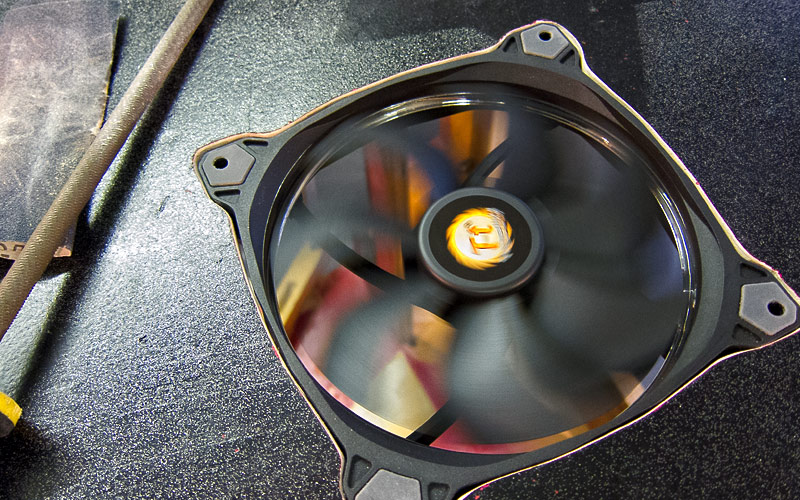
- Cooling: 2 pcs. 140er and 1 pcs. 120er Thermaltake Riing, fan power Extension cable and for each some Fan grill | Amazon 80 €
- Printed stickers | by size & complexity
- Various small strips etc.
LEDs:
- 2x 1m WS2812B LEDs (144/m) for Playfield (L/R/Back) | Amazon 52 €
- 2x 1m WS2812B LEDs (60/m) for Backglass (L/R/Top) | Amazon 52 €
- 3x LED-Profil transparency (Playfield L/R/Back) | Amazon 15 €
- 2x 1m WS2801 LEDs for „Undercab/Ambilight“ | Amazon 36 €
Surround Sound Feedback (SSF):
- 7.1 PCIe-Soundcard | Amazon 62 €
- 4x Audio 2.1 Amp (Stereo- & Subwoofer-Output) | Amazon 48 €
- 4x Bass shaker 8 Ohm | Amazon 152 €
- 4x Audio-Exciter/Resonator AR-50 | Amazon 100 €
- Speaker cable OFC chopper 2X 0.75mm² | Amazon 15 €
- 3x Adaptercable (Klinke <> Cinch) | Amazon 12 €
- Power supply 13,8V/ 20A 12V (for amps) | Amazon 60 €
Sonstiges:
- Printable cable labels (self-adhesive) | Amazon 10 €
‚already there‘ costs (in da house):
- Mouse & Keyboard
- Screws, Spax…
- Putty
- Colours & Spray cans
- various small stuff
- …
Anchor points: #Case, #Backbox, #PC, #LEDs, #SSF, #RPI, #Microcontroller, #Pinscape, #Buttons, #Teensy, #Cabinet.xml, #Software, #VPX, #Freezys-DMD-Extentions, #FlexDMD, #Color-ROM, #VPX-SSF-Sounds, #PinSound, #PinballFX3, #DOF, #DOFLinx, #Tools, #X360ce, #fR33Stylers-Pinball-FX3-SSF-PUP-Pack, #PinballY, #fR33Stylers-VPIN-Frontend-Media, #Backup
A bit of theory
What is a Virtual Pinball (VPIN) and how is it with the hardware and stuff?
Briefly explained on a higher flight level is as follows:
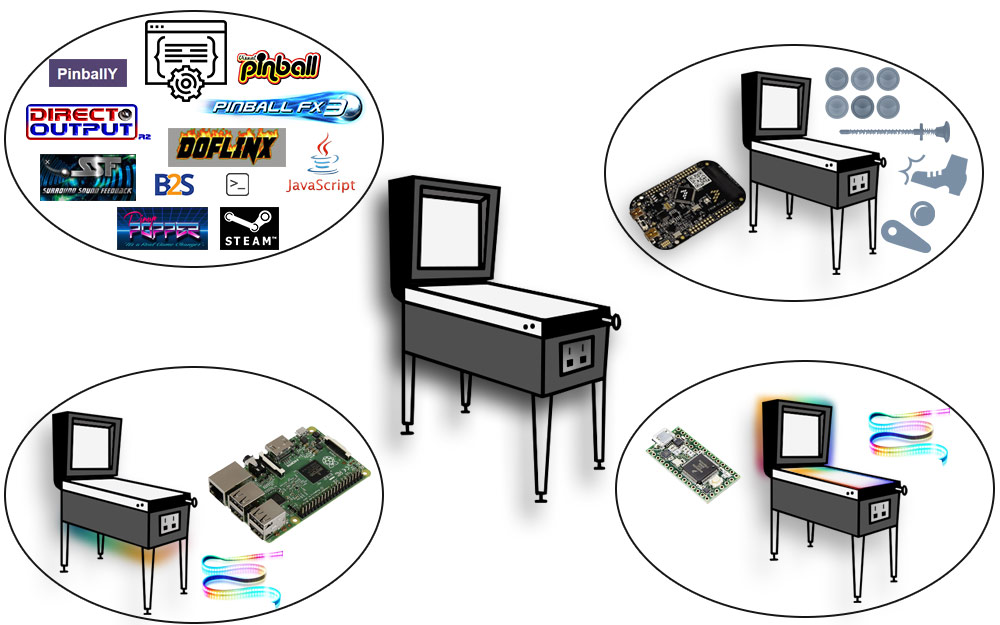
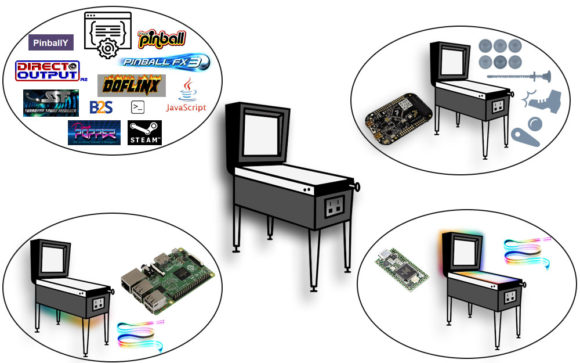
It’s an old pinball machine cabinet, a personal computer and three monitors. It runs Windows and different pinball simulations. But there is also a lot of additional software that interfaces to microcontrollers, which act as a keyboard, sensors or control LEDs. Also additional cool things like bass-shakers or exciter are built in, which further enhance the gaming experience… and on top of that, there is a so-called „frontend“ (software) which is automatically started in windows and controls the individual simulations and their „pinball tables„.
On a virtual pinball machine theres no „one and only table“ like in a real pinball machine… but more about that later.
This documentation is a summary of two building and configuration projects (V1 & V2 Update).
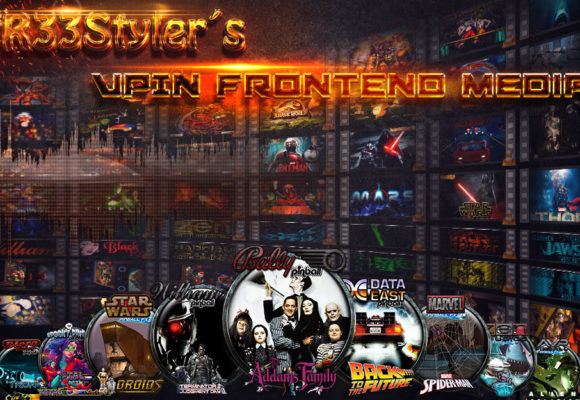
VPIN-Overview
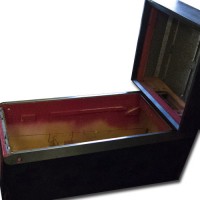
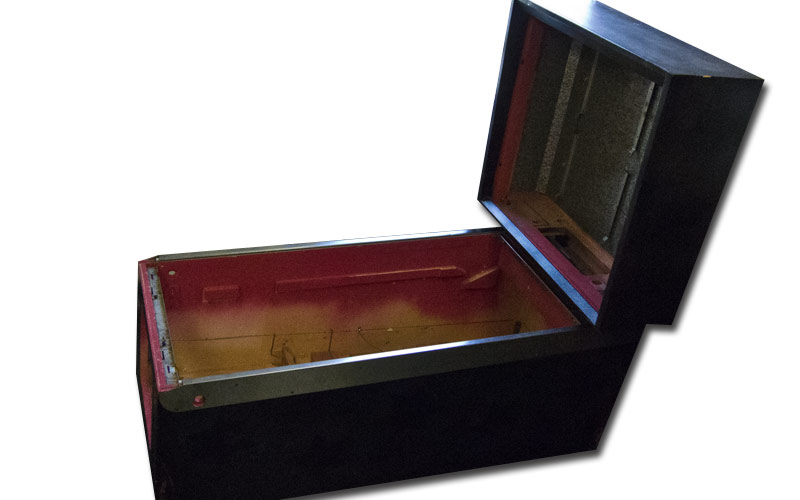
VPIN Leergehäuse/empty case 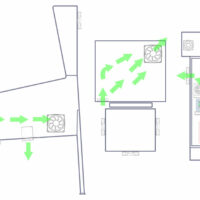
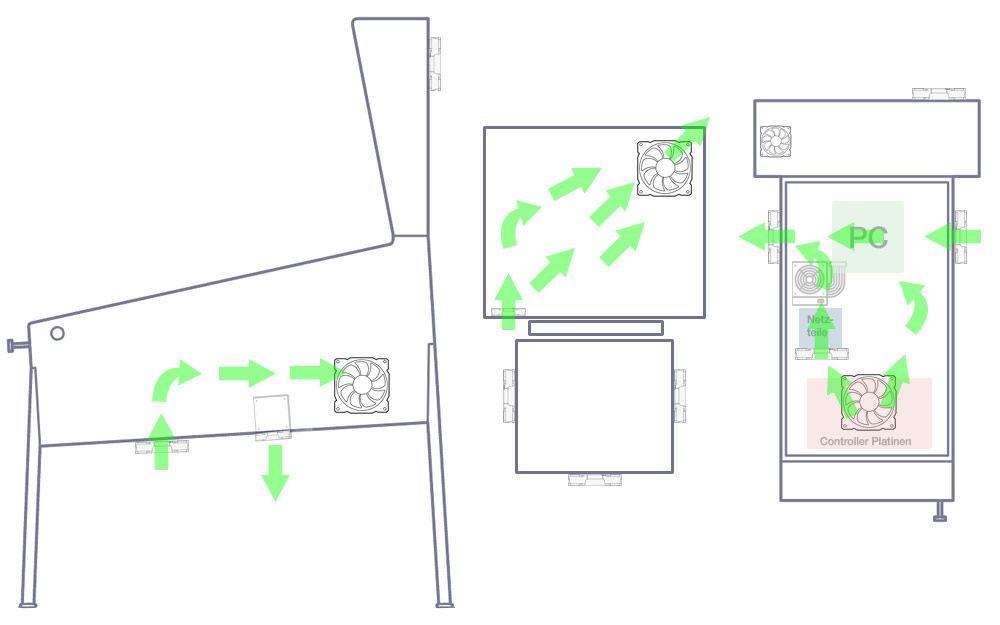
VPIN: Air-Flow 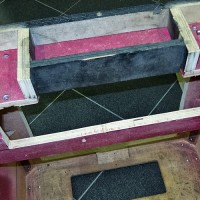
DMD-Monitor-Ausschnitt/Cutting 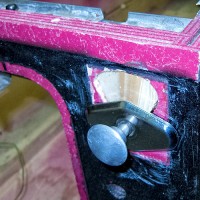
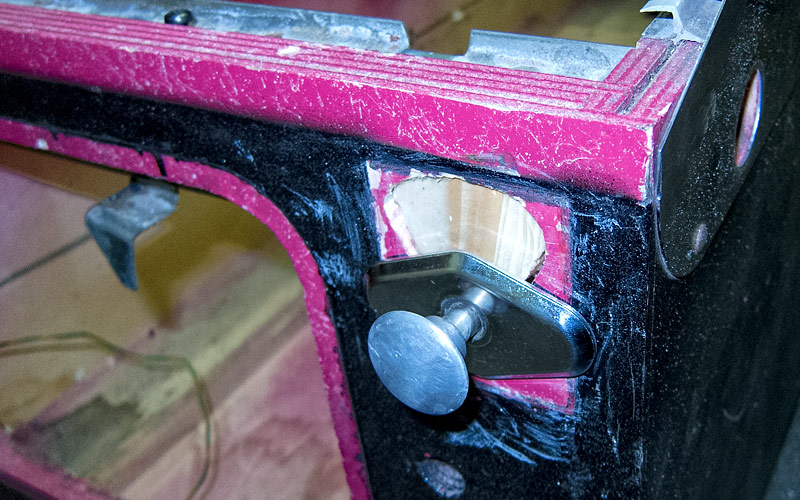
Plunger versetzen/shift plunger 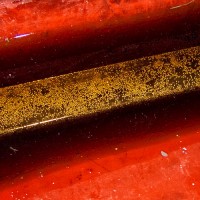
Edelstal Blenden im Cola-bad / Stainless steel stuff take a coke-bath 🙂 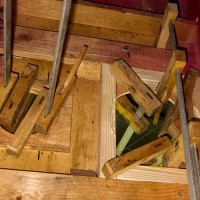
Sound Verstärkung / strengthen Subwoofer 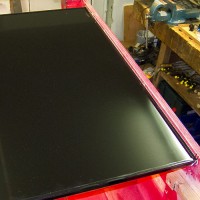
Playfield TV eingelassen in gefräßte Nut / Playfield TV mounted in notch 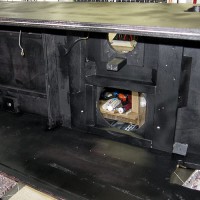
Gehäuse lackieren / varnish housing 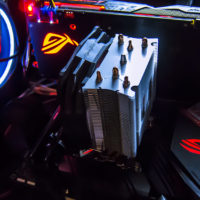
VPIN: PC 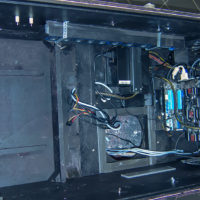
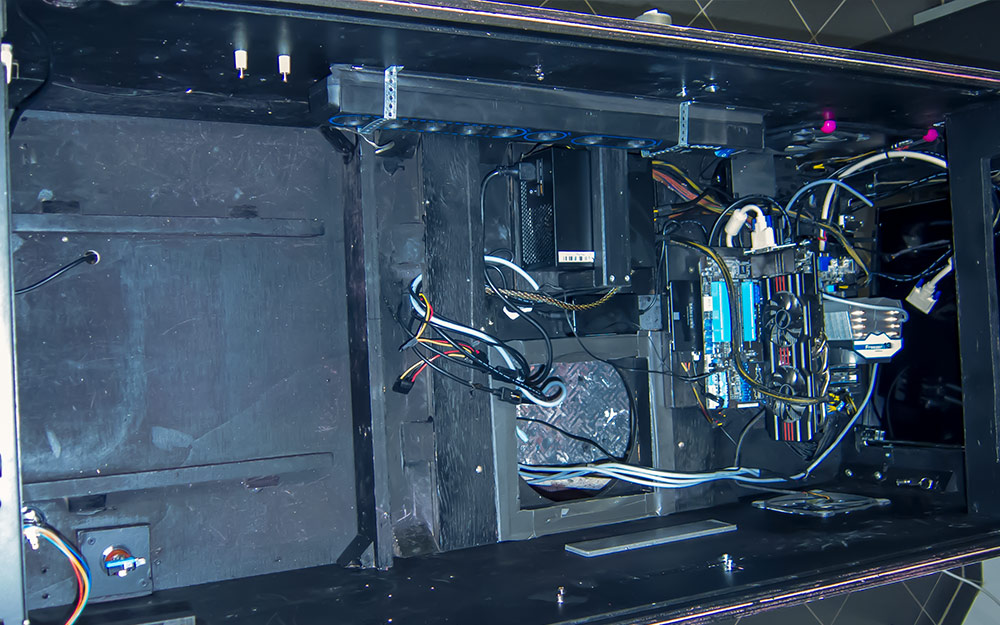
VPIN Case mit Computer / VPIN case with computer 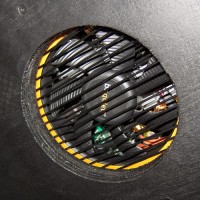
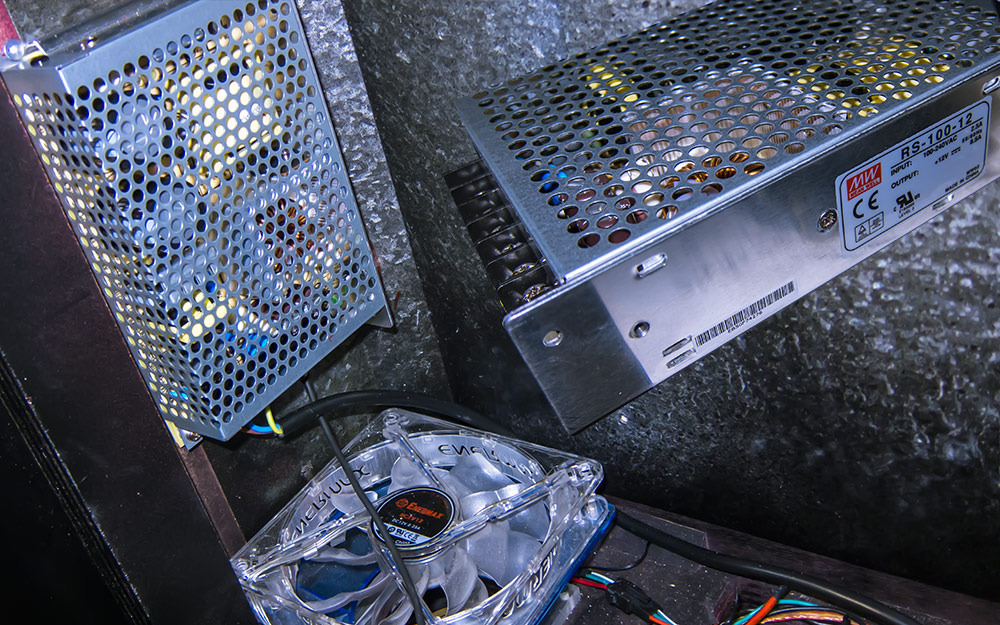
Belüftung des Netzteils (unten) / Cooling of power supply (bottom) 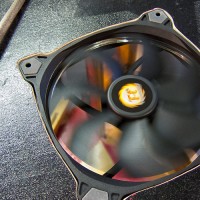
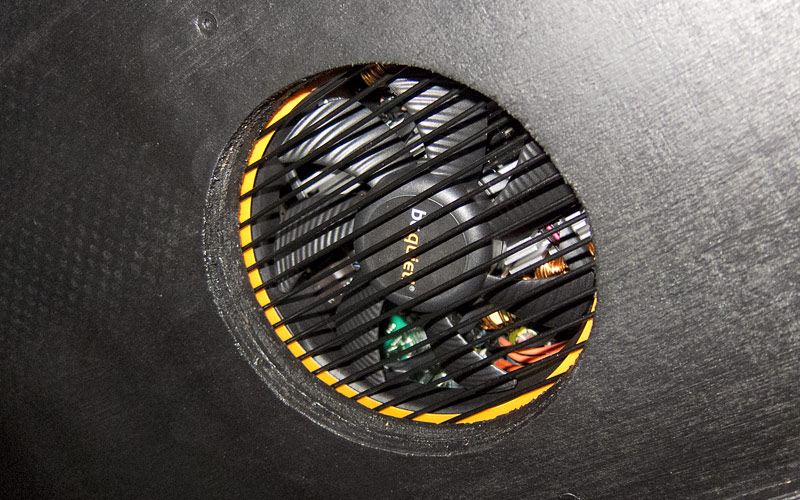
Ventliator (Flippergehäuse) eingelassen / Fan mounted flat in Cabinet case 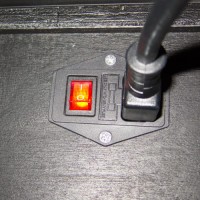
Stromanschluss unten / Power connection (bottom) 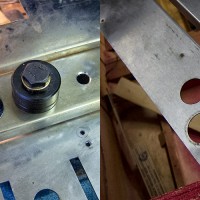
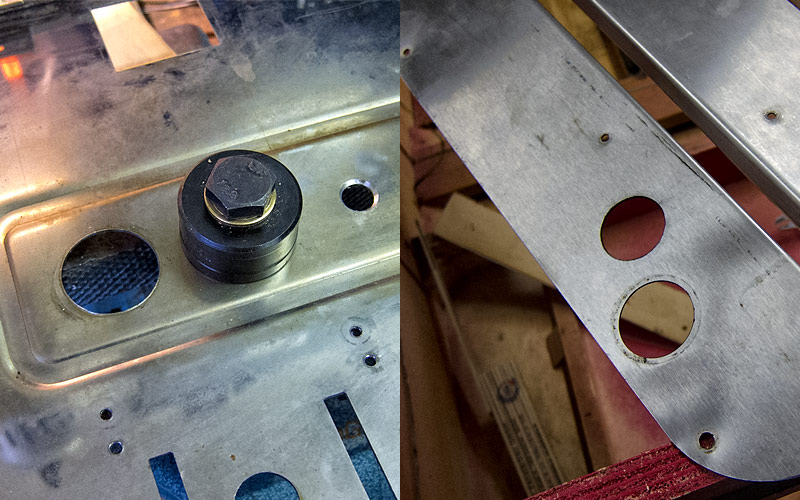
28 mm Löcher mit Lochschneider / 28 mm holes with hole cutter tool 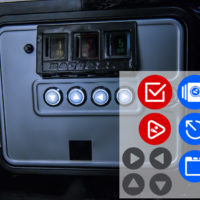
VPIN Front: Buttons 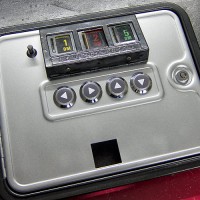
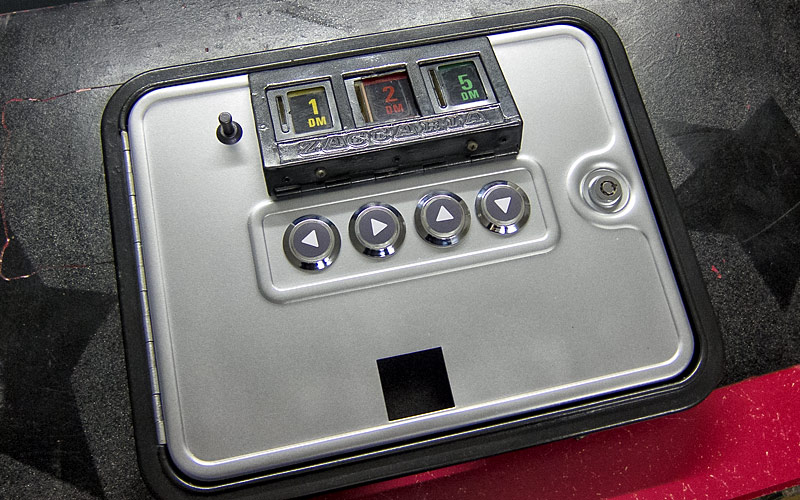
Kassentüre nach dem lackieren und zusammenbauen / Coin door ready 
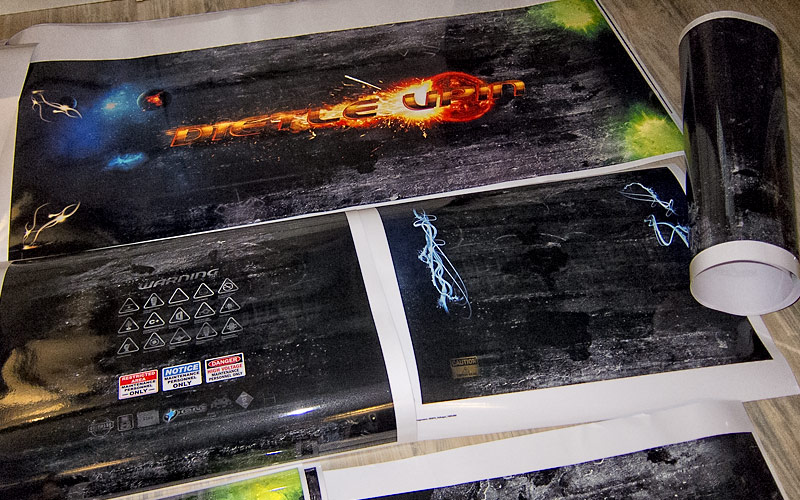
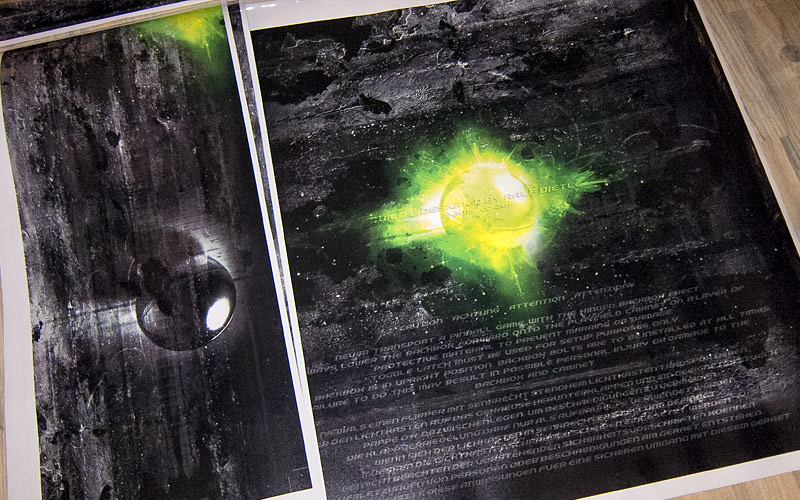
VPIN Design Hintergrundtextur / Backdoor 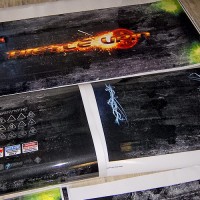
Klebefolien / Film (stickers) 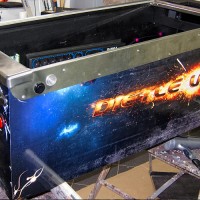
Bekleben des Flippergehäuse mit Folie / Gluing of the flipper housing with film 
Kleber auf Glasscheibe (zwischen Monitor und Ende) / Sticker at Glass (betwenn screen and end) 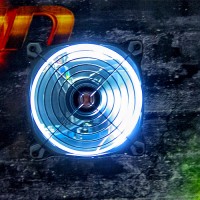
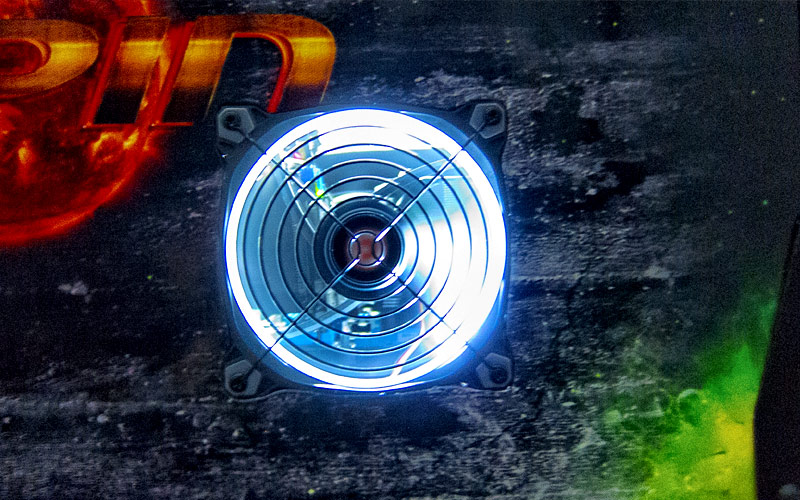
Ventilator im Gehäuse mit Beleuchtung / Chasis fan incl. light 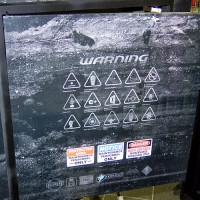
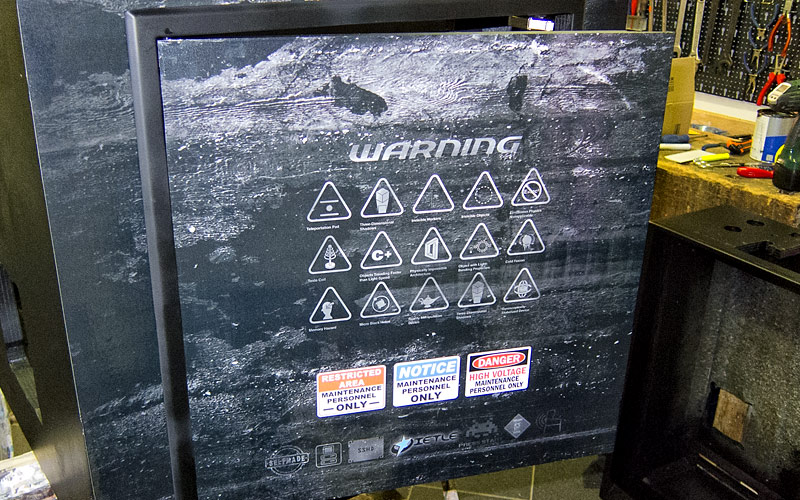
Aufbringen der Folie an der Revisionstüre / Apply the film to the inspection door 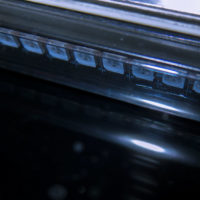
VPIN: LEDs Playfield Spielgelfolie/mirror film 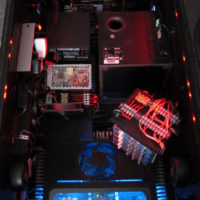
VPIN-Innenleben / VPIN inside 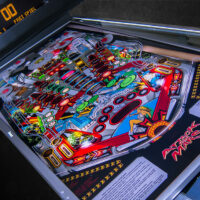
VPIN: 4K Playfield 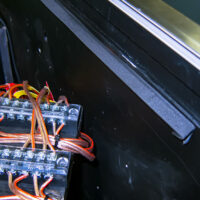
VPIN: Playfield Monitor Halter/Mount 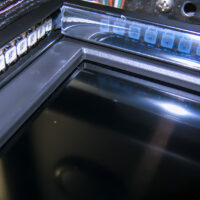
VPIN: LEDs Playfield 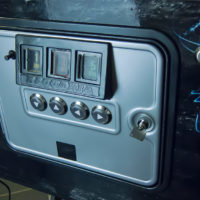
VPIN-Front-Buttons


Here we go… with the case
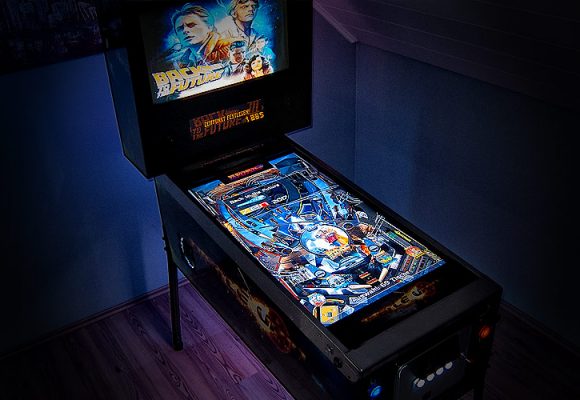
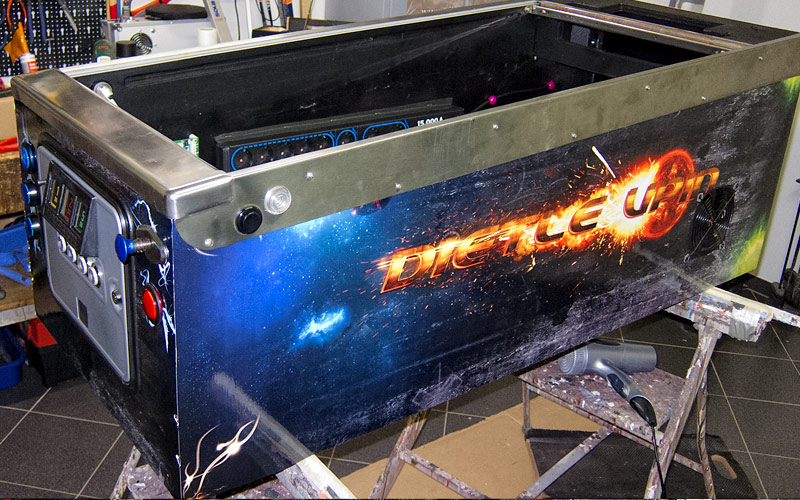
The case
The first thing I bought concerning virtual pinball was a (not virtual) old pinball case (PinBall Champ82) including coin slot, disc & siderails.
After I spent a lot of my (analog) spare time in digital boards/forums, blogs, YouTube & Co. and also various hardware stores… the first steps were roughly clear.
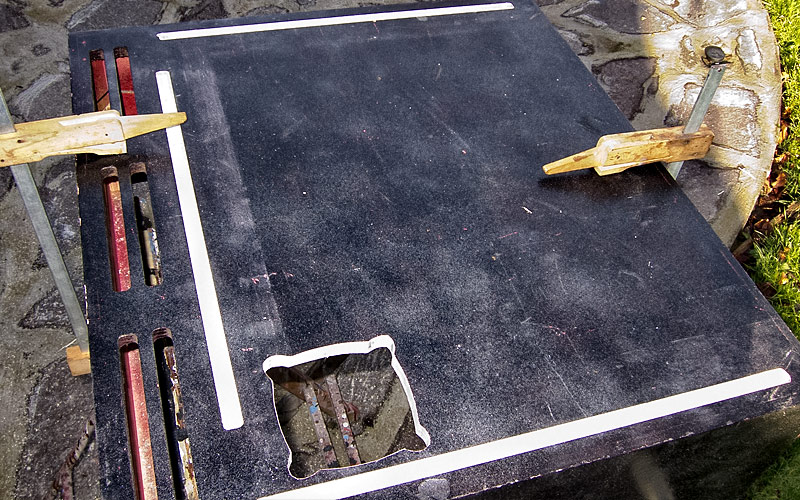
First of all I removed all strips and woods from the inside of the cabinet, made a hole and also a reinforcement for the subwoofer and a hole for the inspection door on the back (to get easy access to the PC later). Then I removed all the metal parts and rust (rust film) in a nice Cola bath (but without Jack Daniels) and polished or sanded them.
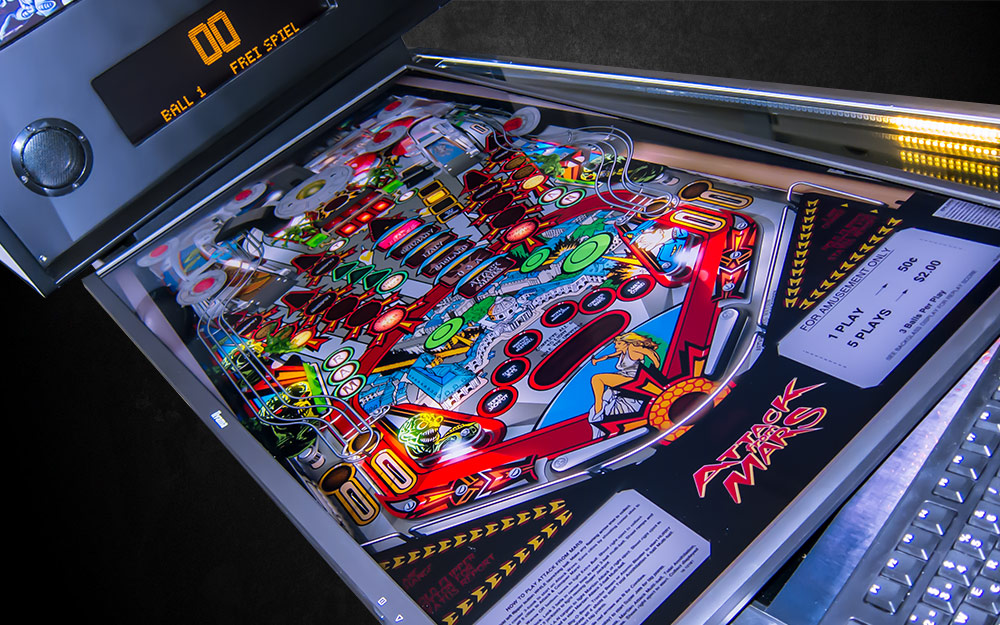
In my V1, I had chosen the (FullHD) Samsung UE40J6250 TV for my „playfield screen“. My pinball case has 52 cm, the TV still had about 52.6 cm „stripped“ (I left the frame at the front to „centre the front“), so the plan was to cut a groove 0.5 cm deep on each side.
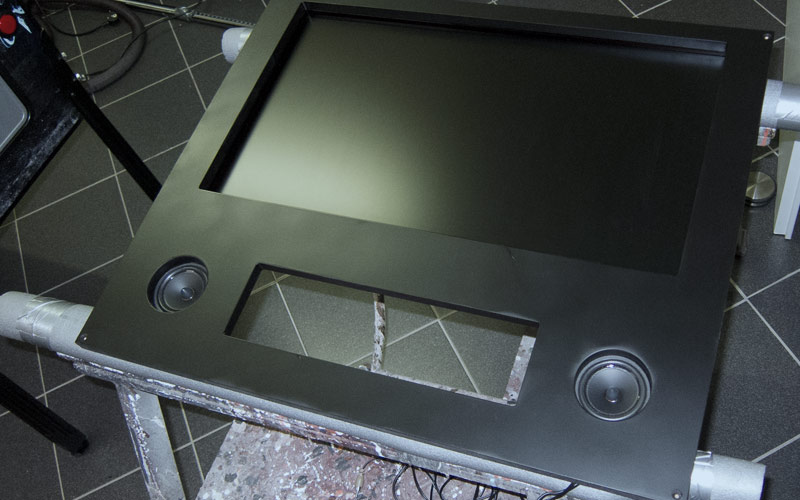
In the V2 I used the PROLITE X4071UHSU-B1 (4K), which fitted in incl. case. However, the buttons (on/off etc.) are still at the bottom and protrude a little… but they are now perfectly recessed in the groove. For the monitor mount, I adapted an angle profile and covered it with good fabric tape to prevent scratches on the monitor housing.
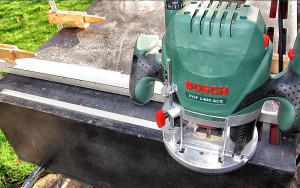
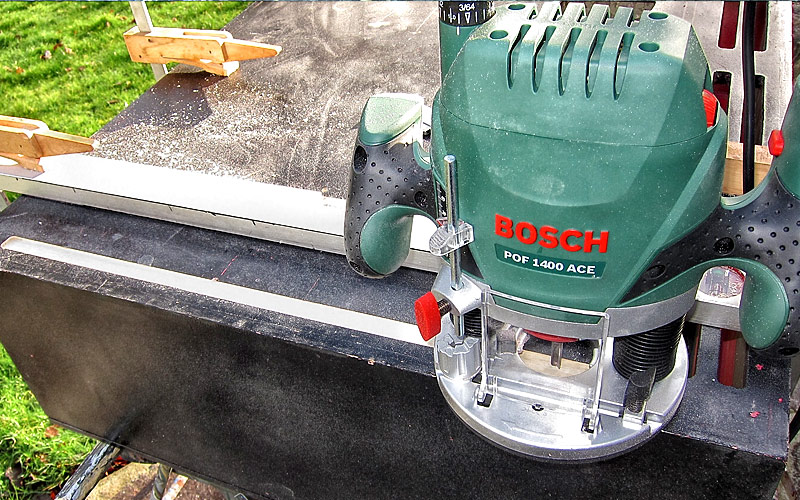
With the help of a ‚hole cutter‘ I was able to cut the 28 mm holes for the additional pinball buttons and the 4 navigation buttons into the related plates.
I left 15 mm distance from the glass pane for the playing field, so that the air can circulate a little bit there. Then I could finally cut the groove for the playfield TV into the case (a router is really a great tool) and stabilize the whole thing afterwards with the wall mount screws.
Then I went on with the router and I worked in all the holes and grooves for the buttons and attached them in a way that they don’t ’stick out‘ with the centering ring but lie nicely against the case.
Also the case, the PC and screen inside need a circulation… so I used a jigsaw (+ file and sandpaper) to cut out the fan hole („sucking in right“ to „blowing out left“).
The illuminated buttons can be disassembled in a way that it is possible to put a sticker or your own printout in front of the button. In combination with LED’s as lighting this comes quite good. So I created a small graphic for the most important buttons (arrows left, right, up, down; ESC, Tab, Launch & Start), printed the whole thing, cut it out and this is how it looks like (see pictures on the right).
I painted all parts black matt (RAL 9005) and then I started to apply the foil. The whole thing went quite well without big air bubbles and as always with such a project it is really fun to build the whole thing together (see gallery). Also take a look a little „closer“ on the revision door in the back.
The design was quite complex… the right/left side of the pinball machine alone has about 100 layers and should be designed to work together during transitions but after 5 nights the work was done and the freshly printed adhesive foils were ‚in da house‘ round about a week later.
With the foil on the side i reccomend ‚work with two people‘, but then it works quite well… also here I cut the cutout for the fans and pulled them over the edges with a hair dryer. Afterwards I attached 10×10 mm edges (like the backbox) and then the case could finally stand on its own feet now.
Because there is a distance between the bezel and the playfield monitor I put a sticker on the top and bottom (so you can’t see inside) and a small black plastic strip on the playfield monitor which goes up to the glass pane.
What happens „electronically„, you will see a little later below.
Nut für LED-streifen fräßen / mill notch for LED-Stripes 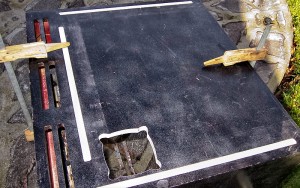
Nuten für LED-streifen und 120er Ventilator-Ausschnitt / Notches for LED-Stripes and 120 mm Fans 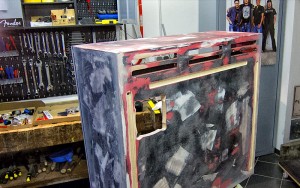
Backglass Gehäuse gespachtelt / filling of backbox 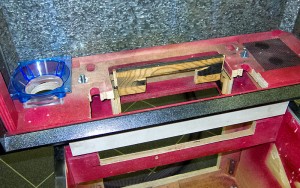
Backglassgehäuse verschrauben / Mount Backglass 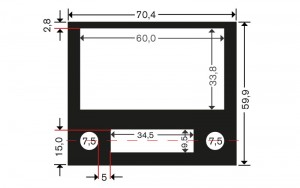
Backglass-Zeichnung/Draft 
Back-(Glass)Holz vorne / Back-(glass)wood front 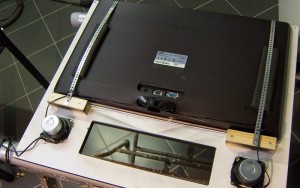
Back-(Glass)Holz hinten / Back-(glass)wood back 
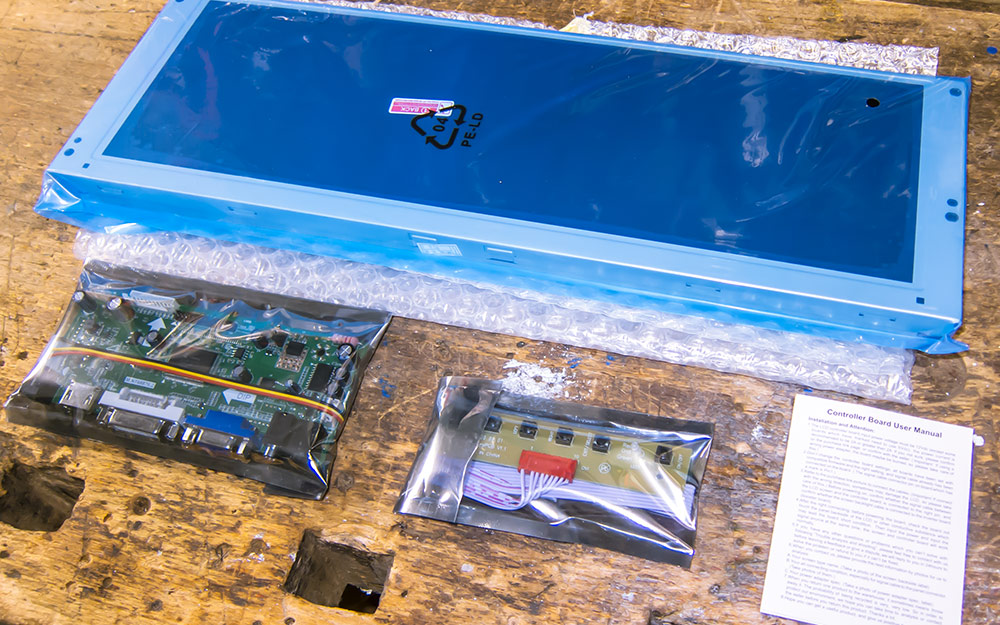
VPIN HDMI LCD 14,9" 
VPIN DMD LCD 14,9" Netzteil/Power supply 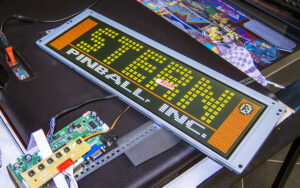
VPIN HDMI LCD 14,9" Test 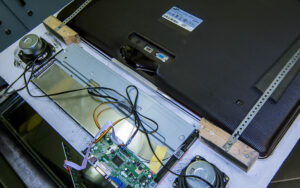
VPIN - Backbox 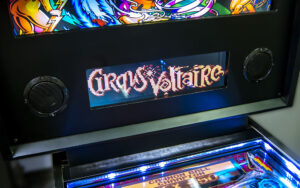
Backbox DMD 
Klebefolie / Film Backbox 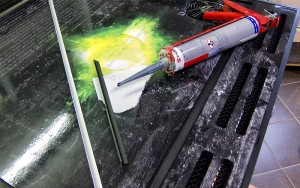
Eckleisten sägen, lackieren und ankleben / ledges: sawing, varnishing and gluing 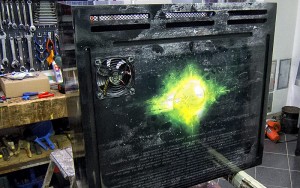
Bekleben der Backbox mit Folie / Gluing of the backbox with film


The Backbox
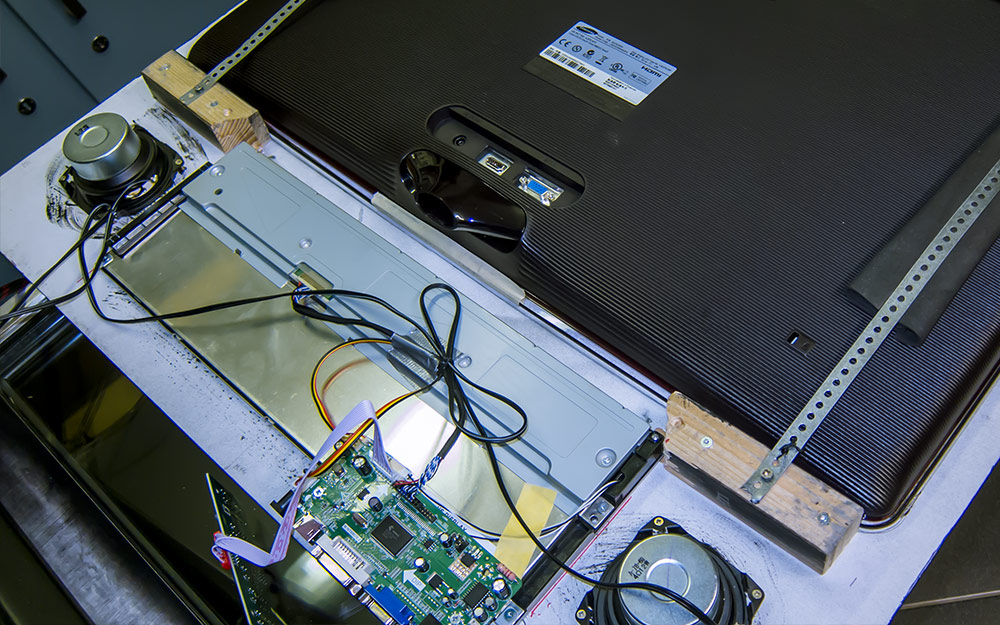
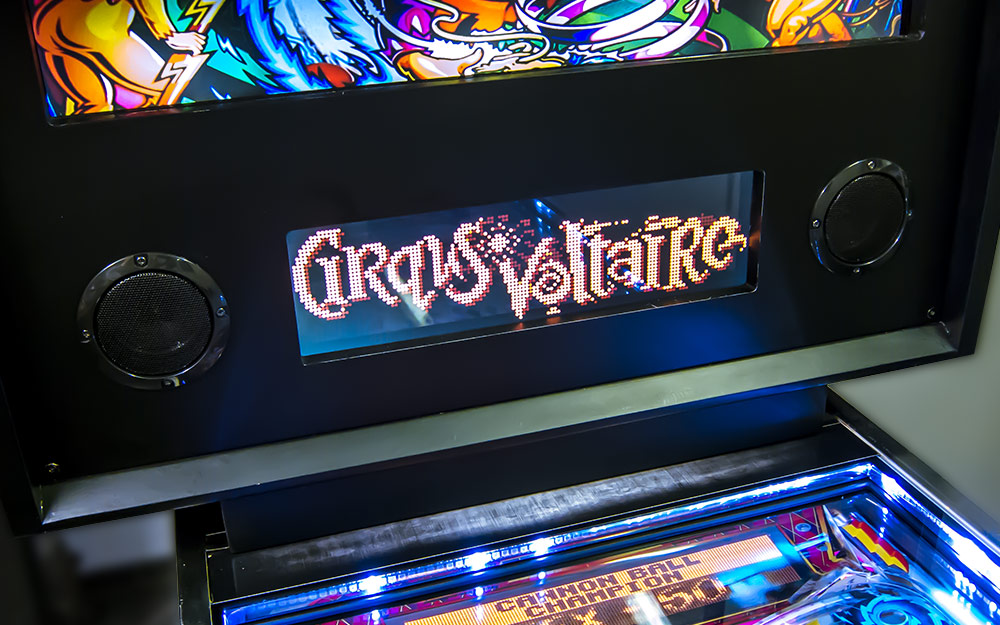
As mentioned in the shopping list above, I bought a 17″ monitor and 27″ TV from Ebay and this was the basis for the layout, which also means that there is space in the backbox (the head of the pinball machine) and in the lower pinball case for the 17″ monitor which is used as a dot-matrix display. So that the dot-matrix display (DMD), in my case the DMD monitor, is adjustable in height (to fit exactly into the cutout) and is screwed to the bottom of the backbox with the appropriate stability.
For ventilation purposes I drilled a hole with a socket drill (120 to 80mm adapter) at the bottom left for the „sucking in fan“ and sawed out an exact cutout for the „blowing out 120mm fan“ with a jigsaw at the top right so that the ‚waste heat‘ can rise to the top and be dissipated and of course be supplied with fresh air from below.
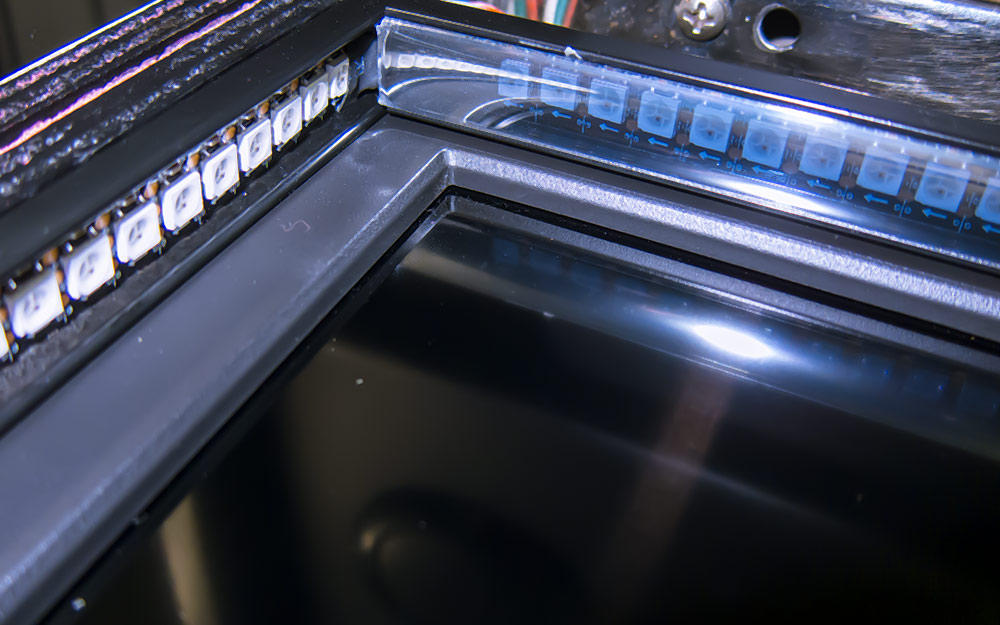
At the same time I made 3 grooves (á 16 mm wide, 4,2 mm deep) with the router for the LED strips to be at ground level (more about this later). Then I had to fill, sand and paint several times.
The application of the foil went quite well and with a hairdryer I was able to bend the corners of the fan cutout… otherwise it is a very exact, tedious work because all the grooves and projections have to be cut carefully with the ‚cutter knife’…. puh…
After that I decided to put 10×10 mm aluminium strips on the edges to protect the foil in these places. The whole thing is mitred and painted black matt (RAL 9005) and fixed with a very good glue.
The last part was then the front, the so-called ‚Backglass‚… in my case rather the ‚Backwood‘ :-). After varnishing & Co. I used 2 pieces of wood to hold the Backglass 27″ Led in place, then tensioned it with a fine perforated plate (which is embedded in the wood) and foam rubber. The loudspeakers of the Wavemaster Moody system (see shopping list) were screwed on, the cable was shortened and the ‚back-wood‘ was ready.
After the complete insert was screwed on, I was able to mount the DMD monitor and finally the wooden panel.
So much for the case… of course I have tinkered with electronics & software in parallel… but more about that later.
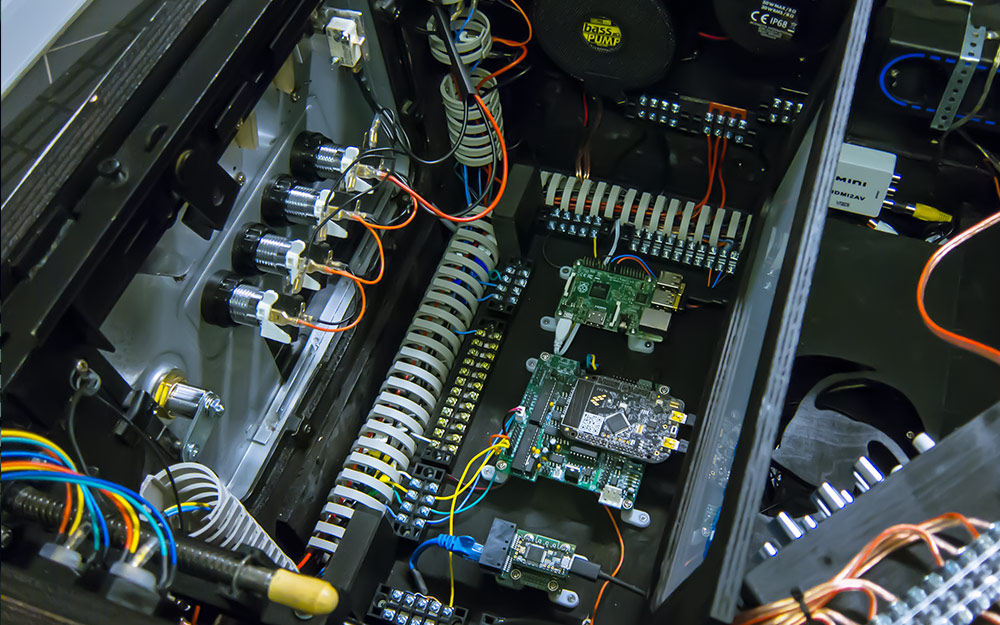
The inside
PC
The computer is a normal PC (see above components) which I have screwed with ‚board feet‘ on a wooden board, the PCIe cards additionally fixed with a threaded rod.
To switch everything on I decided to use a „Master-Slave power strip“. The power button of the PC (on the mainboard „Power“) i.e. the power supply is the „Master“ and the remaining components are then switched on as „Slave“.
You can switch off the whole thing via the VPIN „Frontend“ (details below) with the flipper buttons (in which the PC shuts down).
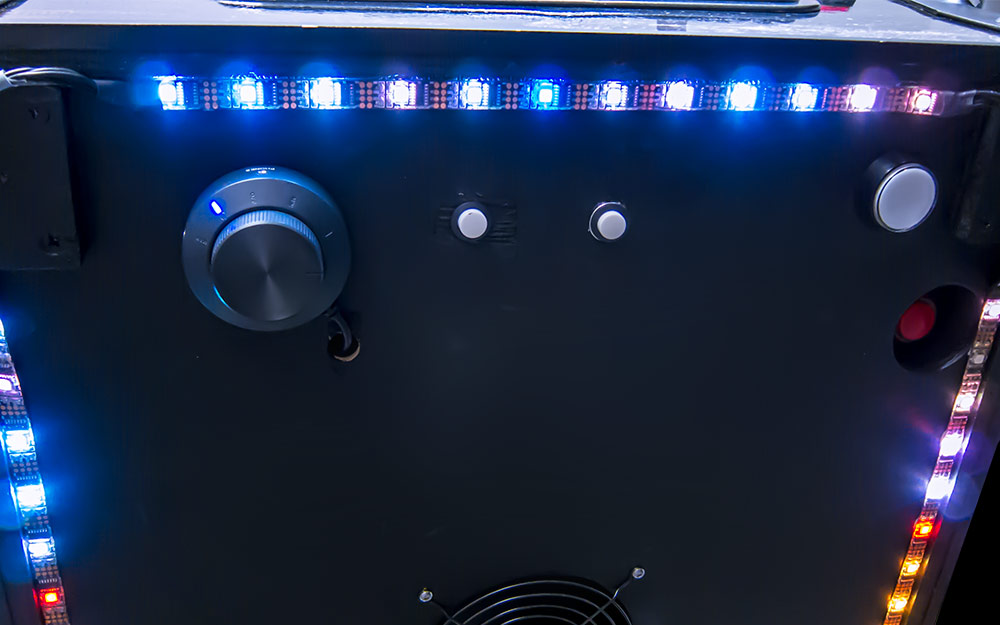
I attached the buttons under the case (white „Power“, red „Reset“, the small white „WIN Volume louder/quieter“ and the bigger knob is the volume of the Moody-Systems).
The whole thing is a „3 Screen Setup“ and I solved it like this: Monitor #1 (TV) is the playing field in portrait format, Monitor #2 is the DMD and Monitor #3 is the backglass. Contrary to the standard setup, I chose to place the monitors sideways, because I often stand in front of them and work in the WIN (install and set up new tables etc.)… I found this more practical (and besides, some bully makes the font smaller and smaller and smaller every year…)
Miscellaneous: the computer boots into WIN again, in the Bios I switched off the USB power supply (otherwise the microcontrollers are permanently on) and in the WIN some programs start by batch file/autostart but more about that later.

VPIN: PC 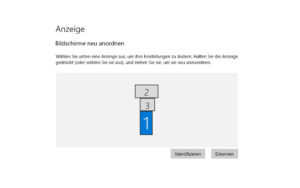
VPIN Bildschirme WIN / Screen setup WIN 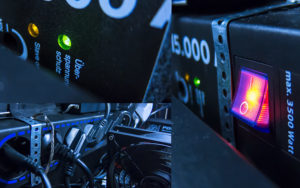
VPIN: Master/Slave 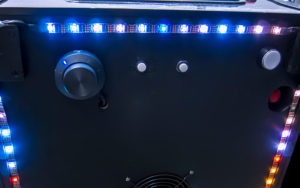
VPIN: Volume Moody, WIN Volume up/down, Reset, Power


LEDs
For my virtual pinball I use the following different setups:
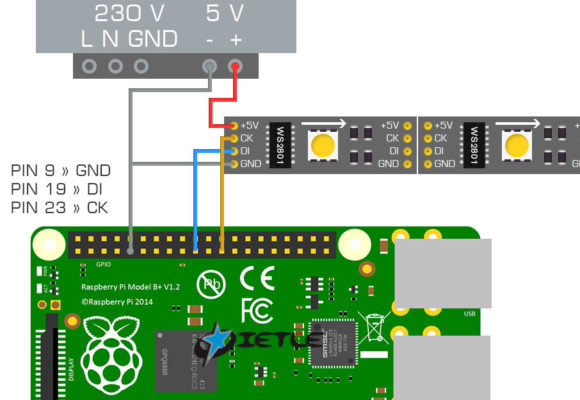
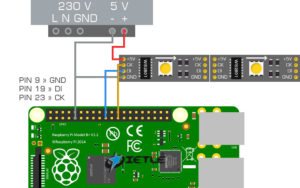
- WS2801 LEDs with a Raspberry Pi2 (RPI) controller (to ‚project the playing field‘ downwards (like Ambilight))
- WS2812B LEDs with a Teensy 3.2 controller (to place colors/triggers/events from the game on the playfield & behind the backglass)
- RGB LEDs to illuminate the pinball & magma buttons with the appropriate color
- (one)colored LEDs to light up the buttons or to put events from the game, e.g. a „blinking“ on the buttons
From the power supply they are connected as follows:
- The WS2801 LEDs are connected to the 5V power supply (see shopping list) with +5 and GND (-) and in parallel GND is connected again to RPI at pin 9, as well as „DI“ at pin 19 and „CK (Clock)“ at pin 23
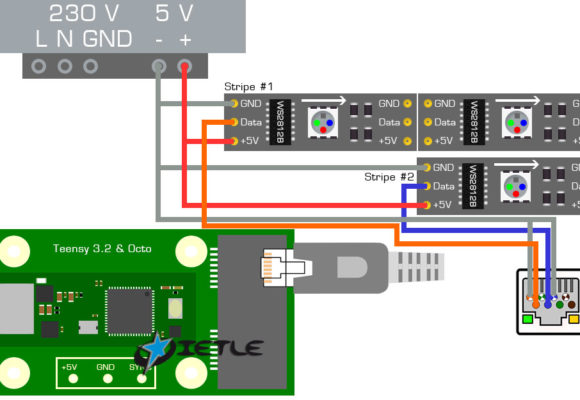
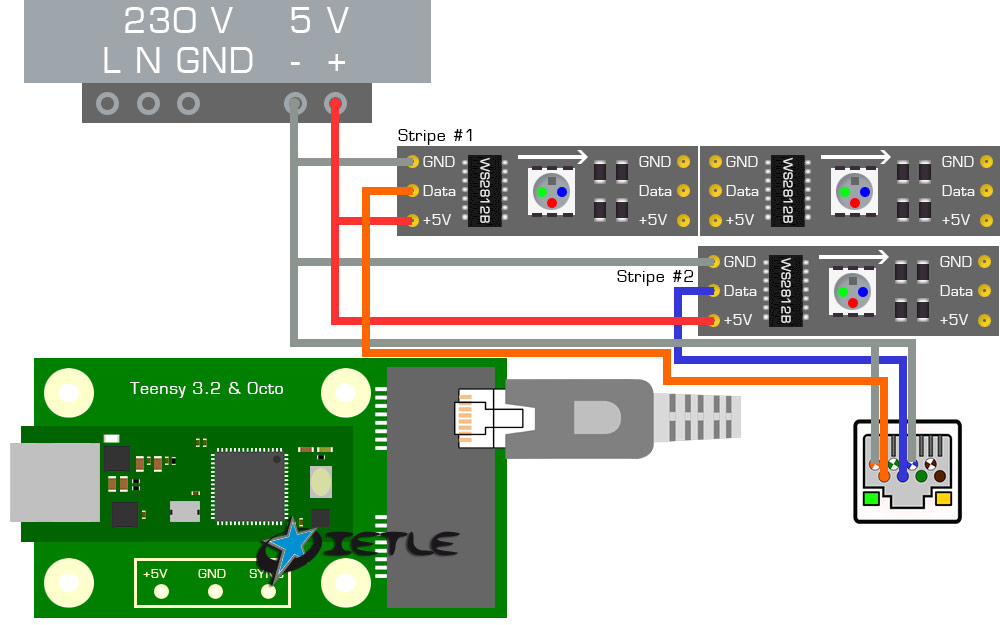
- The WS2812B LEDs on the Teensy Octo adapter (network cable) with Orange/Orange-White: Stripe #1 and
- Blue/Blue-White: Stripe #2: The voltage (+5V and GND) is fed directly into the LED strips from the power supply unit (see pictures). Important: Re-feed +5V after 180 LEDs.
- The monochrome and RGB buttons are connected to the pinscape controller (see pictures)… but be careful: this is „switched to ground“, meaning: there is „a plus“ (PIN 18) and the other cables (R, G, B..) are „ground“ (this experience costs me one RGB button)
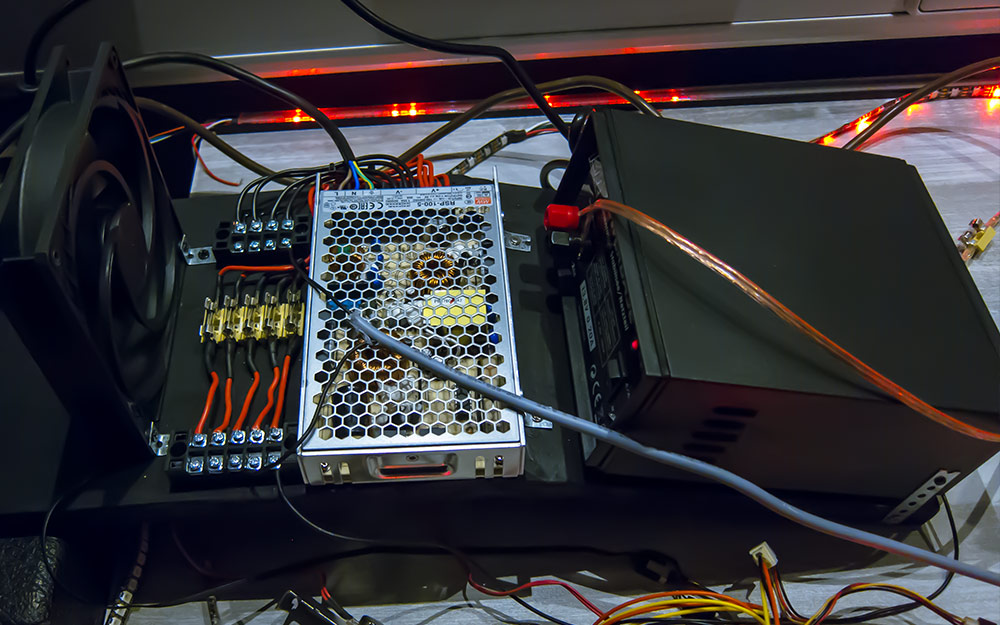
I have fused everything that comes out of the 5V power supply accordingly… the whole thing can be calculated well (see pictures)… I usually split it up in a way that 2A are enough (very important for the lifetime of the LEDs, the Pinball machine… and house at least).
How I control them in the VPIN can be found at the Software / Microcontroller.
VPIN: Rapsberry Pi WS2801 LEDs 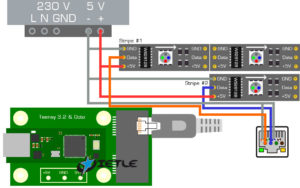
VPIN: Teensy WS2812B LEDs 
Pinscape RGB & 5V LEDs 
VPIN: Netzteile/Power supplies 
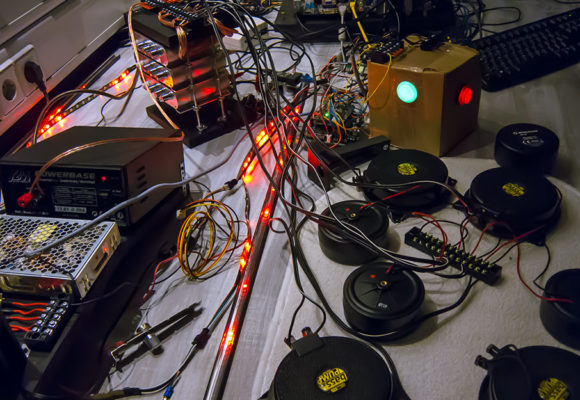
VPIN-Teensy-Test 
VPIN: RGB-Flipperbuttons VPIN: Volume Moody, WIN Volume up/down, Reset, Power 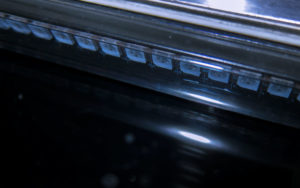
VPIN: LEDs Playfield Spielgelfolie/mirror film 
VPIN: LEDs Playfield Spielgelfolie/mirror film 
VPIN: LEDs Playfield 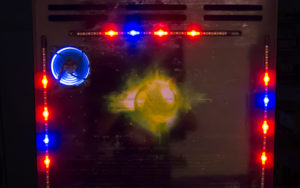
VPIN: LEDs Backglass


Surround Sound Feedback (SSF)
SSF does not stand for South San Francisco… no… it stands for „Surround Sound Feedback“… important here is the word „feedback“.
Simply explained: the feedback is „tangible“ through bass pumps (bass shaker/body sound transducer) and „audible“ through so-called exciters.
SSF can be used together with DOF (Direct Output Framework) and solenoid based stuff like contactors etc. or standalone. I personally operate it standalone (without contactors & Co.), find it very simple and effective… actually almost the coolest thing about my Virtual Flipper (VPIN).
But you can also visit South San Francisco… a nice spot on earth :-).
but Ok… how you procced?!
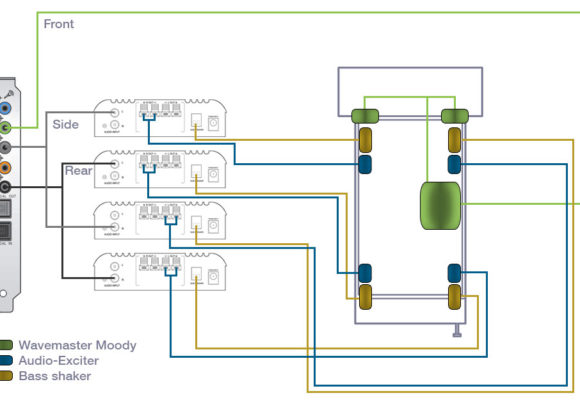
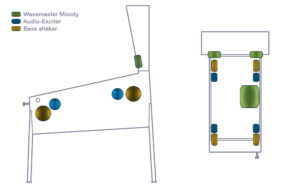
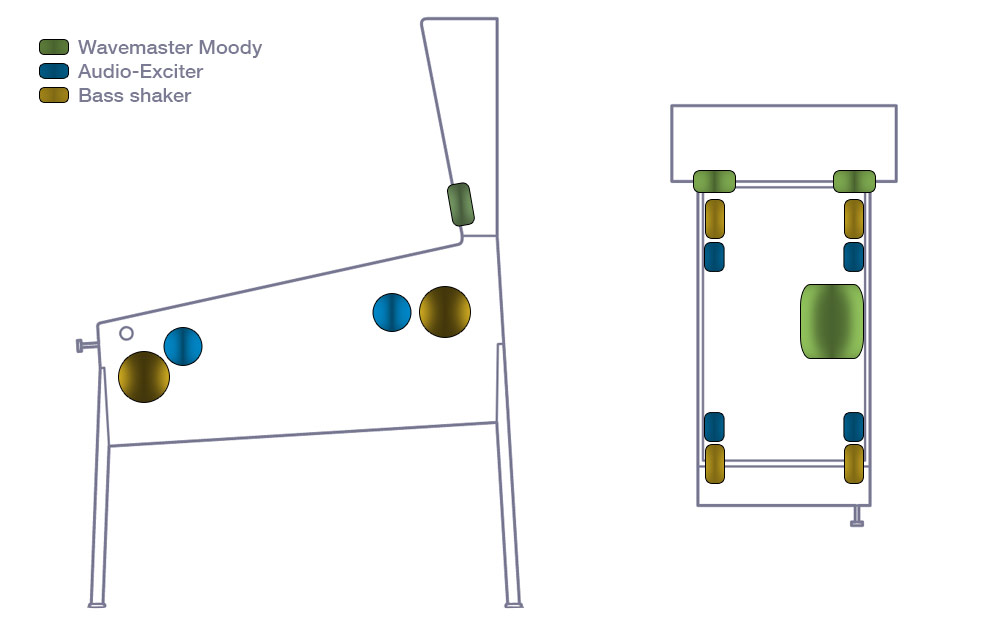
You take a 7.1 soundcard and use:
- Front for his normal system, which is mounted in the backglass (in my case the „Moody“, which contains a subwoofer with crossover)
- Center/subwoofer remains empty
- Side for rear bass pumps & exciter (near backglass)
- Rear for the bass pumps & exciter in the front (near flipper buttons)
» See sketch in the gallery.
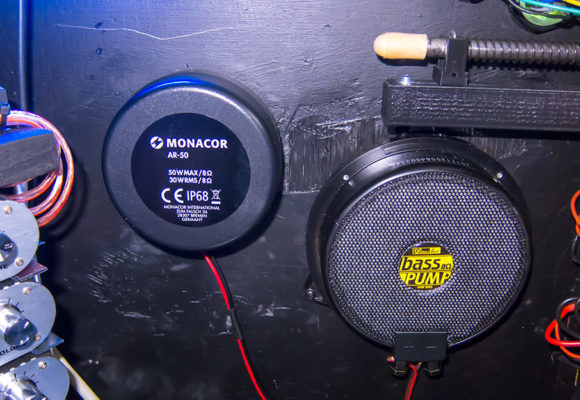
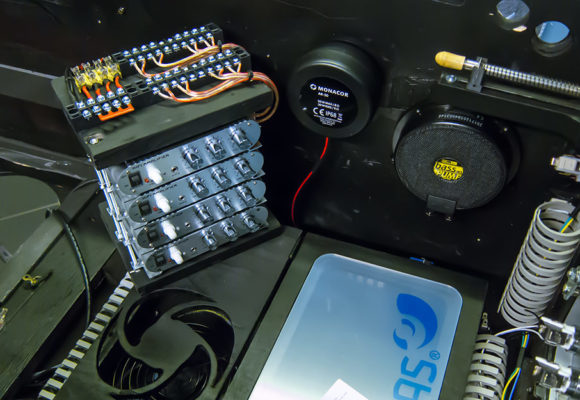
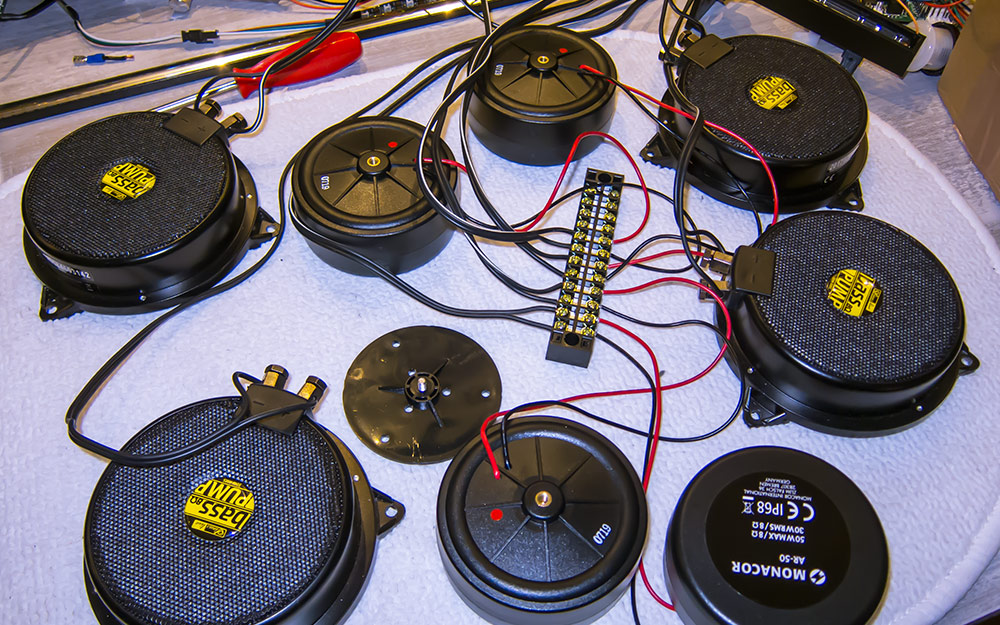
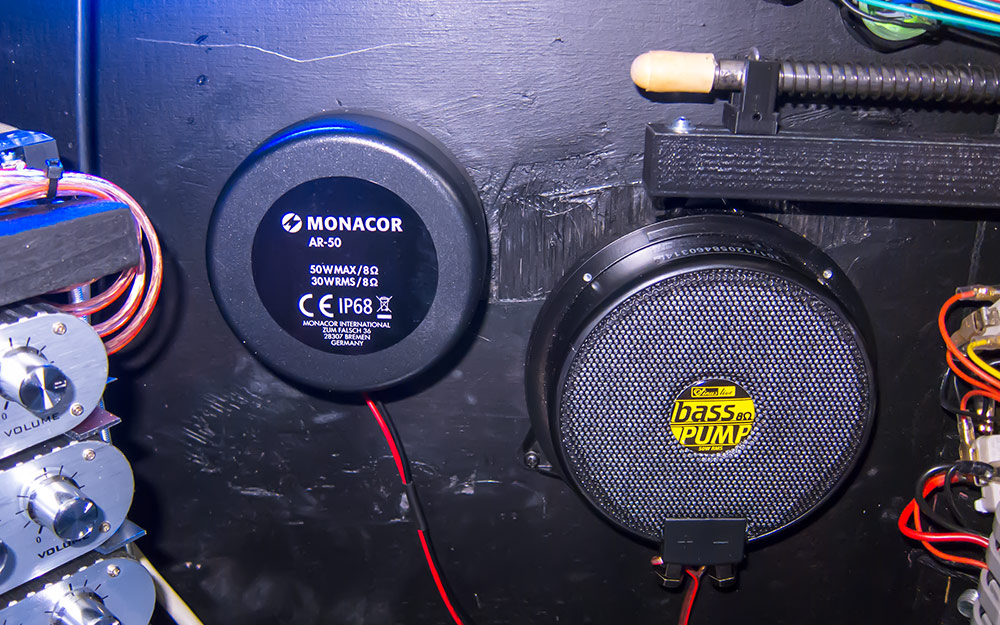
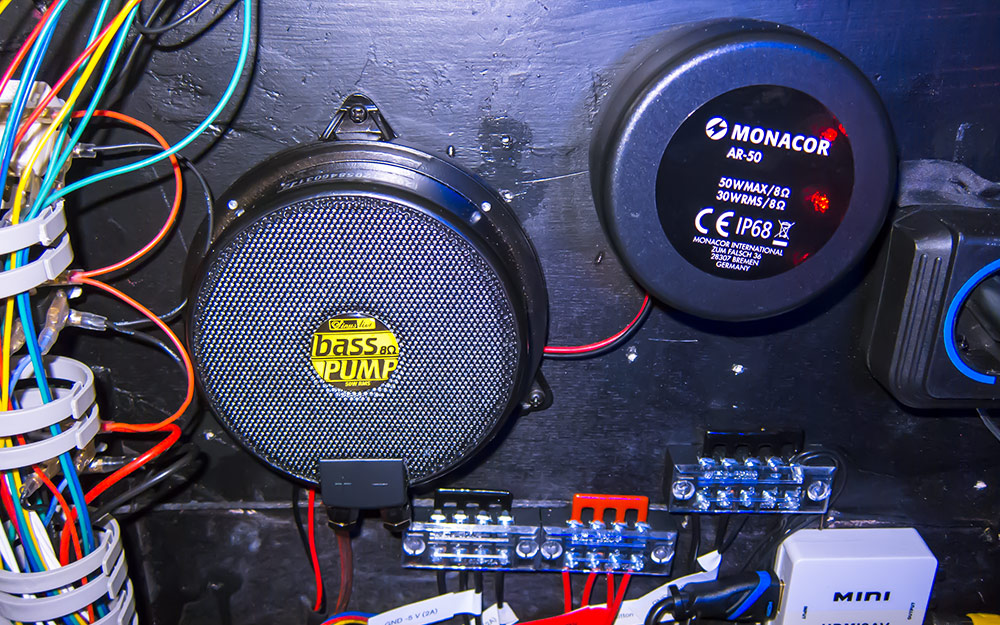
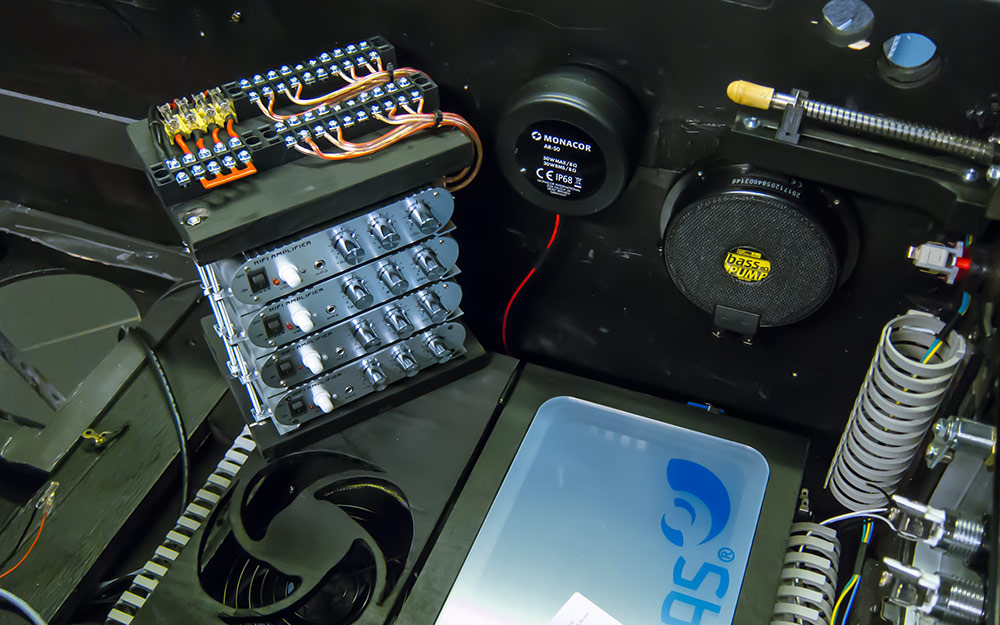
How the speakers, exciters & bass pumps are mounted, you can see best on the photos in the gallery.
I controlled the whole thing with 2.1 power amplifiers… 4 of them, so that I can use the bass pumps at the subwoofer output. As you can also see on the pictures: L/R is disconnected at the soundcard with a „jack <> chinch“ cable, then it goes to the left or right channel of the amp and from there to the exciter (sound) and bass pump (vibration).
I recommend amps with a small tone control and separate volume for subwoofer & speaker output. Also a high quality power supply to avoid noise on the bass pumps (thus e.g. stupid vibrations).
Each power amplifier is fused with 2A. All parts can be found again in the „shopping list“ above.
For mounting the components I can only give the following advice:
- Power supply should get a little „cooling“ (place it somewhere in the air stream)
- The bass pumps should not necessarily be placed next to electronically critical components
- Place the amps so that you can easily „readjust“ the sound
I’ve been asked several times… but that has no influence on the „nudging“ (tilt & co), because my pinscape controller (on which the sensor is sitting) is mounted on a board in the middle of the cab.
It is remarkable in any case, when in the „virtual game“ the pinball flippers, slingshots & bumpers are triggered and you can hear and feel it on the case!
Even if the ball rolls or bounces against wood, plastic or metal… you can feel and hear that… a super great „feedback“… I can only recommend it!
How to set up and configure all this, you can see under „Software„.
VPIN: SSF Layout 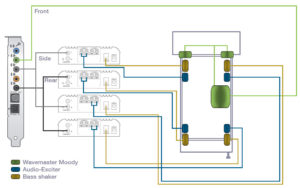
VPIN: SSF 7.1 Amp Verkabelung / wiring 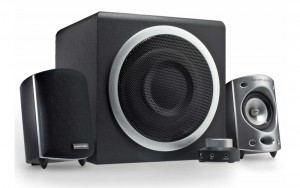
Wavemaster Moody 2.1 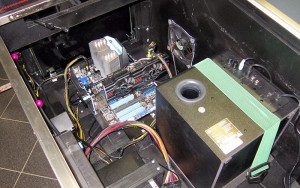
Zusammenbau Mainboard, Netzteil und Subwoofer / Mounting of mainboard, power supply and subwoofer Back-(Glass)Holz hinten / Back-(glass)wood back 
VPIN: SSF (Surround Sound Feedback) Test 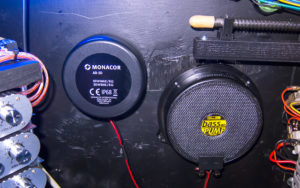
VPIN: SSF Exciter & Bass-Pumps (R) 
VPIN: SSF Exciter & Bass-Pumps (L) VPIN: Netzteile/Power supplies 
VPIN: SSF Verstärker / SSF Amps 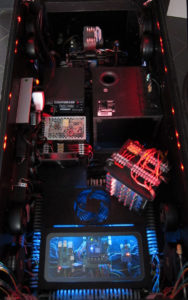
VPIN-Innenleben / VPIN inside


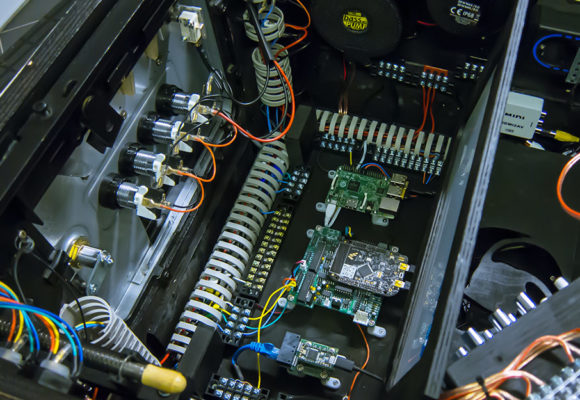
The Microcontroller
VPIN-Overview 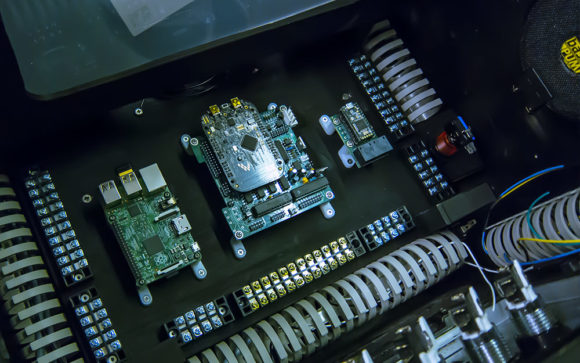
VPIN-Case-Microcontroller-Layout 
VPIN-Verkabelung/Wiring 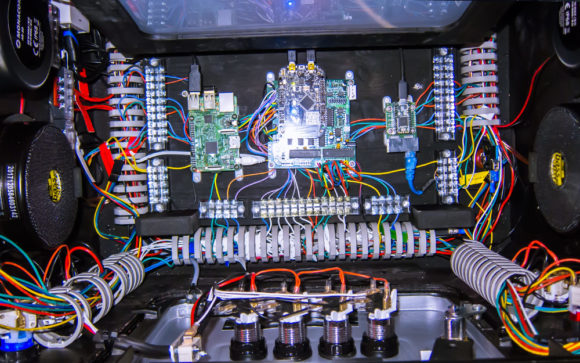
VPIN-Microcontroller


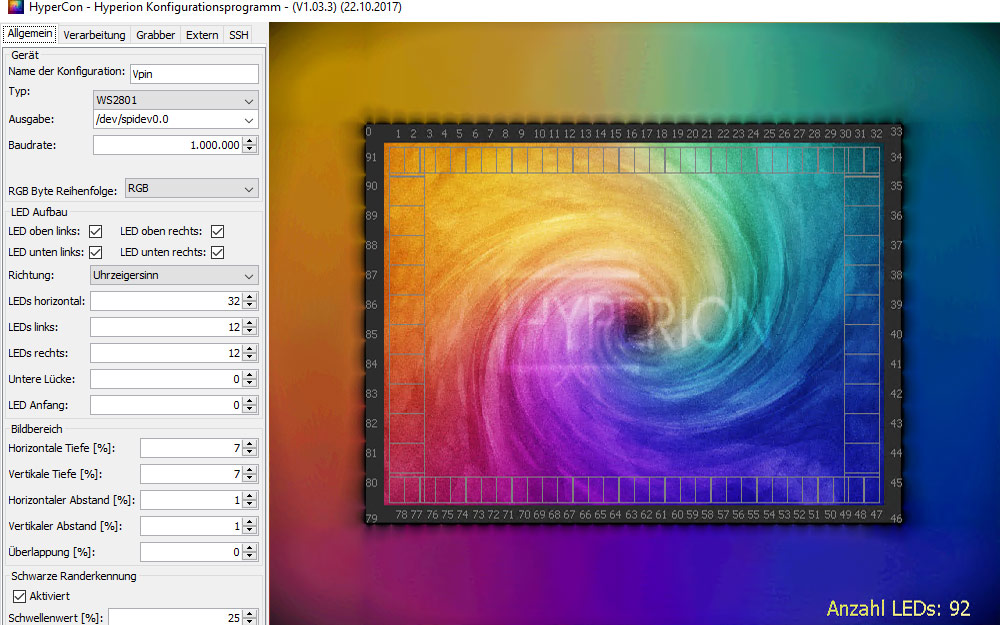
Raspberry Pi
My Raspberry Pi 2 I use in combination with OpenElec, WS2801 LED´s and Hyperion to project the edge of the „playfield“ down on the floor.
How I solved this exactly, you can find a bit more detailed on this page: Self-built ambilight with Raspberry PI
- Number of LEDs left/right: 12 each
- Number of LEDs front/rear: 32 each
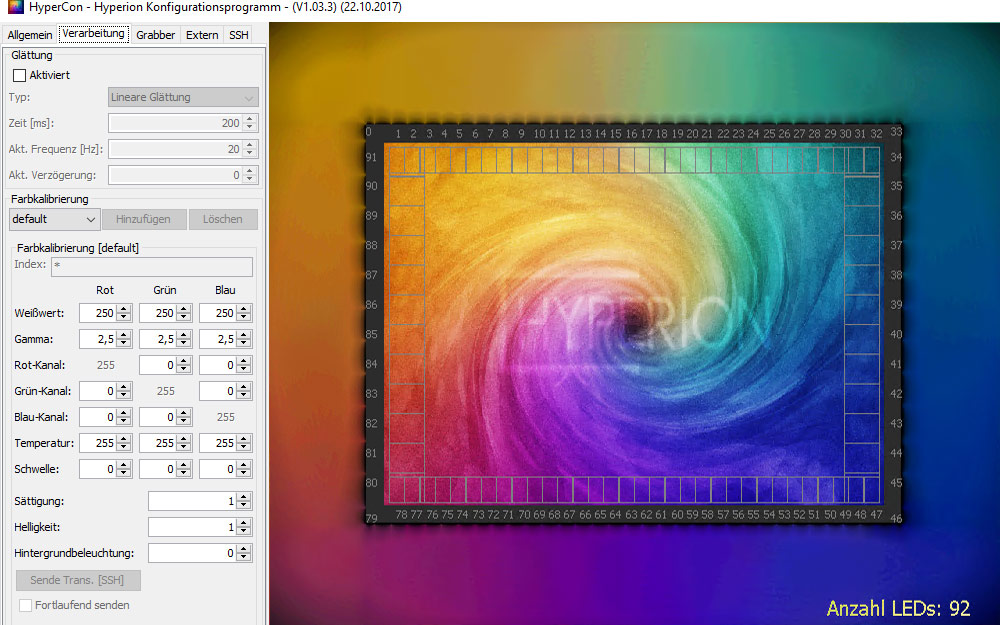
HyperCon Settings:

Example video (old version… at that time with Ambilight also on the backglass):
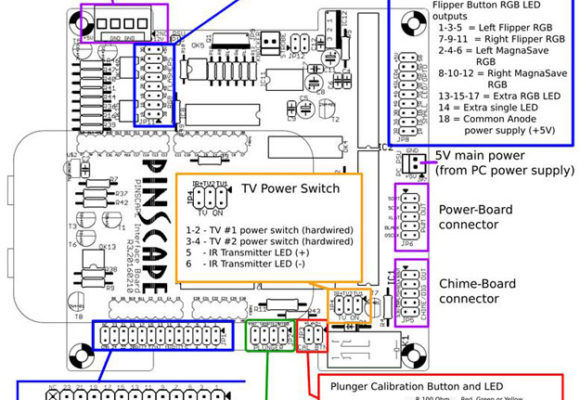
Pinscape KL25Z
The Pinscape KL25Z is one of the core pieces in my virtual pinball machine / VPIN, the whole thing is OpenSource (Webseite) which I find additionally a very good thing.
I use the Pinscape incl. the mainboard (extension board) for:
- my buttons (click button)
- the control of the lighting of the Start / launch ball button and the 4 RGB flipper buttons
- the „nudging“ (sensor) – i.e. influencing the pinball machine by shocks
- the analog „plunger“
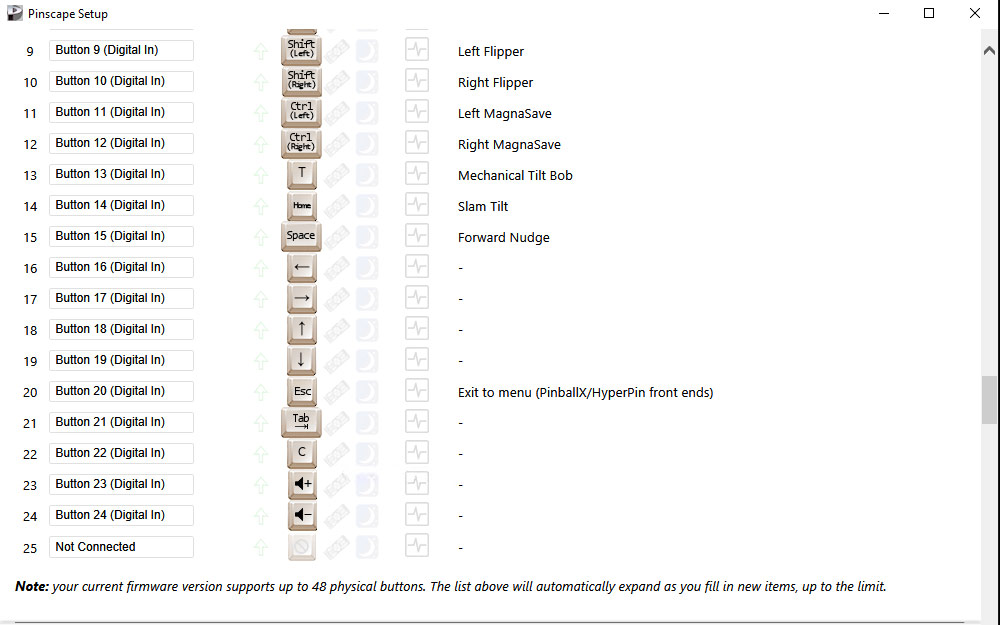
Buttons
For the (arcade) buttons I designed some icons, printed them with the inkjet printer, cut them out and put them between the button & plate… the effect: buttons with illuminated symbols (see pictures).
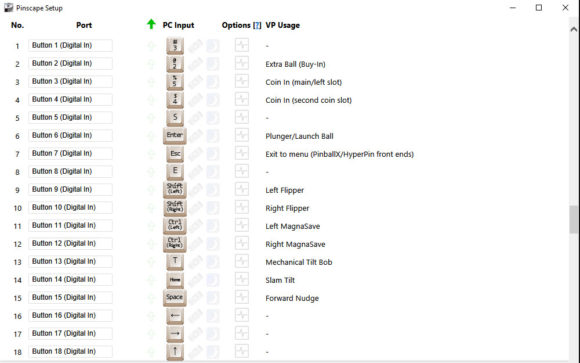
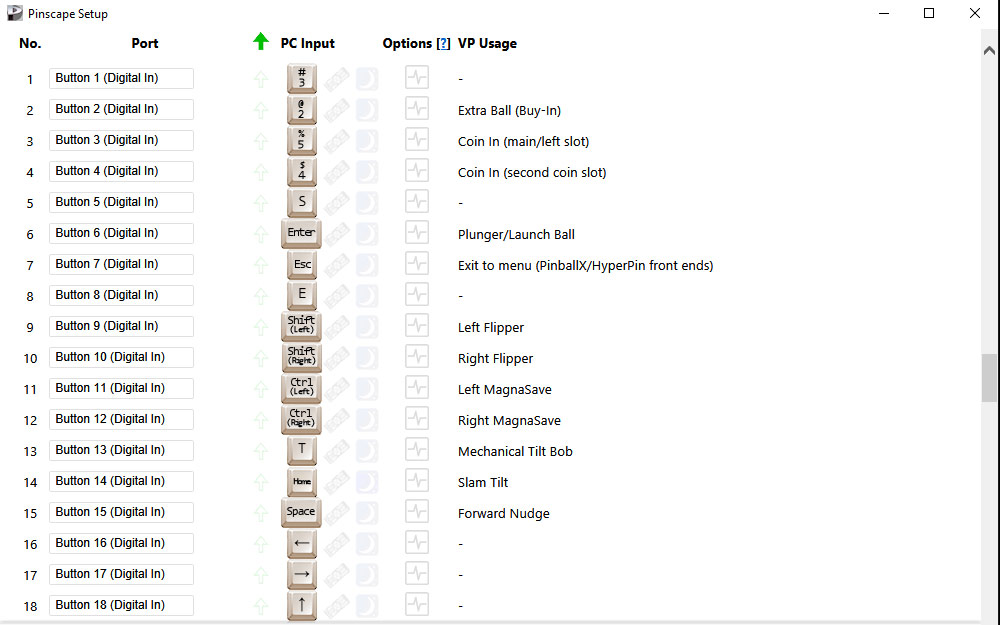
I connected the following buttons to the pinscape:
- blue top – key: „E“
- Frontend: Cancel/Escape/Exit Game
- Visual Pinball: –
- Pinball FX: –
- blue middle- key: „ESC“
- Frontend: –
- Visual Pinball: –
- Pinball FX: Menu
- blue bottom – key: „Tab“
- Frontend: Info
- Visual Pinball: –
- Pinball FX: Tab in Menu
- Left, Right, Up, Down
- Arrow keys on the keyboard… to navigate through the menus in Pinball FX
- Money ejection – key: „3“
- Frontend: Coin1
- Visual Pinball: Add credit
- Pinball FX: camera(view angle)
- red top – key: „Enter“
- Frontend: Select/Enter
- Visual Pinball: Plunger
- Pinball FX: Plunger/Enter(Menu)
- red middle – key: „S“
- Frontend: Launch
- Visual Pinball: Start Game
- Pinball FX: Wizard-Power
- Flipper left – key: „Shift L“
- Frontend: back
- Visual Pinball: Flipper L
- Pinball FX: Flipper L
- Magnasave left – key: „Ctrl L“
- Frontend: page back
- Visual Pinball: Magnasave L/Nudge L
- Pinball FX: Nudge L*
- Flipper right – key: „Shift R“
- Frontend: next
- Visual Pinball: Flipper R
- Pinball FX: Flipper R
- Magnasave right – key: „Ctrl R“
- Frontend: next page
- Visual Pinball: Magnasave R/Nudge R
- Pinball FX: Nudge R*
*Note: the Magnasave keys are mapped to the „L / R“ keys in Pinball FX… and in DOFlinx Config (see below) then mapped to „Nudge L/R via “ Ctrl L & R“.
- Vol up (WIN Volume +)
- Vol down (WIN Volume -)
Pinscape Buttons (1/2) 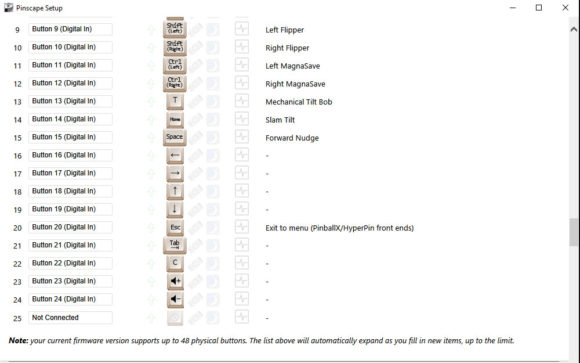
Pinscape Buttons (2/2) 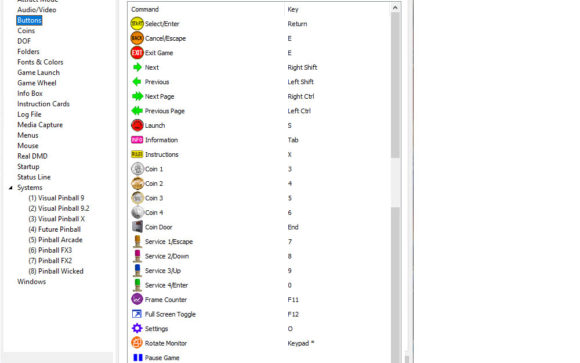
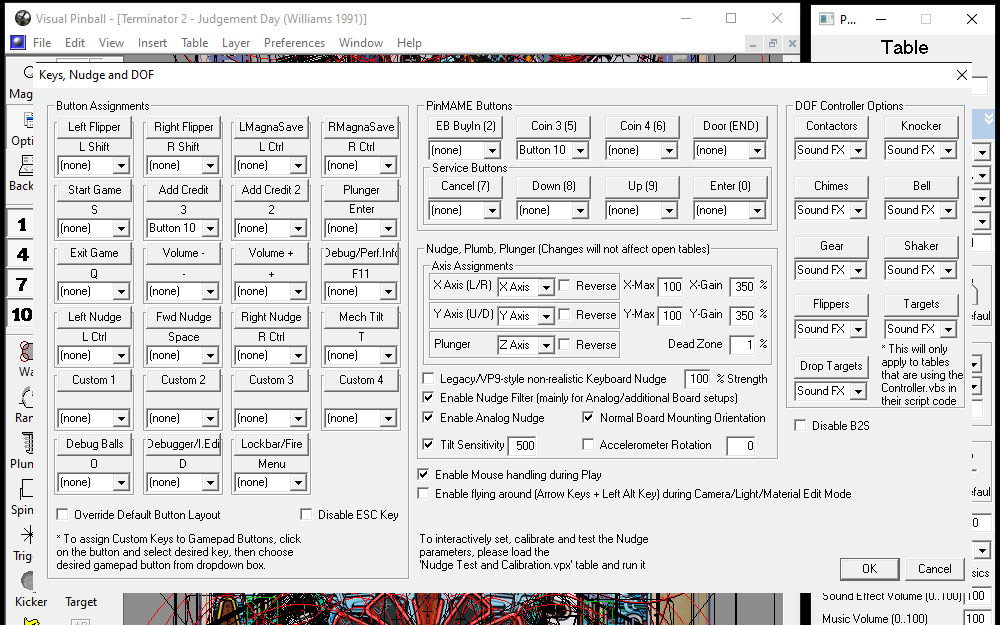
PinballY Keys 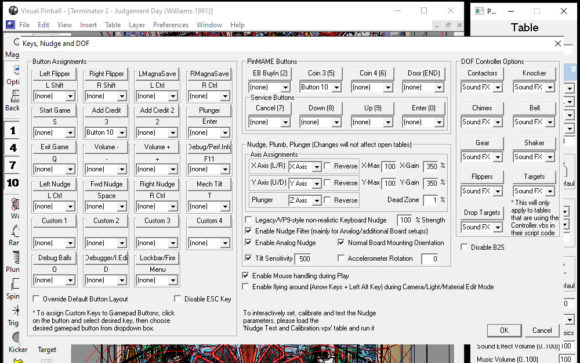
VPIN - Keys, Nudge, DOF 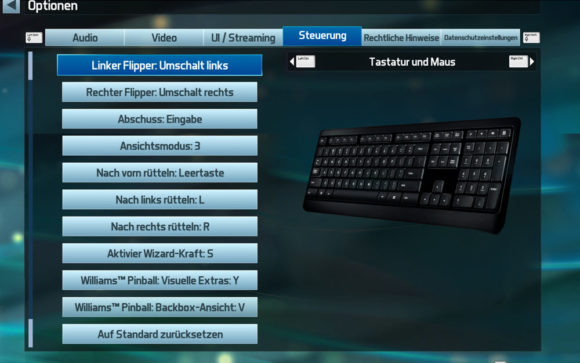
Pinball FX3 - Keys 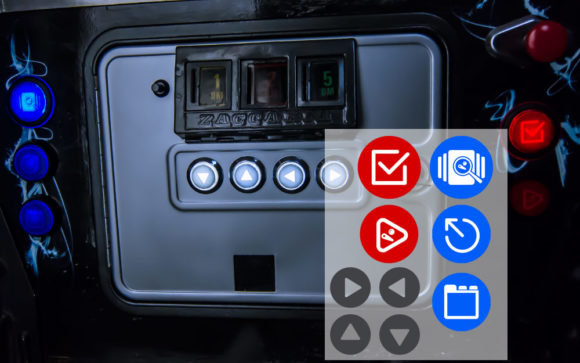
VPIN Front: Buttons

Outputs (lighting control)
I’m taking advantage of the outputs of the Pinscape:
- set the RGB Flipper & Magnasave buttons to the corresponding color
- at the Launch Ball / Start Buttons (Select/Enter or Start Game – see Buttons) to let the LED light up or pulsate
Use case is like: I can illuminate the pinball buttons with the original colors of the real tables and control interaction (e.g. if money is thrown into Visual Pinball + credits are enough there, then the „Start Game“ button pulsates) from within the game or frontend.
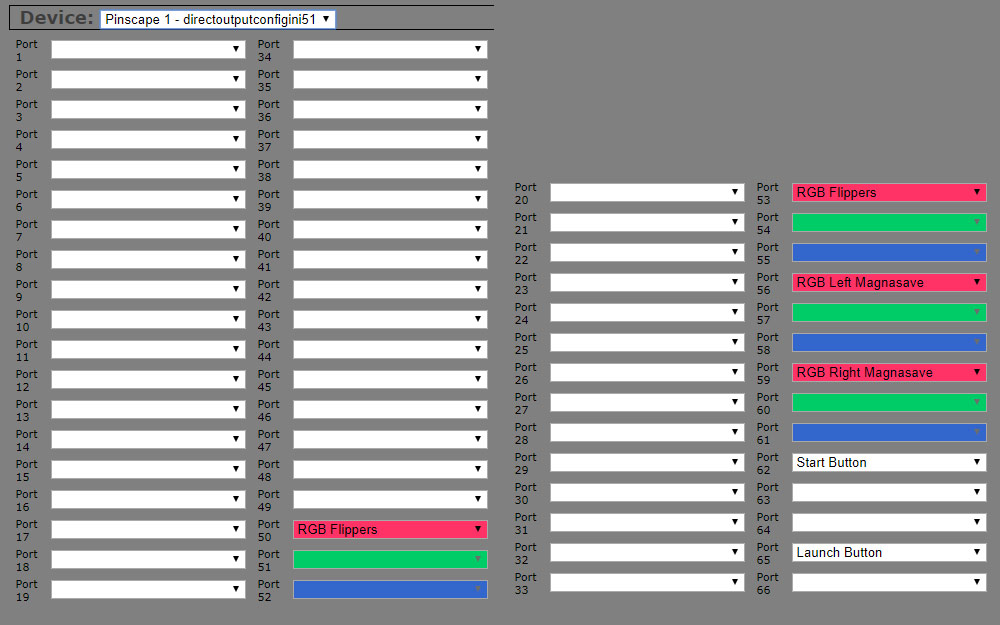
- Output 50-52 (RGB): Flipper right
- Output 53-55 (RGB): Flipper left
- Output 56-58 (RGB): Magmasave right
- Output 59-61 (RGB): Magmasave left
- Output 62: Launch Ball
- Output 65: Start Game
PIN-assignment at the pinscape you can see in the pictures on the right. The whole thing is also entered in the DOF-Config-Tool so if DOF support is available (in the game/frontend…), the corresponding color/action for the corresponding table is stored.
More about DOF (direct output framework) further down in the category „Software„.
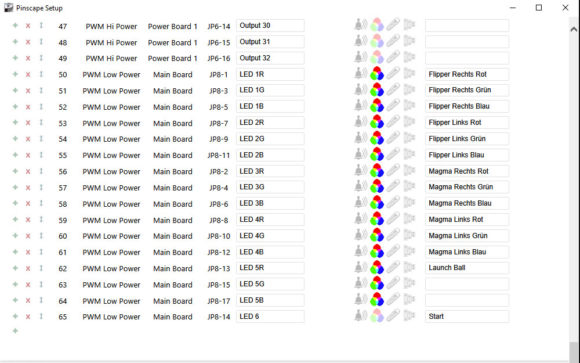
Pinscape-Outputs 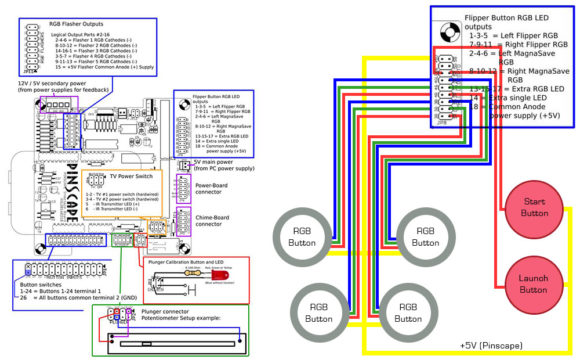
Pinscape RGB & 5V LEDs 
VPIN: DOF Config Tool - directoutputconfigini51 VPIN Front: Buttons 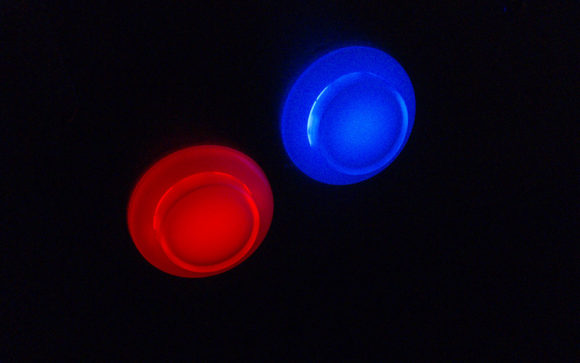
VPIN: RGB-Flipperbuttons

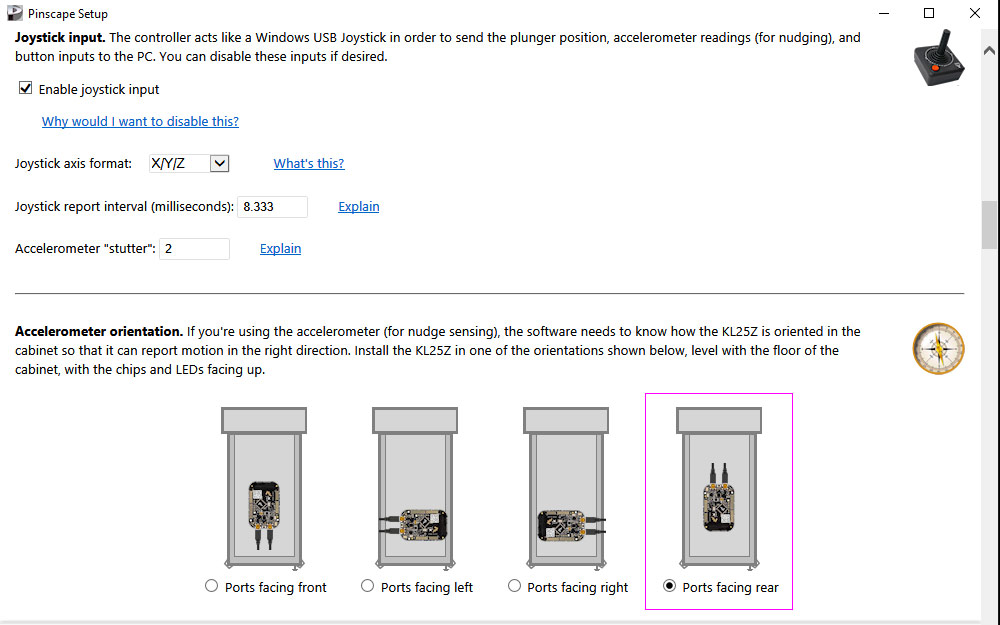
Nudging
Nudging (synonymous with stimulating, directing, shaping) is a behavioural economics method that attempts to influence people’s behaviour in a predictable way… at „pinball“ it means: to influence the ball with mechanical action (by bumping, shaking) on the cabinet „.
Our playing field is „digital“ and the cabinet is „analog“… in this case, the acceleration sensor of the pinscape controller creates the bridge.
And I have to say: it’s pretty cool if you shake the pinball cabinet and the ball or even elements on the playfield are moving / influenced.
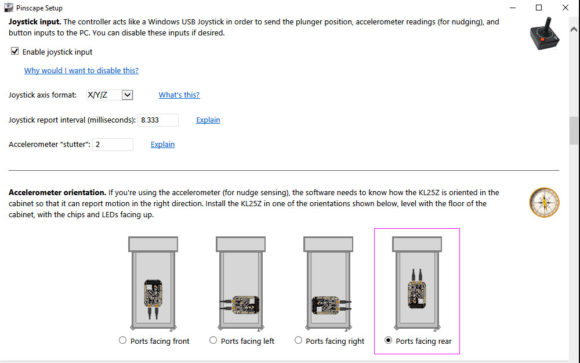
How exactly… you can see below at Software (Visual Pinball, DOFLinx…).. at Pinscape I set the dynamic of the sensor to +/- 1G and the centering to „Auto-Center“.
My Pinscape is installed so that the USB ports are pointing to the back.
Pinscape Plunger/Nudging 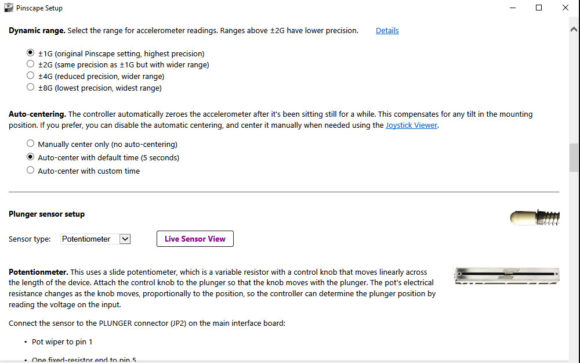
Pinscape Plunger/Nudging
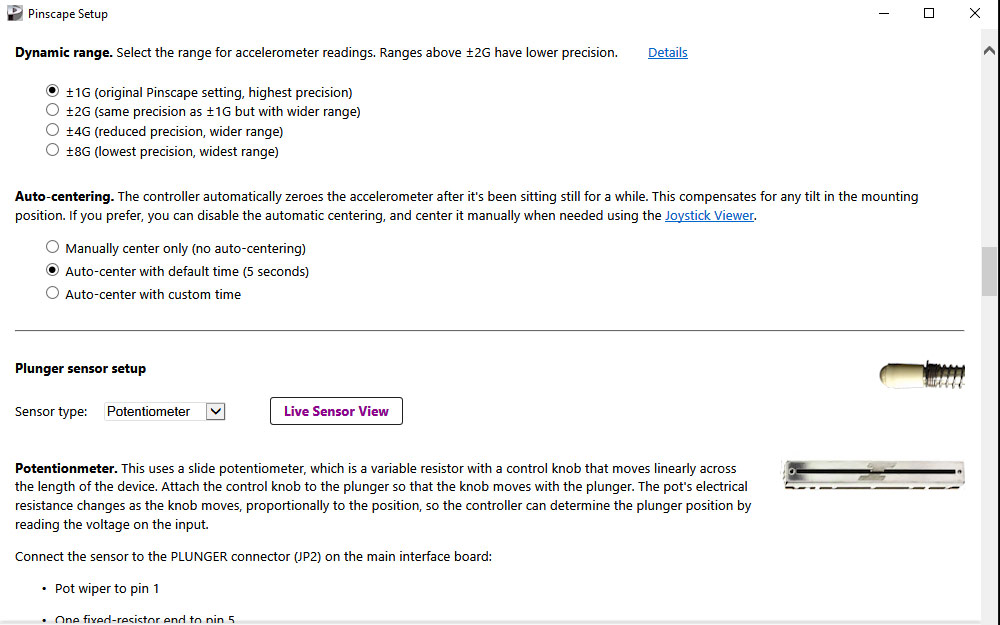
Plunger
With the plunger (piston) it behaves like above with the „nudgen“… we have a „real plunger“ for a „digital playing field“. Some pinball tables (like Terminator 2) also have a „launch button“… I use the button from above (Launch Ball).
You can also solve it in such a way that if you hold this button longer, it „winds up“ the plunger…. but its:
- „fiddly“, because you have to release it at the right time, e.g. to make a skillshot
- not so cool…
It’s amazing and much more „play friendly“ if you pull the (real analog) plunger and then the plunger is moved to the same position on the digital playfield (incl. corrections).
Short and simple explained: the plunger via Pinscape works like a joystick with the corresponding axis.
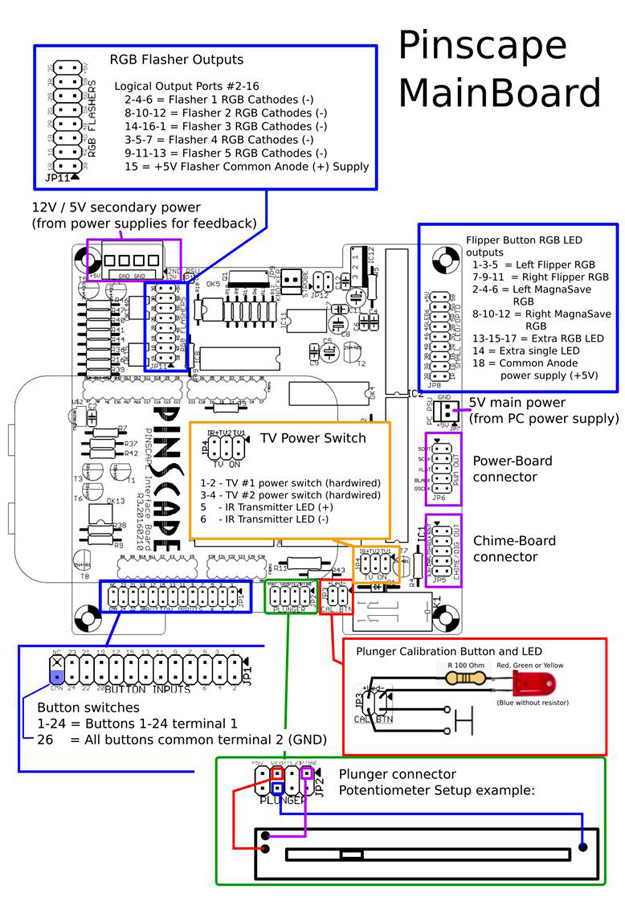
I have installed a potentiometer (poti) with a resistance of 10 kOhm and a sliding distance of 100 mm.
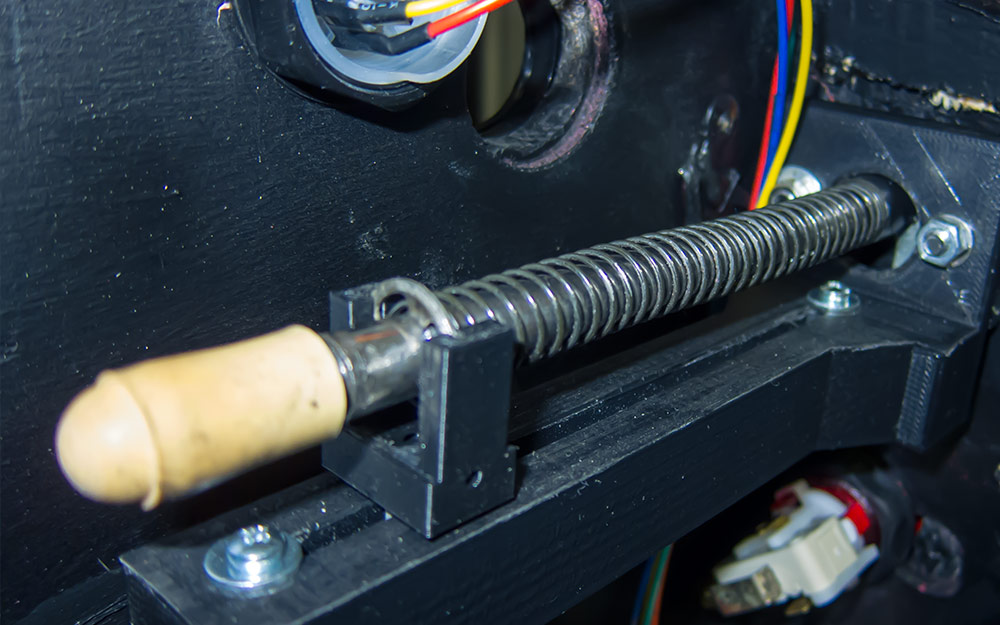
The potentiometer is connected with 3 cables to the corresponding PINs (see pictures). The potentiometer is attached to the plunger by means of a 3D print holder and calibrated in the Pinscape software.
I would also like to refer to the very good documentation from MJR (details about the plunger).
How this is set up in Visual Pinball and what else is to be done in Pinball FX3 can be found below under „Software“.
Pinscape Plunger/Nudging Pinscape Plunger/Nudging 
VPIN-Pinscape 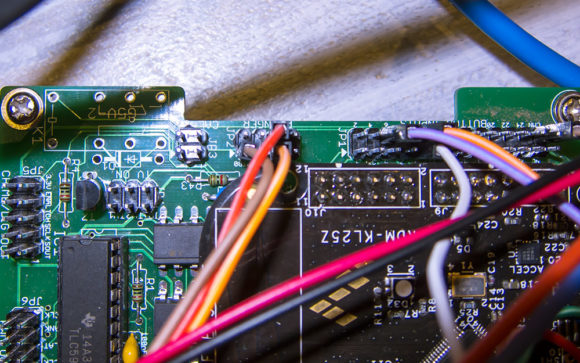
VPIN-Pinscape_Plunger 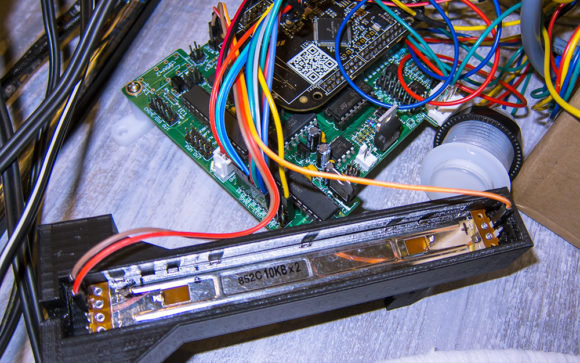
VPIN-Pinscape_Plunger_Poti 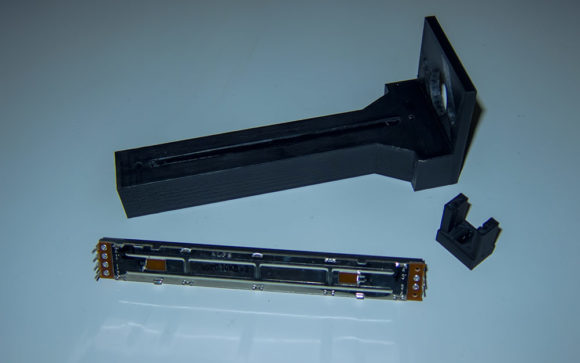
VPIN-Plunger-Halter-Poti 
VPIN-Plunger


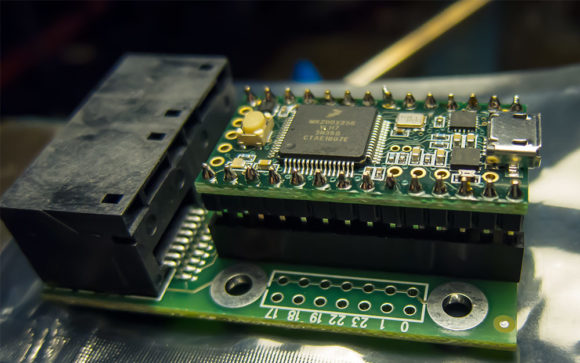
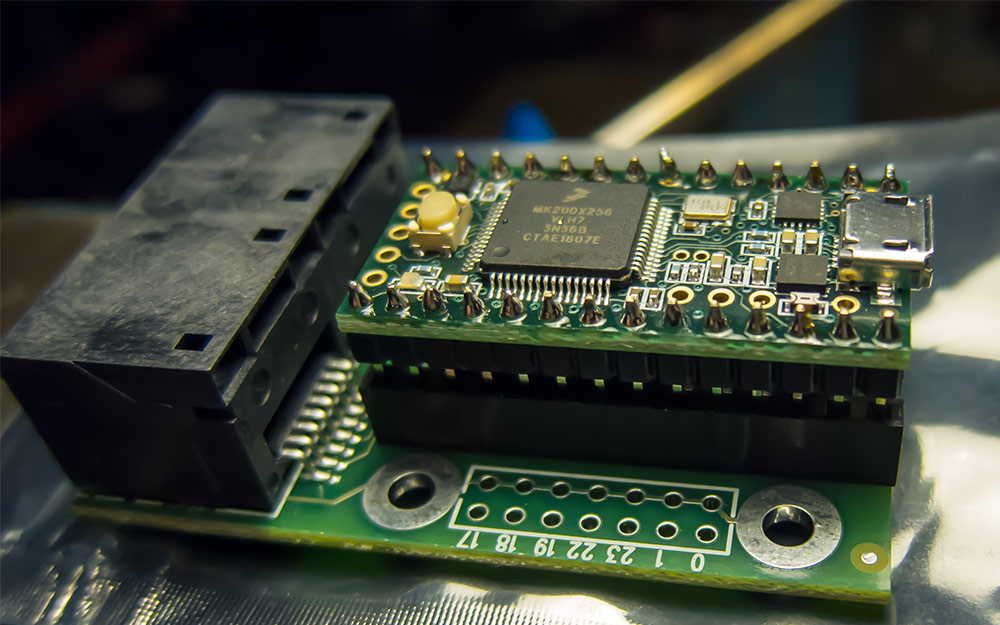
Teensy 3.2
The Teensy (which I soldered on a Teensy Octo board) takes control of (WS2812B) LEDs on the Playfield and Backglass triggered from the game/frontend.
The most people use LEDs in the playfield, under the pinball „undercab“… a little bit different than myself. Since in my case „undercab“ is done by the Raspberry (which I like more, because there is a little „movement of the real game“) I have the following setup:
In total there are 405 LEDs distributed over:
Stripe #1 (RJ45 cable – Orange/Orange-white)
- Playfield right: 126
- Playfield back: 69
- Playfield left: 126
Stripe #2 (RJ45 cable – Blue/Blue-white)
- Backbox left: 28
- Backbox top: 28
- Backbox right: 28
So I use „RGB Undercab Complex MX“ for my backbox left/right… this has the effect: the back in the corresponding table color / pinball table LED animation illuminates the room… and I use „Playfield back“ parallel on the „Backbox top stripe“, which has the effect, if e.g. the stroboscope on the playing field of a pinball table is turned on, the room also joins in for a short time (looks very cool to my taste).
Flashed is the Teensy via Arduino with the „OctoWS2811Ext.h“ (see pictures).
Every power supply is fused with 2A (with my use-case / my number of LEDs)… I have calculated as follows:
132 Led’s are about 7,92A, 25% of it = ~2A
I have fed in (+5V) at:
- Playfield right + back (195 LEDs)
Playfield left (126 LEDs)
Backbox left, top, right (84 LEDs)
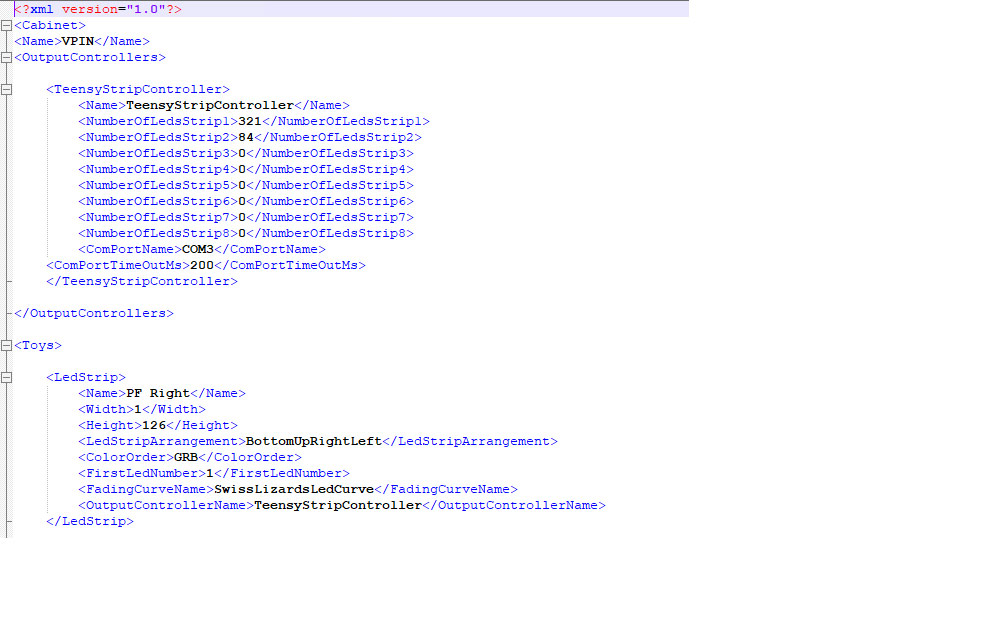
The Cabinet.xml:
This describes, let’s say: the structure of your LED arrangement (number of strips, name, number of LEDs, LED number, colors, output, output grouping etc.)… see pictures.
My LEDs are mounted in a strip on the playing field and covered with mirror foil, in the backbox the LEDs are embedded in the corresponding groove.
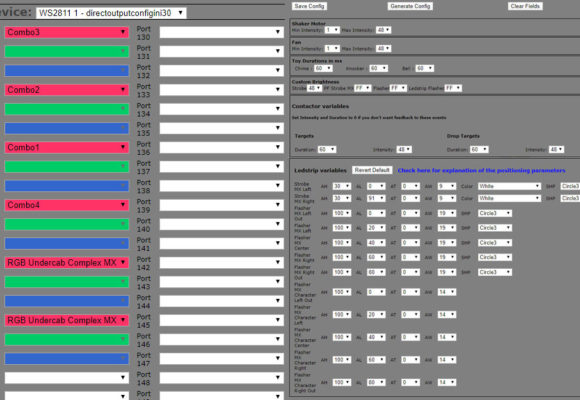
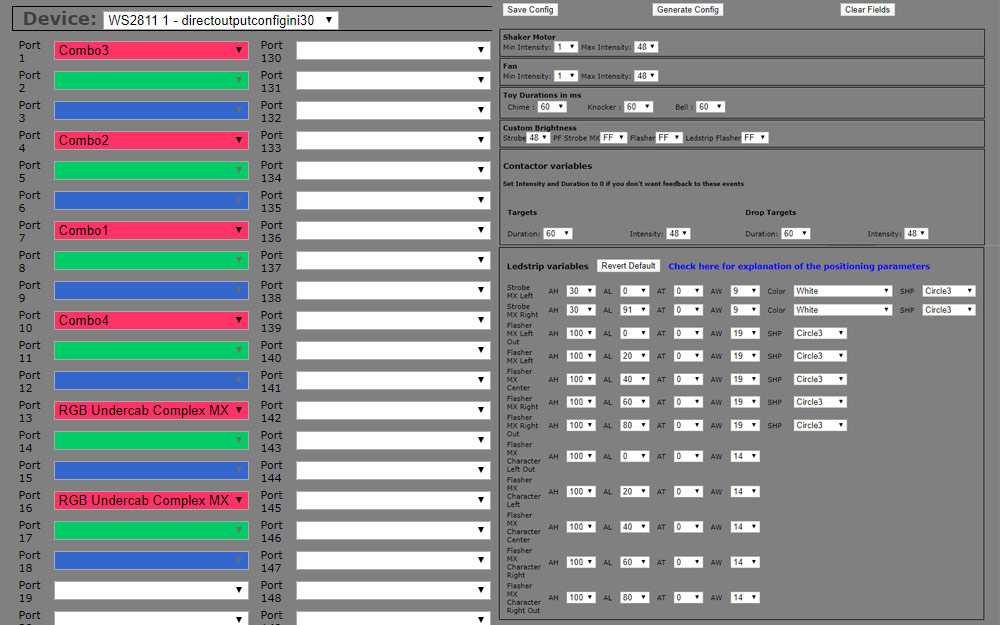
As with the „outputs“ above, the corresponding „ports“ must be entered in the DOF-Config-Tool, so that the „triggers of the game“ can control the corresponding LED effects á pinball table (see pictures).
Relevant here is the „directoutputconfig30.ini“… but more about „DOF“ and the corresponding settings below at „Software„.
Hint: where I easily wasted 3 days „trouble shooting“: plug the network cable „RJ45“ into the correct port (Port1 = Stripe 1-4, Port2 = Stripe 5-8) on the Teensy 😉
VPIN-Teensy-loeten 

Cabinet.xml (1/4) 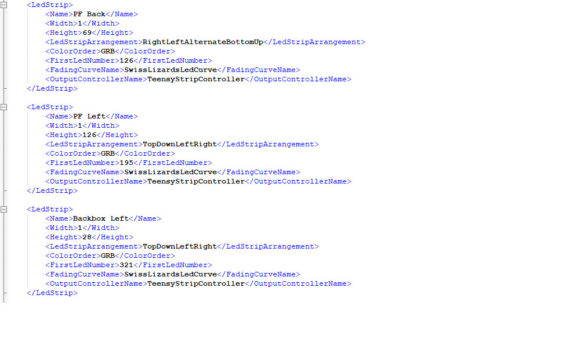
Cabinet.xml (2/4) 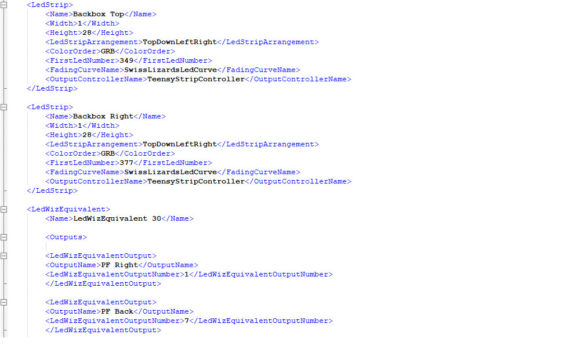
Cabinet.xml (3/4) 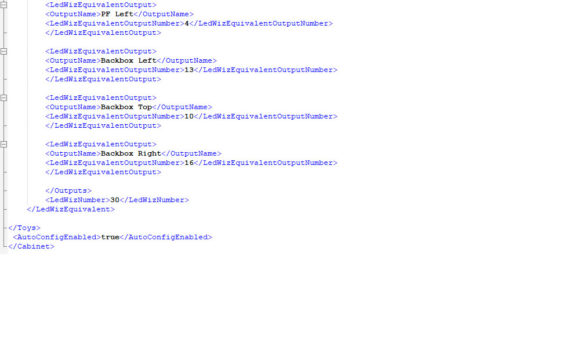
Cabinet.xml (4/4) 
VPIN: DOF Config Tool - directoutputconfigini30 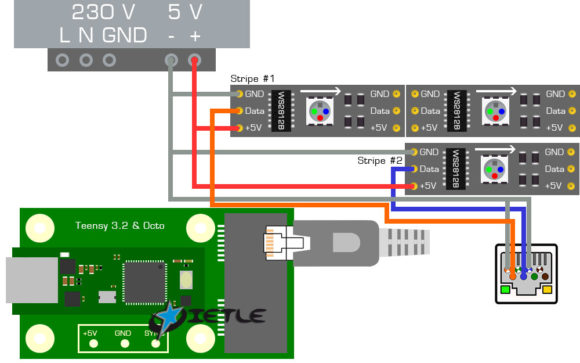
VPIN: Teensy WS2812B LEDs 
VPIN: LEDs Playfield Spielgelfolie/mirror film 
VPIN: LEDs Playfield 
VPIN: LEDs Backglass


Software
Minimum 50% of my project time was spent on software.
The software chapter is pretty much the biggest and most elaborate, at least the way I use the VPIN. That’s why I’ll go into a few things here, but not in all depth (the individual documentation of the programs gives a lot of very helpfull information).
In summary, the whole thing is a WIN10 (Pro, because of remote desktop functionality) computer, which activates a master/slave power strip when the „Power Switch“ (mainboard) is turned on by a button at the bottom of the cabinet. The computer boots up and supplies the devices connected via USB and computer power supply (Pinscape, Teensy…) and the master/slave power strip then supplies the rest (RPI, 5V & 13.8V power supply, monitors, TV…)
In Windows, the user is automatically logged in, a batch file and the autostart will start programs like „PinballY, DOFLinx, PinUPPlayer, PINvol, PinSoundStudio… “ are started.
As soon as the frontend (in my case PinballY) is started, everything can be controlled comfortably via the Buttons.
Here´s a rough ratio of the effort::
@echo off
c:
cd c:\DirectOutput
start /min DOFLinx.exe

c:
cd C:\PinUPSystem\PinUPPlayer
start /min PinUpPlayer.exe

c:
cd C:\PinballY\
start PinballY Admin Mode.exe

c:
cd C:\PinSoundStudio\PinSoundStudio-09\
start PinSoundStudio.exe /minimized
Project phase
Effort distribution Mechanical/Technical/Software during the project phase
Regular operation
Effort distribution in regular operation (software)
Share of effort: Software (during the project phase)
I’m not gonna start with how to install a WIN10… also the „automatic login“ is easy to find on the net.
I start from the „Games“ over the interaction of „Gimmicks“ and necessary „Tools“ up to the „Frontend“.
Visual Pinball
Visual Pinball is a freeware video game engine for pinball tables and in combination with Visual PinMAME it is able to emulate the ROMs from the (real) pinball machines and with the B2S Backglass Server (Plugin) it is able to emulate another Backglass. The tables roughly consist of two parts: the playing field design and a script which controls the gameplay.
Attention: VPX (Visual Pinball 10) is not a „Plug & Play like thing“… i.e. if you are not ready to go a little bit deeper and cannot edit an INI file, you are wrong here… but the other way round you are probably here for this reason (descend into the depth etc.).
I would start with the:
VPX 10.6 All-in-one Installer (or current Beta …).
- Install VPX6Setup.exe
- in c:\Visual Pinball
- Select DMD-EXT
- and further (DirectX, .Net etc)
- and for the 3-monitor setup I installed B2S (direct backglass)
- let vpinballx.exe still run as „Admin
Unpack the latest SAM build (3.3 Beta) and overwrite the following folder: c:\Visual Pinball\VPinMAME\, then run the Setup.exe and install Freezys DMD Extentions (Freezys DLL) for a nice DMD (see Install Instructions on the page).
Also in the meantime I can highly recommend FlexDMD (in combination with Freezy’s DLLs)…. in short: floats, looks great… and even adds value by supporting PinballY… more about this at the features and the (relatively easy) installation on the git page.
A tip on how to make sure that the DMD is in the right place on all tables and what exactly the pixel position is you can find below at tools.
Btw „about settings“ » here is my DmdDevice.ini:
[global]
; how to downscale SEGA 192x64 pixel games to smaller displays: fit, fill or stretchresize = fit
; flips the image horizontallyfliphorizontally = false
; flips the image verticallyflipvertically = false
; enable or disable frame-by-frame colorization (inactive in VPX bundle)colorize = true
; a DMD that renders with nice dots on a computer monitor[virtualdmd]enabled = true
; virtual dmd stays on top of all other windowsstayontop = false
; hide the resize griphidegrip = false
; x-axis of the window positionleft = -3
; y-axis of the window positiontop = -936
; width of the dmd in monitor pixelswidth = 1296
; height of the dmd in monitor pixelsheight = 324
[pindmd1]
; if false, doesn't bother looking for a pinDMD1enabled = false
[pindmd2]
; if false, doesn't bother looking for a pinDMD2enabled = false
[pindmd3]
; if false, doesn't bother looking for a pinDMD3enabled = false
; COM port, e.g. COM3port =
[pin2dmd]
; if false, doesn't bother looking for a PIN2DMDenabled = false
; if enabled, writes frames to an .avi fileenabled = false
; path to folder or .avi file. if folder, gamename.avi is used.path =
The B2S Backglass Server should be located in c:\Visual Pinball\Tables\… in case this doesn’t work:
- B2SBackglassServer.dll “ right mouse button “ Tab: General » Allow“
- B2SBackglassServerRegisterApp.exe “ right mouse button “ run as administrator“
What I have set up in VPX, you can find in the gallery.
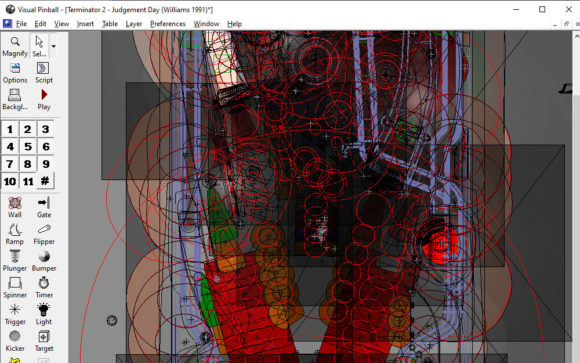
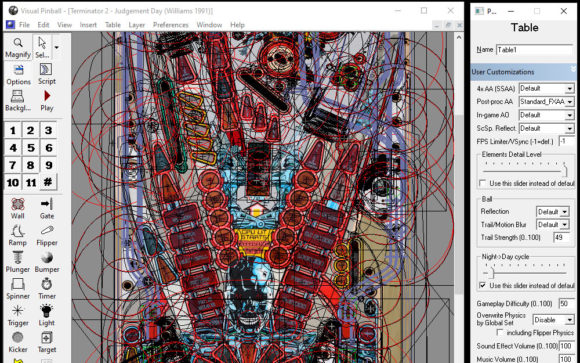
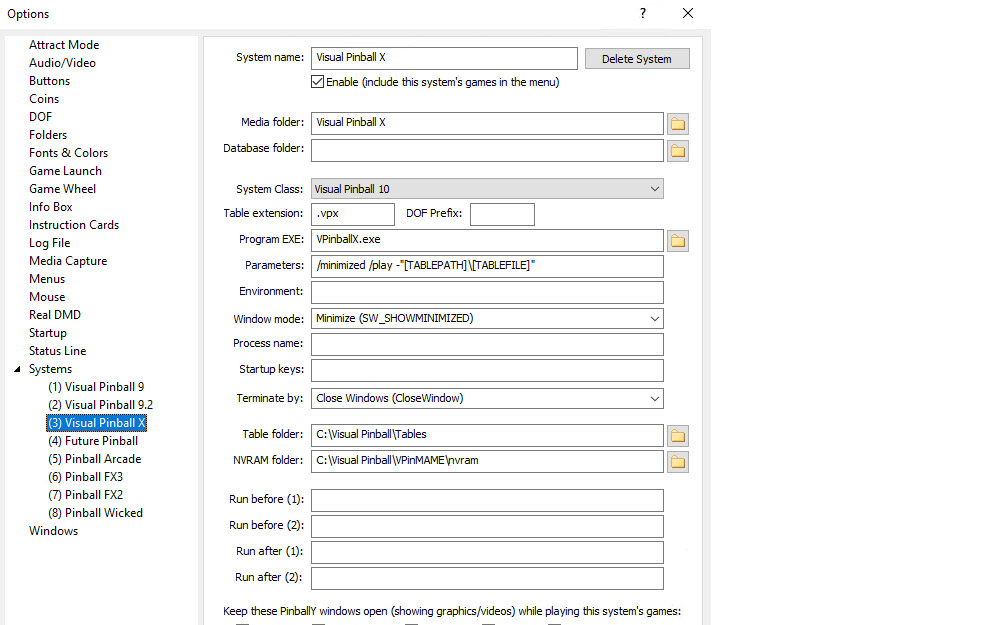
Visual Pinball X (VPX) 
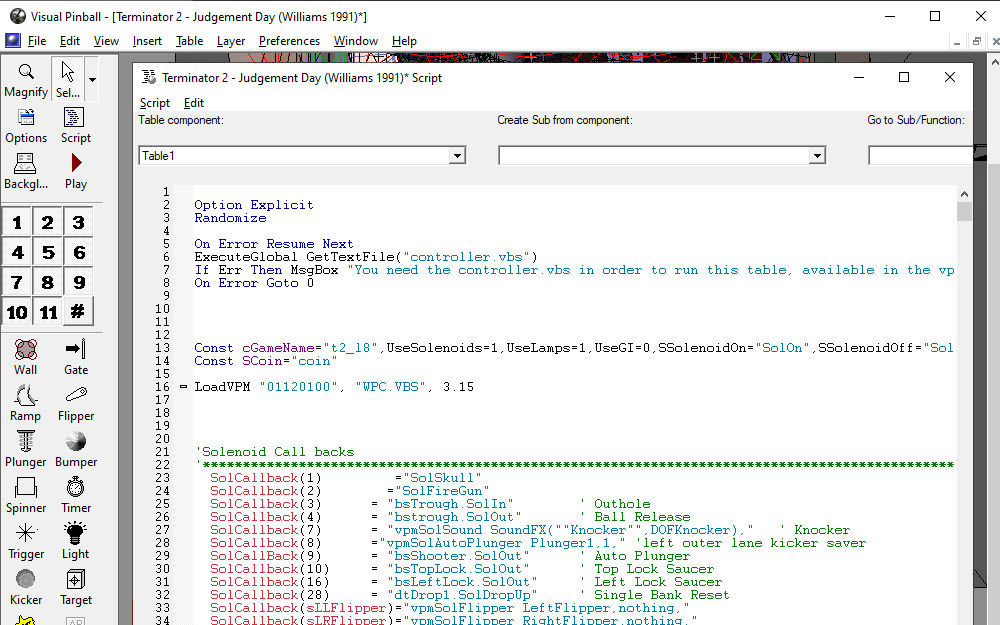
VPX Script 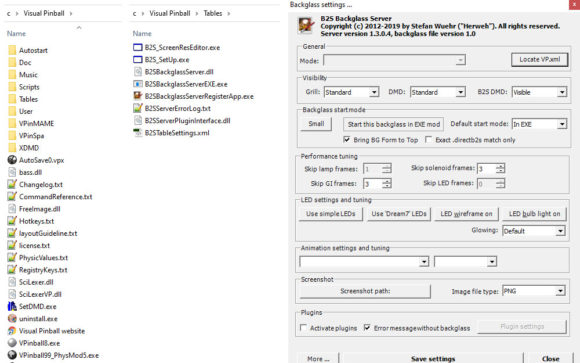
VPX: directB2S 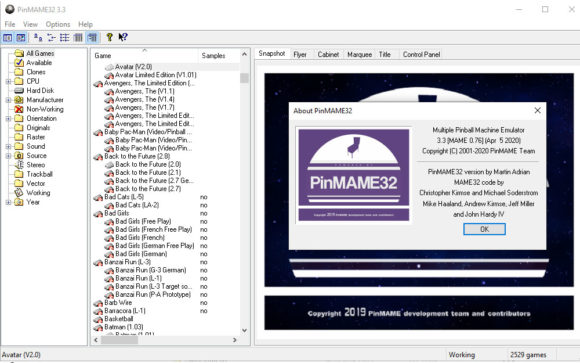
VPX VPINMame


Install tables in Visual Pinball
Basically you need (until e.g. on tables that are made ‚only in VPX‘ or in combination with the PUPPlayer) the table itself, the backglass and the Rom
- tablename.vpx » c:\Visual Pinball\Tables
- tablename.directb2s » c:\Visual Pinball\Tables
- ROM.zip » c:\Visual Pinball\Tables\VPinMAME\roms\
Note: I always use the following logic for table name:
- Name (Brand Year)
- Attack From Mars (Bally 1995)
So no table name V.0815.vpx etc… because that’s also the way the filing structure of my media is in the Frontend.
Alternatively you can replace the sound with Altsound or PinSound, as well as install so-called PUPPacks… but more about that later.
Sources for tables & ROMs: VPForums.org, vpuniverse.com, vpinball.com, worldofvpx.com, Google.
Fine tuning:
Since I have a Sourround Sound Feedback (SSF) setting, I optimize almost every table… I basically always replace
- Bumper-Sounds
- Flipper-up / Flipper-down
- Slingshots
in the sound manager (see pictures) and position the sounds accordingly (front/rear, left/right), and depending on the table, change the output of backglass/table (e.g. collide, plunger-pull, knocker to the „BG“).
If you like, you are welcome to try my sounds… here for download:

VPIN Virtual Pinball X VPIN - Keys, Nudge, DOF 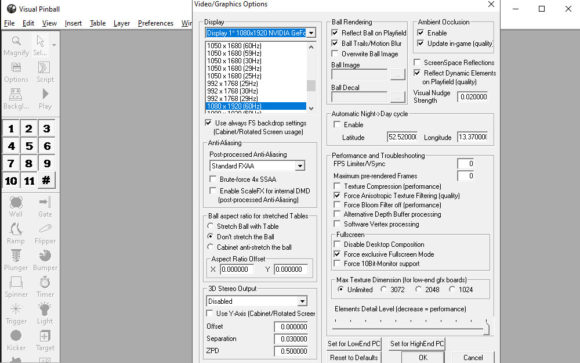
VPX: Video Options 
VPX: Audio Options 
VPX SSF tuning


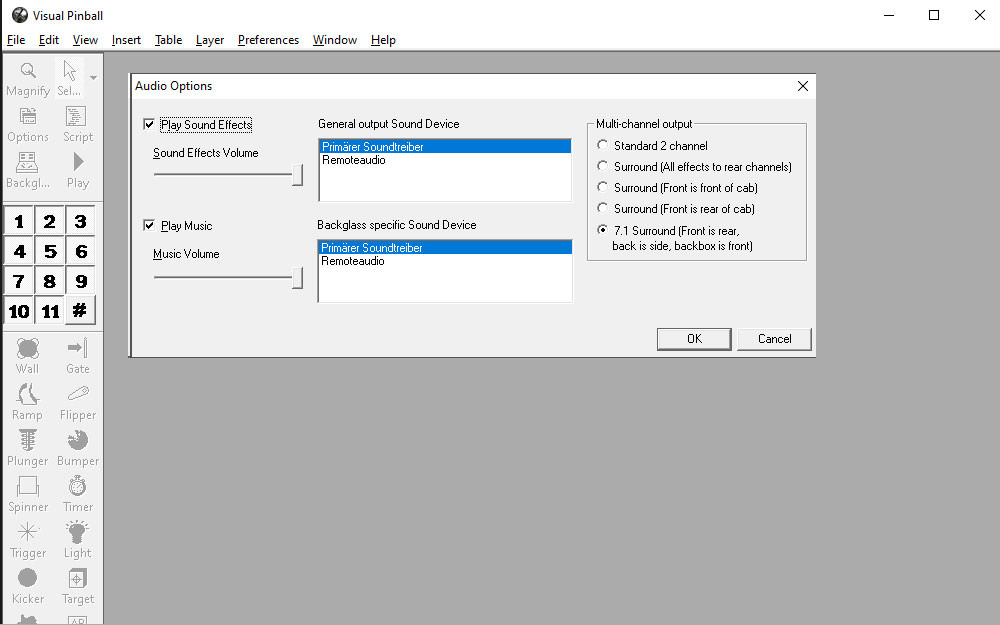
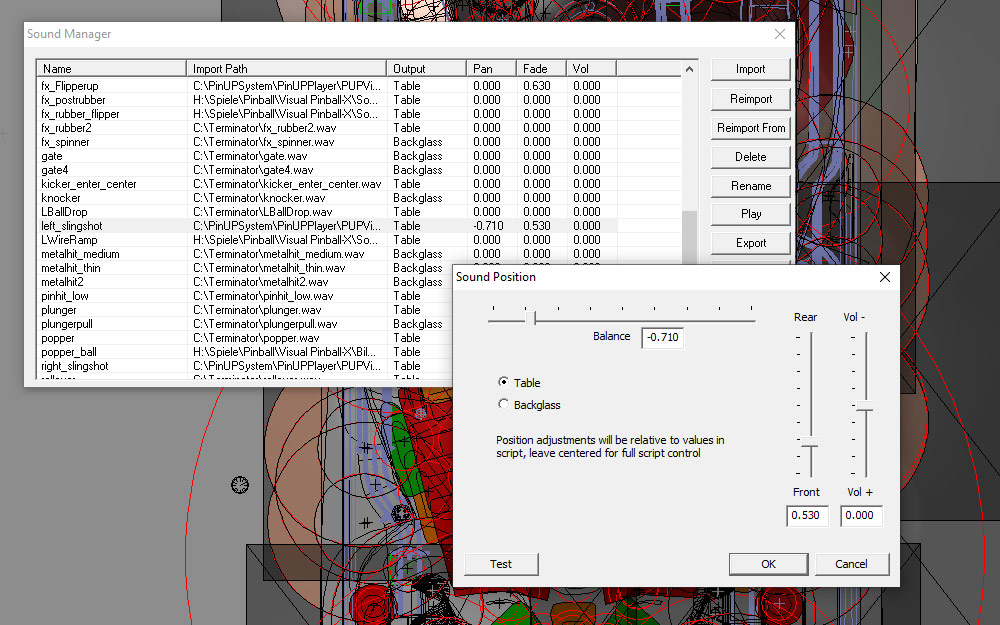
Table position
From VPX you can start the positioning of the table with „F6„… and then use the Flipper & Magnasave buttons to adjust angle, size and position as well as lighting etc.
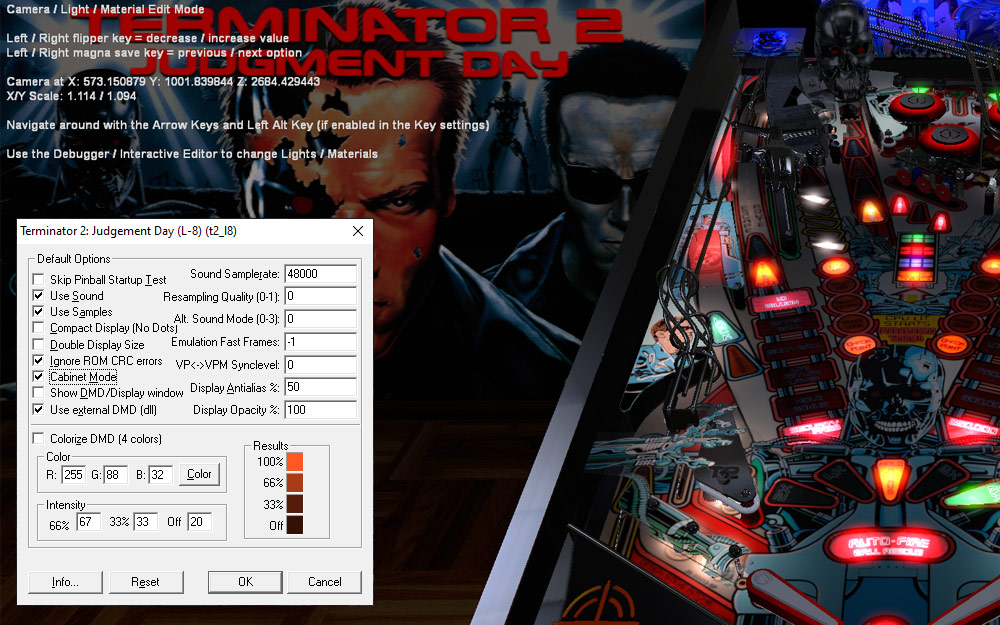
Options
In the game with „F1“ you can go to the „Options“ and set there e.g. Cabinet-Mode and external DMD (see „FlexDMD„).
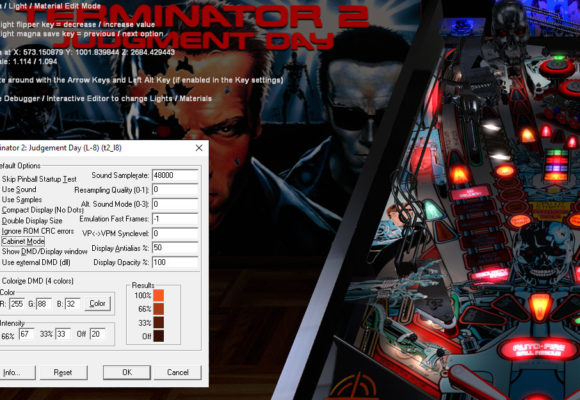
Color ROM (DMD with color)
To „colorize“ the ROM there are 2 possibilities: Altcolor (colorize via Pin2DMD) & patch a ROM (Stern ROMs)
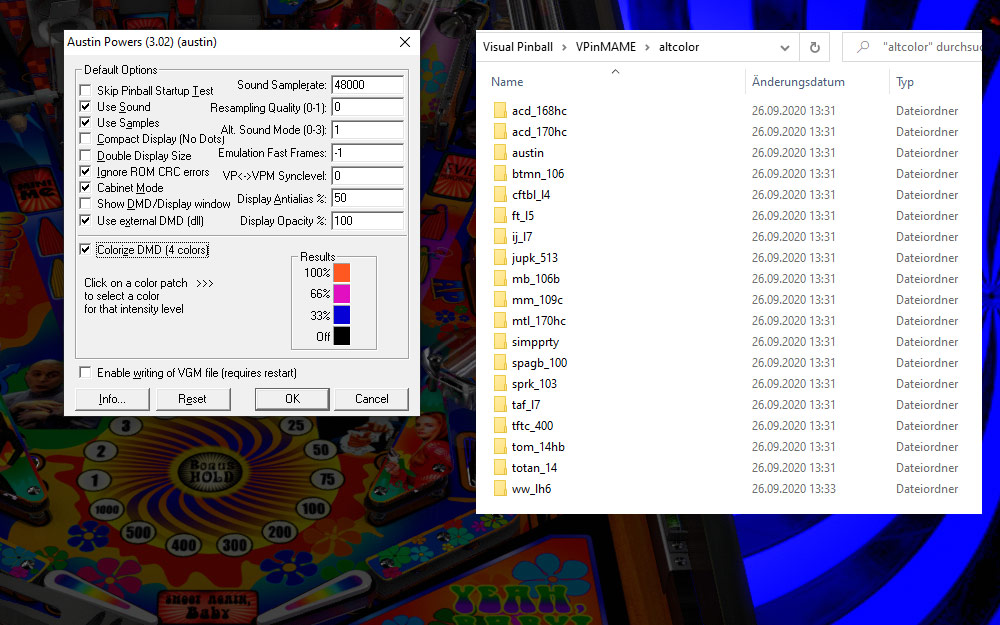
How to proceed for Altcolor:
Requirement: Freezy’s DMD Extentions and my recommendation FlexDMD (check #VPX)
- Create folder: c:\Visual Pinball\vpinmame\altcolor\(rom-name)
- copy files pin2dmd.pal & Pin2DMD.vni into this folder
- Press F1 in the game, there (of course „Use external DMD (dll)“ activated) then select „Colorize DMD (4 colors)“ (see pictures on the right)
- Restart the table and ‚be colorful‘ 😉
How to patch ROMs:
Prerequisite: Freezy’s DMD Extentions and my recommendation FlexDMD also applies here (check this at #VPX)
- reate folder: c:\Visual Pinball\vpinmame\altcolor\(rom-name)
- copy file pin2dmd.pal into this folder
- bspatch
- download, unzip
- right mouse button and select „Allow“… and in case of compatibility „run as admin“.
- start DOS Window (execute (WIN+R) » „cmd“)
- navigate to the folder of the files (z.B. c: … cd ABC …)
- then patch the ROM (i.e. the original ROM (.bin), the patch file (.diff) should then also be in that folder)
- Parameters are: bspatch original-rom.bin new-color-rom.bin patch.diff
- means for AC/CD as an example: bspatch ACD170LE.bin acd_170hc.bin acd_170hc_ByPinballMikeD.diff
- the new ROM then packs (with 7zip / Winrar) e.g. under the name acd_170hc.zip
- store the ROM (.zip) in the following folder c:\Visual Pinball\vpinmame\roms\
- in the table script then enter the name of the new ROM at „cGameName“
- Press F1 in the game, there (of course „Use external DMD (dll)“ activated) then select „Colorize DMD (4 colors)“ (see pictures on the right)
- Restart the table and ‚be colorful‘ 😉
Important: the selected ROM name MUST be present in the VPinMame database, otherwise it will not work.
Good sources for: Pin2DMD Colorizations & Color ROM Patches also 296 AltColor Color Pallettes (for colouring only).
Altsound
Important here: if you have an „altsound“ (alternative soundpack), you have to select „Alt. Sound Mode„, you have to set a „1„, the soundpack in exactly the same name as the Rom: c:\Visual Pinball\Tables\VPinMAME\altsound\(rom-name) speichern.
A good source for altsounds: altsound.vpin24.com
I adjust the volume inside the tables with „PINvol„… but more about that below.
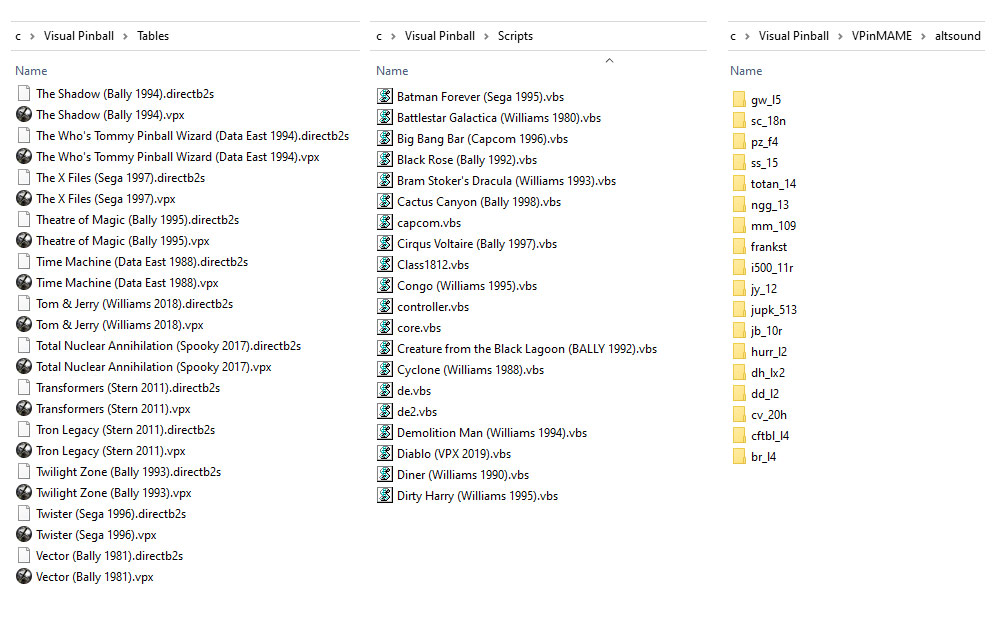
Scripts
What I also do is sometimes use optimized scripts…from Fastflips to SSF optimizations. You don’t have to replace the „original script“… it’s enough if you name the script the same way as tablename.vpx or .directb2s (as above) and copy it into the folder c:\Visual Pinball\Tables\ .
Check out the repo of „sverrewl„: vpxtable_scripts, I think there are some good ones and in the comments you can read what has been optimized.

VPX: Camera, Light, Material Mode & Options 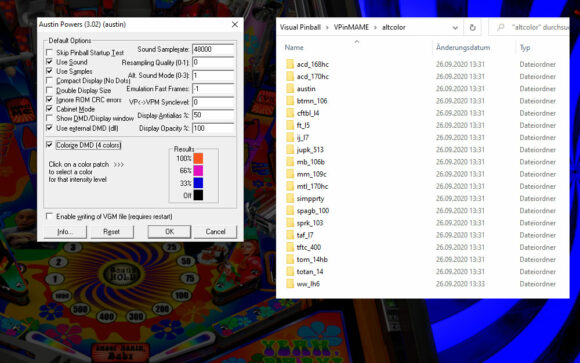
VPinMAME-Altcolor 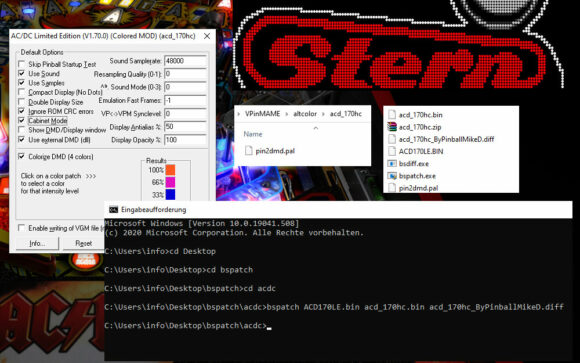
VPinMAME-ROM-Patch 
VPX: Tables, Script, Altsound

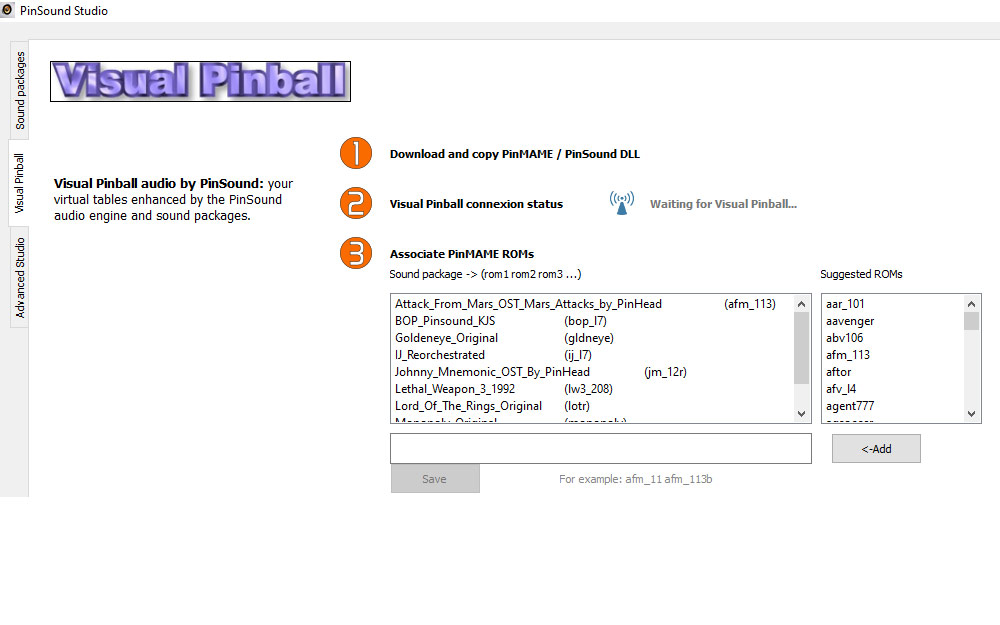
PinSound
PinSound actually stands for Soundboards, which gives the pinball machines of yesterday a higher sound quality.
But there is also a software called „PinSound Studio Pro“ which allows you to edit and adjust sounds etc. Unfortunately after version 0.9 the focus is only on „editing“.
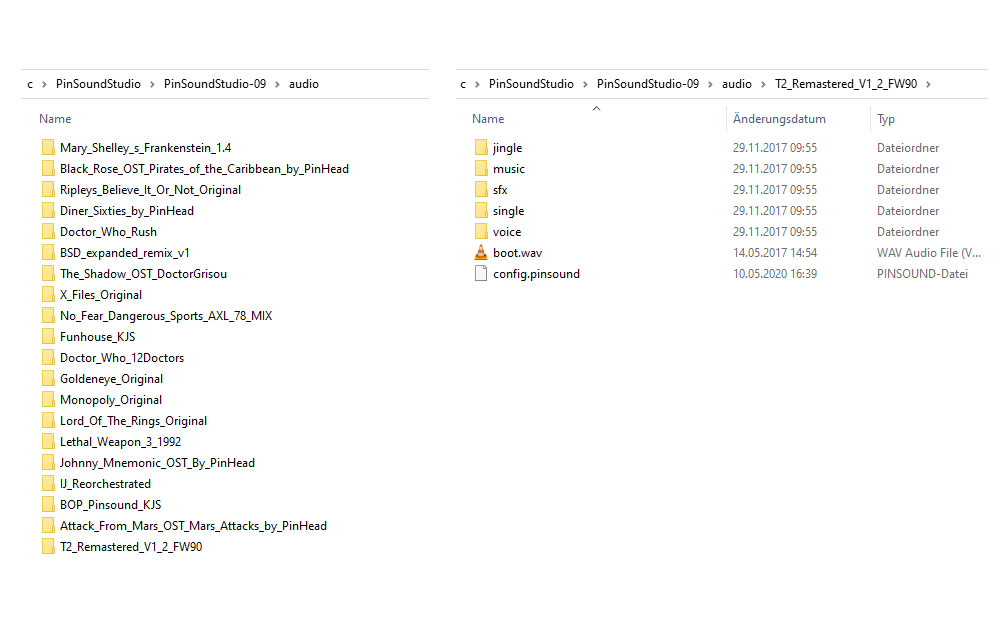
Until version „PinSound Studio 0.9“ it was possible to assign a PinSound-Soundpack to a VPINMame-Rom (see pictures)… and what happened: when the game starts, the sounds from the pack are used instead of the original/old rom sounds.
Procedure:
- Install PinSound Studio 0.9
- Unpack the Soundpack into the corresponding folder under PinSound Studio 0.9
- In PinSound Studio 0.9 assign ROM <> Make Soundpack
- In VPX, enter a „2“ in the „Options“ (F1 key) under „Sound mode
- Restart the table and have fun
Important: VPX and PinSound Studio must be running in admin mode.
That sounds pretty damn good… I can really recommend to try the Terminator 2 or the Doctor Who Rush Pack.
You can find some packs here in the PinSound Community: Downloads
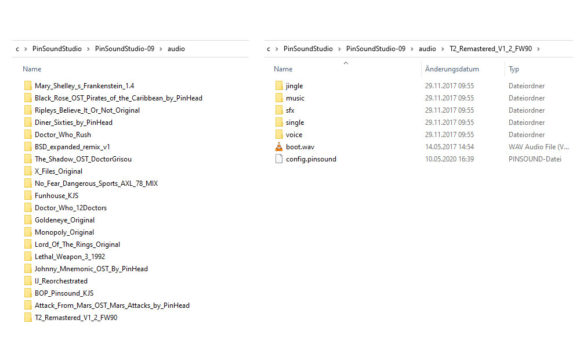
PinSound Folders 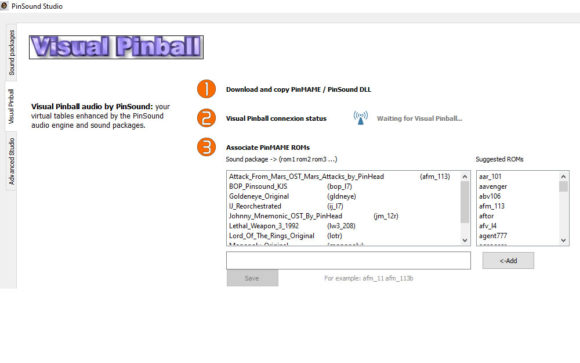
Pinsound 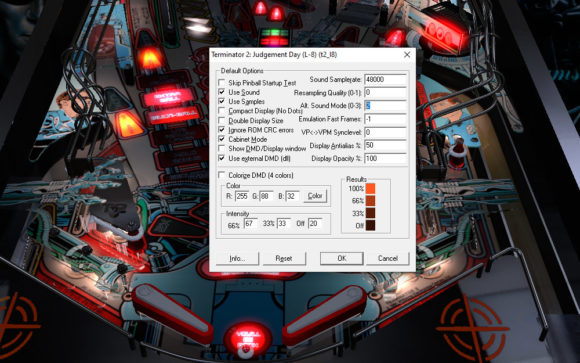
PinSound VPX-Soundmode 2

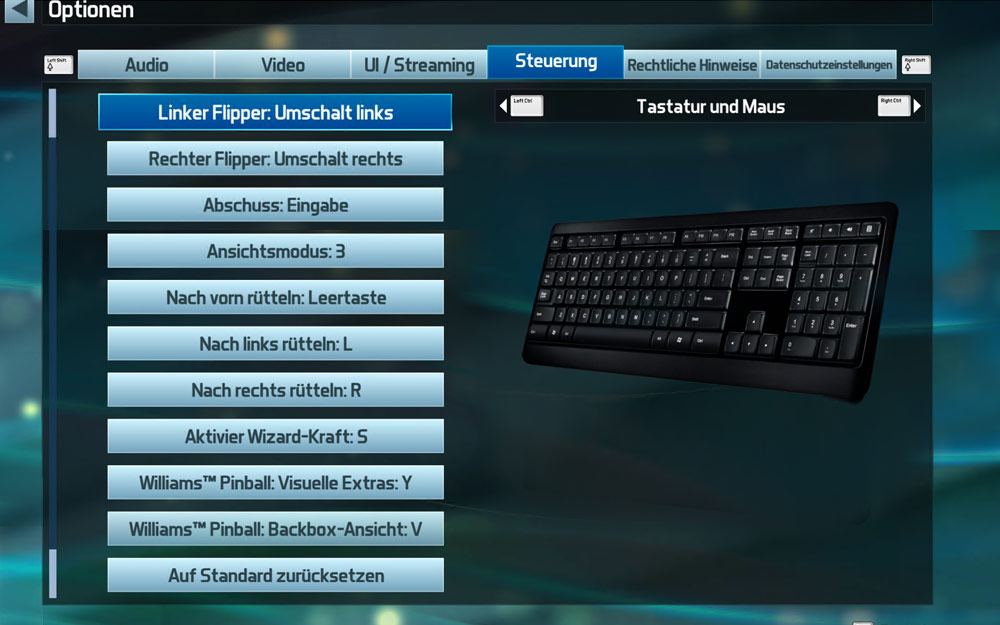
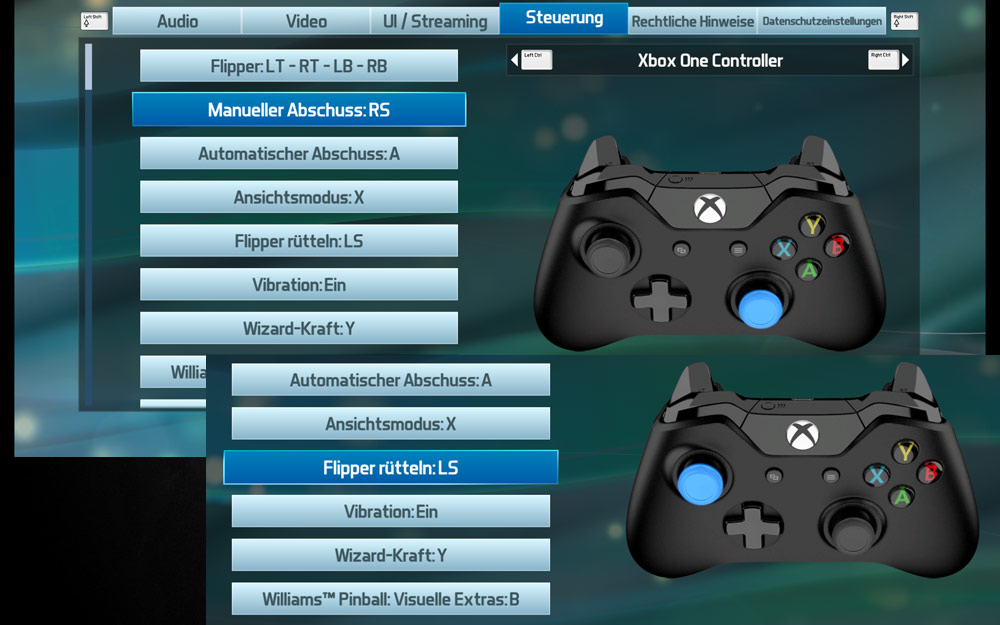
Pinball FX3
Pinball FX3 is actually the easiest to set up. It won’t be so easy to get the „toys“ (Leds, SSF..) running later, but more about DOFLinx later.
You install the game via Steam, buy the tables (best in a Steam-Sale) you want to play… then you ask for the cabinet code (takes 2-3 days) and with this code you can put the DMD on a separate screen (see pictures).
Note: how to find out the best pixel position for your DMD can be found under tools.
In the audio settings I have taken back certain things like the game mechanics and adjusted the whole thing in relation to PINvol, VPX, as well as frontend (PinballY)… so that the ‚volume jumps‚ are not too violent, but also the surround sound feedback over the PUPpack is balanced (slingshots, bumpers, pinballers etc. are given directly to the bass pumps and exciters and the game mechanics are added discreetly over the backglass of Pinball FX3 „on top“.
More about „fR33Styler´s Pinball FX3 SSF PUP-Pack“ and DOFLinx/PUPplayer below.
Pinball FX3 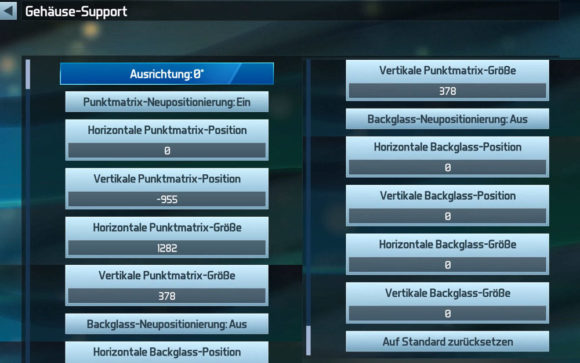
Pinball FX3: Cabinet-Support Pinball FX3 - Keys 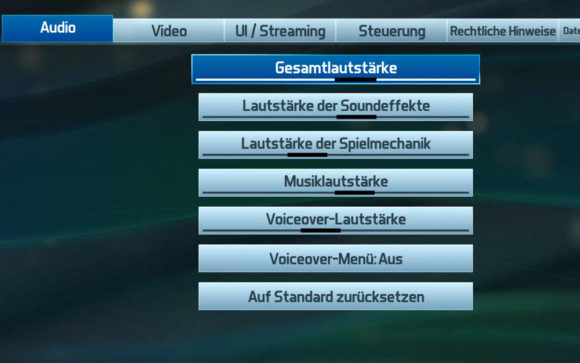
Pinball FX3: Audio


Direct Output Framework (DOF)
DOF (direct output framework)
DOF is a software that allows to control feedback devices. It is a kind of „add-on“ that works together with Visual Pinball and other software.
DOF takes care of the communication between the pinball software and the output controllers (LedWiz, PacLed, SainSmart relay boards, Pinscape and more) and translates between the simulated game elements of VPX and the physical device connectors of the output controller.
So… driving LEDs, strobe, shaker motor, fan, solenoids, knocker, bell(game) etc.
DOF: Download
The following microcontrollers are automatically recognized by DOF: Pinscape, LedWiz, and Pac-Led.
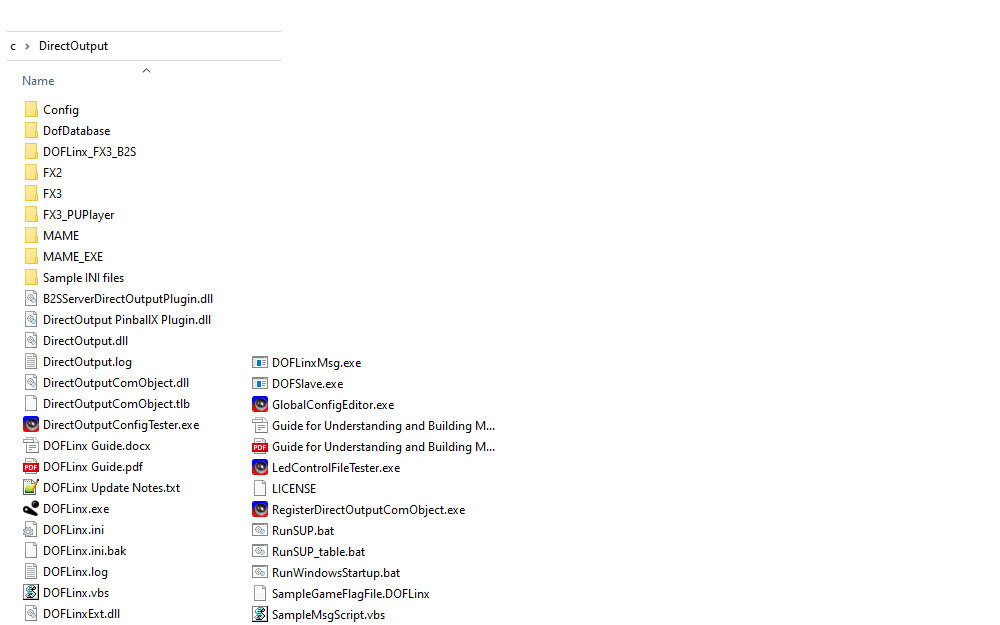
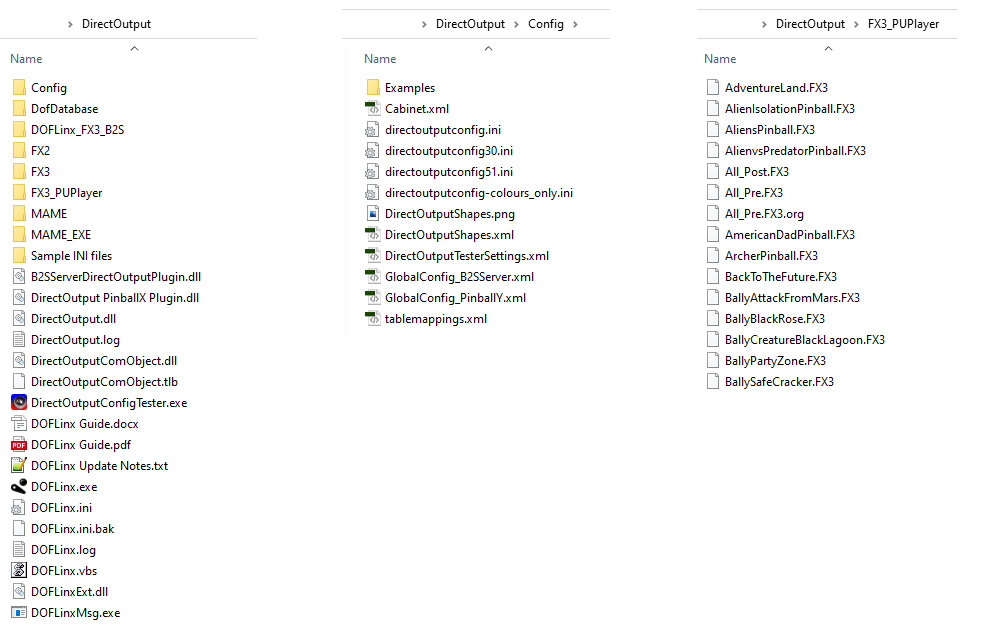
It is important to install DOF after VPX and B2S… and preferably in the folder: C:\DirectOutput
- Unpacking in C:\DirectOutput
- release all new DLL and EXE files
- right mouse button on the file
- Properties from the menu
- General“ tab
- „Security: This file is from another computer and could be blocked to protect this computer“
- Click on the „Allow“ button
- Create a shortcut of C:\DirectOutput in the folder c:\Visual Pinball\Plugins\
Now for testing purposes load a VPX table containing an interactive backglass (the topic from above with the .directb2s backglass files) and test it.
Press the right mouse button on the backglass in the game, then click on „Plugin Settings“ and you should see „DirectOutput“ running as plugin:
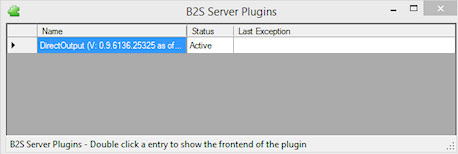
VPIN: DOF Plugin
More about DOF is also explained quite well at MJR´s website.
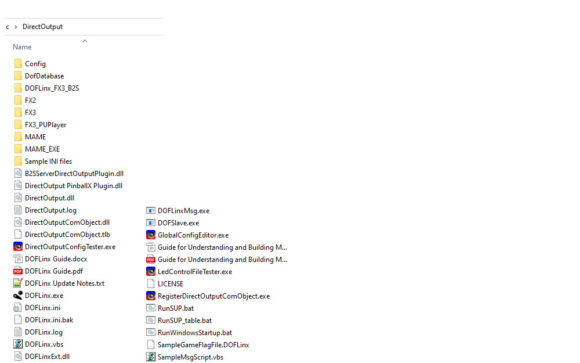
DirectOutput Folder
DOF Config Tool
DOF loads the Cabinet.xml (see above)… and this is also the basis for controlling the LEDs.
Now we need the „bridge“: VPX -> Trigger -> what should the LEDs do -> …
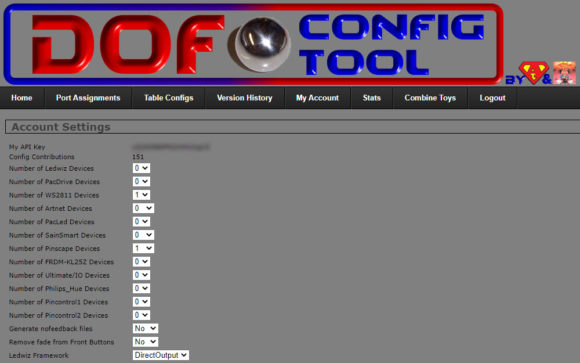
You create an account and log into the DOF Config Tool: configtool.vpuniverse.com
Output devices:
In the navigation bar under „My Account“ you can enter how many output devices you have. If you use a pinscape controller, set the „Number of pinscape devices“ to 1 and leave the „Number of FRDM-KL25Z devices“ at 0… then save with „Save Settings„.
Port assignments:
Navigate to the „Port Assignments“ in the navigation, here you make the mappings between „output port numbers“ and „specific devices“.
At the moment I have „only LEDs“… and as described above with the Outputs I have my 4 RGB pinball buttons, Start- & Launch-Button… which is very much like you see in the picture on the right… responsible for the pinscape outputs is the „directoutputconfigini51„.
Note: the outputs are set to the same „numbers“ in the DOF Config Tool as in the Pinscape above. 😉
The LED stripes are similar. Above in the Cabinet.xml or under Teensy you can see my distribution of the Stripes or from which LED address on what starts… that’s exactly the same here… responsible for Teensy & the Stripes is the „directoutputconfigini30„.
For both: each channel in RGB-stuff uses one port (see pictures).
VPIN: DOF Config Tool - My Account VPIN: DOF Config Tool - directoutputconfigini51 VPIN: DOF Config Tool - directoutputconfigini30 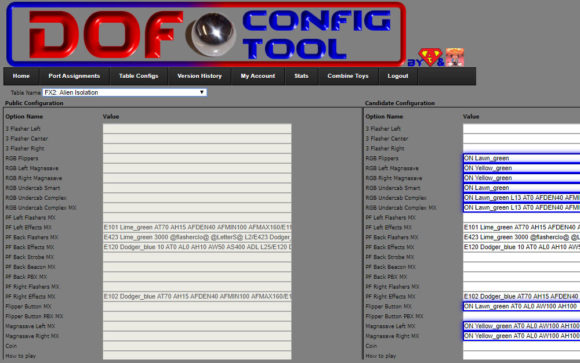
VPIN: DOF Config Tool - Table Configs


DOFLinx
DOFLinx
DOFLinx is the bridge for Pinball FX3/Future Pinball and hardware… in the end: LEDs and SSF (in combination with the PUPPlayer) and is based on Direct-Output-Framework.
And it’s damn fun to play Pinball FX3 with SSF & LEDs.
DOFLinx to the: Download
Wichtig ist DOFLinx im DOF-Ordner zu installieren (C:\DirectOutput)
- Unpacking in C:\DirectOutput
- Customize DOFLinx.INI
- Check path specifications in the INI
I start DOFLinx with the above mentioned autostart (see #Software) and here is my DOFLinx.ini on the right (open it) to view and download.
To start, I can only recommend:
DEBUG=2
and see what DOFLinx is up to… you can quickly see if the triggers are read by Pinball FX3 etc.
What else did I do specifically in the INI?
I deactivated the joystick „Plunger Settings„and „Nudge Settings„, because I realize this meanwhile in Pinball FX3 with X360ce (see below).
The Flipper-Buttons are assigned to the corresponding Output [DeviceNo.] [Port] (150,153)… and the Start-Button (162) and the Launch Ball- & Fire-Button (165).
This creates the following: in Pinball FX3 the flipper buttons are illuminated according to the defined color of the table, the buttons flash depending on the action.
Keyboard key codes can be found here: https://docs.microsoft.com/de-de/windows/win32/inputdev/virtual-key-codes
Read more about „Surround-Sound-Feedback @ Pinball FX3“ and „fR33Stylers-Pinball-FX3-SSF-PUP-Pack“ below.
DOFLinx
#############################
#							#
# DOFLinx.ini by fR33Styler	#
#							#
#############################


####
# The config file for DOFLinx with most common settings as a sample
#
# Note - this works with LEDWiz, PacLed64, Pinscape, Ultimate I/O and Sainsmart (FTDI devices)
# Edit this file as you see fit, lines that start with a hash (#) or are blank are not processed.  This blurb and comments can be cut out if you want.
#
# Output devices outputs are entered in the format of
# device (D) and output number (#) in the format D##, so controller device 1 and output 3 is "103" without the quotes, controller board 2 output 23 is "223" without quotes
#
# The keyboard hex code for the key that is used for each flipper from https://msdn.microsoft.com/en-us/library/windows/desktop/dd375731(v=vs.85).aspx
#
####

DEBUG=0
SHOW_IN_TASKBAR=0

# Point to your directoutputconfig.ini file.  Your file may have a number, ie directoutputconfig20.ini
# You can point to any of your directoutputconfig.ini files, but only one
# Keep this as the first pararameter to process in your INI file.  The order past ths point is not relevant

DIRECTOUTPUTCONFIG=c:\DirectOutput\config\directoutputconfig.ini
#DIRECTOUTPUTCONFIG=c:\DirectOutput\config\directoutputconfig51.ini
#DIRECTOUTPUTCONFIG=c:\DirectOutput\config\directoutputconfig30.ini
#DIRECTOUTPUTCONFIG=c:\DirectOutput\config\directoutputconfig-colours_only.ini

# The location of the .FX2/3 game specific files included with the DOFLinx release package
# Ensure your path has a \ on the end of it
PATH_FX2=C:\DirectOutput\FX2\
#PATH_FX3=C:\DirectOutput\FX3\
PATH_FX3=C:\DirectOutput\FX3_PUPlayer\

# The path to where you keep all of the .directb2s files that you've downloaded for use with FX3
# Ensure your path has a \ on the end of it
PATH_FX3_B2S=C:\DirectOutput\DOFLinx_FX3_B2S\

# This is the folder where B2SServer.exe can be found on your system
PATH_B2S_SERVER=C:\Visual Pinball\Tables\

# This is the path to where your B2SServer GlobalConfig is located. Needed for addressable led effects.
DIRECTOUTPUTGLOBAL=c:\DirectOutput\config\GlobalConfig_B2SServer.xml

# The list of processes that can activate DOFLinx, in this case, Pinball FX2, Pinball FX3 and Future Pinball
PROCESSES=Pinball FX2,Pinball FX3,Future Pinball

# An over-ride to the default setting given this is just being used with Pinball FX3, not FX2, FP or other systems that may require the default delay
PROCESS_TO_ACTIVE_TIME=1
#PROCESS_TO_ACTIVE_TIME=30000

# Joystick Nudge Settings with keycodes https://docs.microsoft.com/en-gb/windows/win32/inputdev/virtual-key-codes
# Doku: https://www.vpforums.org/index.php?showtopic=42325
# Keys: https://docs.microsoft.com/en-gb/windows/win32/inputdev/virtual-key-codes
# 4C = "L", 52 = "R"
#

#JOY_PORT=1
#JOY_X_OFFSET=32767
#JOY_Y_OFFSET=32767
#NUDGE_LEFT_POINT=-5500
#NUDGE_RIGHT_POINT=5500
#NUDGE_FORWARD_POINT=4000

#NUDGE_LEFT_POINT=-1900
#NUDGE_RIGHT_POINT=1900
#NUDGE_FORWARD_POINT=2000

# L & R
#NUDGE_LEFT_KEY=4C
#NUDGE_RIGHT_KEY=52

#CTRL
#NUDGE_LEFT_KEY=A2
#NUDGE_RIGHT_KEY=A3

#NUDGE_FORWARD_KEY=20
NUDGE_LEFT_INPUT=A2
NUDGE_RIGHT_INPUT=A3

# Joystick Plunger Settings
# Doku: https://www.vpforums.org/index.php?showtopic=41930&p=425029 Alternativ X360CE: https://www.vpforums.org/index.php?showtopic=36108&p=413506
#PLUNGER_JOYSTICK_NUMBER=1
#PLUNGER_AXIS=Z
#PLUNGER_KEY=0D
#PLUNGER_PULL_POINT=63000
#PLUNGER_RELEASE_POINT=35000

# use default MX displays for Pinball FX2, Pinball FX3
# the five flashers, flippers, slingshots, bumpers, strobe and beacon
AUTO_MX=1

# Set to 1 to output the game name to the log regardless of the DEBUG flag setting.  Set to 0 to simply follow the DEBUG flag.
# Quite useful when you trying to get the FX3 window game name for setting game specific colours, matching B2S names, etc
OUTPUT_GAME_NAME=0


# Future Pinball Link-Section (for Pinball FX too)
FP_ATTEMPT_LINK=1
#FP_LINK_WAIT_TIME=65000


######## DEVICES and PORTS for FUTURE PINBALL and FX3 ########

# LINK_XX=D##,Default Time,Max Time,Intensity Level
# Intensity Level should normally be left at 255 (max). Only PWM outputs used with something like a Shaker Motor can be less than 255.

# Device and Ports for the 10 solenoid setup for Flippers, Slingshots, Middle 3 solenoids, Back 3 Solenoids.
#LINK_LF=101,50,10000,255
#LINK_RF=102,50,10000,255
#LINK_LS=104,50,1000,255
#LINK_RS=105,50,1000,255
#LINK_ML=106,50,1000,255
#LINK_MC=107,50,1000,255
#LINK_MR=108,50,1000,255
#LINK_BL=109,50,1000,255
#LINK_BC=110,50,1000,255
#LINK_BR=111,50,1000,255

# Device and Ports for the shaker, gear motor, knocker, beacon and strobe
#LINK_SH=112,1000,5000,255
#LINK_GR=113,750,10000,255
#LINK_KN=114,120,500,255
#LINK_BK=115,FLASH,200,255
#LINK_SR=116,ON,0,255

# Device and Ports for the lights inside the various buttons including Start, Extra Ball, Coin, Exit, Launch Ball and Fire
#LINK_ST=117
#LINK_EB=118
#LINK_CN=119
#LINK_EX=120
#LINK_LB=121
#LINK_FR=122

# Device and "RED" ports for the 5 RGB flashers.
#LINK_FLOL=201
#LINK_FLIL=204
#LINK_FLCN=207
#LINK_FLIR=210
#LINK_FLOR=213
#LINK_LF=150,50,10000
#LINK_RF=153,50,10000
#LINK_LS=118,50,500
#LINK_RS=126,50,500
#LINK_ML=127,50,500
#LINK_MC=128,50,500
#LINK_MR=129,50,500
#LINK_BL=130,50,500
#LINK_BC=131,50,500
#LINK_BR=132,50,500
#LINK_SH=115,1000,5000
#LINK_GR=116,750,10000
#LINK_KN=124,120,500
#LINK_SR=217,ON,0
#LINK_BK=218,ON,0
#LINK_FLOL=201
#LINK_FLIL=204
#LINK_FLCN=207
#LINK_FLIR=210
#LINK_FLOR=213
#LINK_ST=102
#LINK_EB=101
#LINK_CN=106
#LINK_EX=104

# Just in case things go wrong (ie no keyup signal is detected, flipper held down for a long time), what is the maximum time a flipper solenoid / contactor can be in in milliseconds
MAX_FLIPPER_ON=5000

# Turn on the attempt to make a full connection to Future Pinball when it is detected as running
FP_ATTEMPT_LINK=1

# Set the key code for the keys being used as Left and Right flippers
# Used for the default fll back if a full link cannot be established
# Left Shift = A0, Right Shift = A1
L_FLIPPER_KEY=A0
R_FLIPPER_KEY=A1

# The device / port for the left and right flippers, set to output device 1, left flipper solenoid on port 1 and right flipper solenoid on port 2
L_FLIPPER_OUTPUT=150
R_FLIPPER_OUTPUT=153

# Link_[DeviceNo.][Port]
LINK_ST=162
LINK_LB=165
LINK_FR=165


# -LIGHTING SECTION--------------------------------------------------------------------------------------------------------------

######### RGB UNDERCAB LIGHTING #########

# RGB Undercabinet Colour Change. RAINBOW = cycle through the colours. RANDOM = use random colour order. RAINBOW_ALTERNATE = hat picks Colour# and Colour#+1 then applies them to alternate RGB devices
#RGB_STYLE=RAINBOW_ALTERNATE
#RGB_STYLE=RANDOM

# What changes the RGB undercabinet colour. TIME = set time period. FLIPPER = flipper press after the RGB_TRIGGER minimum time (to stop rapid colour changes)
#RGB_TRIGGER=TIME
#RGB_TRIGGER=FLIPPER

# The minimum time for change between flipper flips, 1000mS or 1 second
#RGB_MIN_TIME=8000

# The Device and "RED" port for RGB undercabinet lighting
#RGB_OUTPUT=213,216
#RGB_OUTPUT=213,216,156,159
#RGB_OUTPUT=213,216,150,153,156,159
#RGB_OUTPUT=156,159

######### BUTTONS #########

# These are the default and "fallback" type of functions that are used when DOFLinx is made active, but no link to Future Pinball or FX3 is established.
# Turn on Button lights when DOFLinx is activated (such as EXIT button) - but "mono" Buttons only (no RGB)
BUTTONS_ON=165

######### RGB BUTTONS #########

#Magnasave/Nudging buttons
#56 Rechts
#59 Links
#LINK_LF=156
#LINK_RF=159
#KEY_TO_COLOUR=A0,156,Red,A1,159,Red,A3,156,Red,A4,159,Red

#LINK_P2=218 then use BUTTONS_ON_COLOUR=BUT_P2,Blue
#LINK_P2=156
#BUTTONS_ON_COLOUR=BUT_P2,Blue
#BUTTONS_ON_COLOUR=156,Blue

#BUTTONS_ON_COLOUR=156,Blue,159,Blue
#BUTTONS_ON_COLOUR=156,Blue,159,Blue,150,Yellow,153,Yellow
#BUTTONS_ON_COLOUR=156,Blue,159,Blue,150,153
#BUTTONS_ON_COLOUR=156,Blue,159,Blue,150,Gold,153,Gold
#BUTTONS_ON_COLOUR=150,Red,153,Red,156,Yellow_green,159,Yellow_green

#Nudging (ctrl) makes Magnasave/Nudging RGB Button-Color = red
#KEY_TO_COLOUR_TIMER=A2,156,Red,1500,A3,159,Red,1500


# -Testing Area--------------------------------------------------------------------------------------------------------------
######## KEY TO OUTPUT / COLOUR, etc examples ########

# Make the "4" key (key code 34) to pulse controller/output 119

#KEY_TO_OUTPUT=34,119

# Set the left and right control keys to turn on a specific colour (red) for RGB.
# Example, when nudge keys are used it all goes red.
#KEY_TO_COLOUR=A2,109,Red,A3,109,Red

#Links
#LF = Left flipper
#RF = Right flipper
#LS = Left slingshot
#RS= Right slingshot
#ML = Mid field left solenoid
#MC = Mid field centre solenoid
#MR = Mid field right solenoid
#BL = Back left solenoid
#BC = Back centre solenoid
#BR = Back right solenoid
#SH = Shaker motor
#GR = Gear motor
#KN = Knocker
#FN = Fan
#BE = Bell
#C1 = Chime 1 (high note)
#C2 = Chime 2 (mid note)
#C3 = Chime 3 (low note)

# Devices
#FLOL = Flasher outer left
#FLIL = Flasher Inner Left
#FLCN = Flasher Centre
#FLOR = Flasher Outer Right
#FLIR = Flasher Inner Right

# The other 8 solenoid of a 10 solenoid setup using ports 4 to 11 inclusive
#LINK_LS=104,50,500,255
#LINK_RS=105,50,500,255
#LINK_ML=106,50,500,255
#LINK_MC=107,50,500,255
#LINK_MR=108,50,500,255
#LINK_BL=109,50,500,255
#LINK_BC=110,50,500,255
#LINK_BR=111,50,500,255

# Ports for the shaker, gear motor, knocker, beacon and strobe using ports 12 - 16 inclusive
#LINK_SH=112,1000,5000,255
#LINK_GR=113,750,10000,255
#LINK_KN=114,120,500,255
#LINK_BK=115,FLASH,200,255
#LINK_SR=116,ON,0,255

# Ports for the lights inside the various buttons being Start, Extra Ball, Coin, Exit, Launch Ball and Fire for ports 17 to 22 inclusive

#ST = Start button
#EB = Extra Ball button
#EX = Exit button
#CN = Coin button
#LB = Launch Ball button
#FR = Fire Button
#P1 = Player 1
#P2 = Player 2
#PS = Pause

# -End of Testing Area--------------------------------------------------------------------------------------------------------------


######## GAME COLOURS ########
# Game specific colours in the format of a CSV of Game Name,Colour#1,Colour#2 - colours as they appear in your directoutputconfig
# Thanks to Vizzini here is a great starting list for Pinball FX2
# Extended for FX3 games by DDH69

#GAME_COLOUR=AlienIsolationPinball,Medium_Blue,Lime,Dodger_Blue,Lime_Green
GAME_COLOUR=AlienIsolationPinball,Gold
GAME_COLOUR=AlienvsPredatorPinball,Medium_Blue,Lime_Green,Dodger_Blue,Yellow_Green
GAME_COLOUR=AliensPinball,Medium_Blue,Dark_Golden_Rod,Dodger_Blue
GAME_COLOUR=AmericanDadPinball,Medium_Blue,Lime_Green,Dodger_Blue,Yellow_Green
GAME_COLOUR=ArcherPinball,Medium_Blue,Yellow,Dodger_Blue,Blue_Violet
GAME_COLOUR=Biolab,Dark_Red,Lime,Blue,Cyan,Blue_Violet,Yellow
GAME_COLOUR=Blade,Blue,Blue_Violet,Salmon
GAME_COLOUR=BobaFett,Lime,Golden_Rod,Blue_Violet
GAME_COLOUR=BobsBurgersPinball,Medium_Blue,Lime_Green,Dark_Red,Dodger_Blue,Yellow_Green
GAME_COLOUR=CaptainAmerica,Blue,Dark_Red,Dodger_Blue,Gold
GAME_COLOUR=CastleStorm,Blue,Gold,Lime,Dodger_Blue,Orange,Lime_Green
GAME_COLOUR=CivilWar,Blue,Dark_Red,Dodger_Blue,Light_Salmon
GAME_COLOUR=Deadpool,Dark_Red,Blue,Medium_slate_blue,Dodger_Blue
GAME_COLOUR=DoomPinball,Yellow,Silver,Gray,Dark_Orange,Dim_Gray,Orange_Red,Peru,Crimson
GAME_COLOUR=DoctorStrange,Dark_Red,Blue,Gold,Lime_Green,Dark_Violet,Orange,Dodger_Blue,Lime,Medium_Slate_Blue
GAME_COLOUR=EarthDefense,Dark_Red,Blue,Gold,Dark_Violet,Orange,Dodger_Blue,Lime
GAME_COLOUR=ElDorado,Orange,Lime_Green,Yellow,Coral,Lime,Yellow_Green,Cyan
GAME_COLOUR=EpicQuest,Lime_Green,Dodger_Blue,Yellow_Green,Cyan
GAME_COLOUR=Excalibur,Dark_Red,Blue,Lime,Dodger_Blue,Cyan
GAME_COLOUR=FalloutPinball,Crimson,White,Red,Brown,Light_Steel_Blue,Slate_Blue
GAME_COLOUR=FamilyGuyPinball,Dodger_Blue,Lime_Green,Salmon,Dark_Violet,Yellow_Green
GAME_COLOUR=FantasticFour,Blue,Yellow,Dodger_Blue,Orange_Red
GAME_COLOUR=FearItself,Dark_Red,Blue,Yellow,Lime,Dark_Violet,Orange
GAME_COLOUR=GhostRider,Dodger_Blue,White,Yellow,Light_Salmon,Orange_Red
GAME_COLOUR=GuardiansoftheGalaxy,Dodger_Blue,Orange,Medium_Purple
GAME_COLOUR=IRONMAN,Blue,Dark_Red,Dodger_Blue,Gold
GAME_COLOUR=Mars,Blue,Yellow,Deep_sky_blue,Gold
GAME_COLOUR=MarvelsAntMan,Medium_Blue,Dark_Red,Dodger_Blue
GAME_COLOUR=MarvelsAvengersAgeofUltron,Dark_Red,Dodger_Blue,Lime_Green,Light_Salmon,Cyan
GAME_COLOUR=MarvelsTheAvengers,Blue,Dark_Red,Dodger_Blue,Gold
GAME_COLOUR=MarvelsWomenofPowerAForce,Red,Lime,Gold,Slate_Blue,Tomato,Silver,Dark_Orchid,Spring_Green
GAME_COLOUR=MarvelsWomenofPowerChampions,Dodger_Blue,Yellow,Red,Gray,Golden_Rod,Crimson,Orange
GAME_COLOUR=MoonKnight,Dodger_Blue,Blue,Cyan,Royal_Blue
GAME_COLOUR=MsSplosionMan,Dodger_Blue,Pink,Medium_Blue,Purple,Royal_Blue
GAME_COLOUR=Paranormal,Lime_Green,Dodger_Blue,Yellow_Green
GAME_COLOUR=Pasha,Dark_Violet,Golden_Rod,Dodger_Blue
GAME_COLOUR=PlantsVSZombies,Lime_Green,Yellow_Green,Dodger_Blue
GAME_COLOUR=Portal,Dodger_Blue,Yellow_Green,Medium_Blue,Yellow
GAME_COLOUR=Rome,Dark_Red,Gold,Dodger_Blue,Light_Salmon,Yellow_Green,Orange
GAME_COLOUR=SecretsoftheDeep,Blue,Yellow,Dodger_Blue
GAME_COLOUR=Shaman,Dark_Red,Blue,Gold,Dark_Violet,Orange,Dodger_Blue,Lime
GAME_COLOUR=SorcerersLair,Blue,Blue_Violet,Dodger_Blue,Slate_Blue
GAME_COLOUR=SouthParkButtersVeryOwnPinballGame,Dark_Red,Blue,Gold,Dark_Violet,Orange,Dodger_Blue,Lime_Green
GAME_COLOUR=SouthParkSuperSweetPinball,Dark_Red,Lime,Blue,Gold,Dark_Violet,Orange,Dodger_Blue,Lime_Green,Yellow_Green
GAME_COLOUR=SpiderMan,Dark_Red,Lime,Blue,Gold,Dark_Violet,Orange
GAME_COLOUR=STARWARSDARTHVADER,Light_sky_blue,Dark_Red,Cyan
GAME_COLOUR=StarWarsEpisodeVTheEmpireStrikesBack,Medium_Blue,Yellow,Dark_Red,Dodger_Blue
GAME_COLOUR=StarWarsEpisodeVIReturnoftheJedi,Slate_Blue,Golden_Rod,Medium_Blue,Lime_Green,Dodger_Blue,Yellow
GAME_COLOUR=StarWarsPinballDroids,Medium_Blue,Yellow,Orange,Navy,Gold,Orange_Red
GAME_COLOUR=StarWarsPinballEpisodeIVANewHope,Cyan,Golden_Rod,Dodger_Blue,Yellow
GAME_COLOUR=StarWarsPinballHanSolo,Dodger_Blue,Royal_Blue,Antique_White
GAME_COLOUR=StarWarsPinballMastersoftheForce,Medium_Blue,Salmon,Dodger_Blue,Purple,Cyan,Dark_Red
GAME_COLOUR=StarWarsPinballMightoftheFirstOrder,Light_sky_blue,Dodger_Blue,Dark_Red,Cyan
GAME_COLOUR=StarWarsPinballStarWarsRebels,Medium_Blue,Yellow,Royal_Blue,Orange_Red,Purple,Lime_Green
GAME_COLOUR=StarWarsPinballTheForceAwakens,Dark_Red,Medium_Blue,Blue_Violet
GAME_COLOUR=StarWarsPinballRogueOne,Gray,Silver,Light_Sky_Blue,Teal,Beige,Bisque,Aqua_Marine,Slate_Gray,Dark_Orange
GAME_COLOUR=StarWarsStarfighterAssault,Medium_Blue,Dodger_Blue,Dark_Red
GAME_COLOUR=StarWarsTheCloneWars,Dark_Red,Pink,Medium_Blue,Medium_Turquoise,Lime,Lime_Green
GAME_COLOUR=SuperLeagueASRoma,Lime_Green,Orange,Lime,Yellow,Red
GAME_COLOUR=SuperLeagueZenStudiosFC,Lime_Green,Orange,Lime,Yellow,Red
GAME_COLOUR=SuperLeagueArsenalFC,Lime_Green,Orange,Lime,Yellow,Red
GAME_COLOUR=SuperLeagueLiverpoolFC,Lime_Green,Orange,Lime,Yellow,Red
GAME_COLOUR=SuperLeagueJuventus,Lime_Green,Orange,Lime,Yellow,Red
GAME_COLOUR=SuperLeagueACMilan,Lime_Green,Orange,Lime,Yellow,Red
GAME_COLOUR=SuperLeagueRealMadridCF,Lime_Green,Medium_Blue,Lime,Yellow,Red
GAME_COLOUR=SuperLeagueFCBarcelona,Slate_Blue,Lime_Green,Yellow,Blue_Violet,Lime,Red
GAME_COLOUR=Tesla,Lime_Green,Yellow_Green,Dodger_Blue,Golden_Rod
GAME_COLOUR=TheElderScrollsVSkyrimPinball,Light_Slate_Gray,Gold,Golden_Rod,Dark_Sea_Green,Peru,Tan
GAME_COLOUR=TheInfinity Gauntlet,Dark_Red,Blue,Gold,Dark_Violet,Orange,Dodger_Blue,Lime
GAME_COLOUR=TheWalkingDead,Lime_Green,Royal_Blue,Yellow_Green
GAME_COLOUR=Thor,Dark_Red,Blue,Gold,Dark_Violet,Orange,Dodger_Blue,Lime
GAME_COLOUR=V12,Dark_Red,Blue,Gold,Dark_Violet,Orange,Dodger_Blue
GAME_COLOUR=Venom,Dark_Red,Blue,Dark_Violet,Dodger_Blue
GAME_COLOUR=WildWestRampage,Yellow_Green,Dodger_Blue,Royal_Blue
GAME_COLOUR=Wolverine,Dark_Red,Medium_Blue,Yellow,Dark_Violet
GAME_COLOUR=WorldWarHulk,Lime_Green,Yellow_Green,Dodger_Blue,Lime,Yellow
GAME_COLOUR=XMen,Blue,Blue_Violet,Gold,Dodger_Blue,Slate_Blue,Orange
GAME_COLOUR=ET,Yellow,Amber,Sky_blue,Sienna,Aqua_marine,Slate_gray,Dark_olive_green
GAME_COLOUR=BacktotheFuture,Light_steel_blue,White,Crimson,Gray,Teal,Yellow,Dodger_blue
GAME_COLOUR=Jaws,Dark_turquoise,Gray,White,Salmon,Light_coral,Tan,Papaya_whip,Peru
GAME_COLOUR=SonofZeus,Dark_orange,Silver,Dark_salmon,Amber,Sienna,Light_steel_blue,Firebrick
GAME_COLOUR=AdventureLand,Red,Cyan,Yellow,White,Medium_orchid,Aqua,Dark_turquoise,Medium_purple
GAME_COLOUR=JurassicPark,Lawn_green,Amber,Yellow,Light_slate_gray,Cadet_blue,Black,Rosy_brown,Light_steel_blue,Medium_sea_green,Silver
GAME_COLOUR=JurassicWorld,Light_steel_blue,Silver,Tan,Forest_green,Gray,Cadet_blue,Yellow_green,Teal,Bisque
GAME_COLOUR=JurassicMayhem,Sandy_brown,Forest_green,Dark_green,Dark_olive_green,Dark_khaki,Peru,Tan,Navajo_white,Beige,Dark_golden_rod,Corn_silk
GAME_COLOUR=StarWarsLastJedi,Gold,Orange_Red,Aqua,Coral,Dark_Khaki,Light_Steel_Blue,Yellow_Green,Steel_Blue
GAME_COLOUR=StarWarsAhchToIsland,Peru,Tan,Light_Slate_Gray,Light_Golden_Rod,Turquoise,Deep_Sky_Blue,Spring_Green,Steel_Blue
GAME_COLOUR=WMSFishTales,Forest_green,Medium_spring_green,Pale_green,Aqua,Blue,Golden_Rod,Dark_turquoise,Gold,Deep_sky_blue,Sandy_brown,Green
GAME_COLOUR=WMSGetaway,Red,Steel_blue,Dim_gray,Navy,Dark_red,Teal
GAME_COLOUR=WMSJunkyard,Amber,Lawn_green,Burly_wood,Orange,Peru,Dark_turquoise
GAME_COLOUR=WMSMedievalMadness,Yellow,Amber,Rosy_brown,Firebrick,Forest_green,Gray,Dark_salmon,Dark_orange
GAME_COLOUR=WMSAFM,White,Red,Lime,Amber,Sea_green,Forest_green,Turquoise,Corn_silk
GAME_COLOUR=WMSBlackRose,Khaki,Sky_blue,Orange_red,Gold,Aqua_marine,Tomato,Yellow_green
GAME_COLOUR=WMSPartyZone,Lime,Blue_violet,Orange,Purple,Aqua,Red,Medium_blue,Amber,Yellow,Sandy_brown,Deep_pink
GAME_COLOUR=StarWarsSolo,Burly_Wood,Medium_Sea_Green,Light_Salmon,Silver,Golden_Rod,Dark_Turquoise
GAME_COLOUR=StarWarsCalrissianChronicles,Yellow,Silver,Light_Blue,Gold,White,Amber,Dark_Salmon,Navajo_White
GAME_COLOUR=StarWarsBattleOfMimban,Coral,Gray,Dark_Orange,Salmon,Slate_Gray,Light_Steel_Blue,Peru,Tan
GAME_COLOUR=BallySafeCracker,Orange,Gold,Yellow,Orange_Red,Turquoise,Antique_White,Dim_Gray,Golden_Rod,Crimson
GAME_COLOUR=BallyTheatreOfMagic,Gold,Medium_Slate_Blue,Tomato,Light_Yellow,Plum,Orchid,Golden_Rod,Crimson,Silver
GAME_COLOUR=BallyTheChampionPub,Forest_Green,Gold,Orange_Red,Dark_Blue,Green,Red,Light_Green
GAME_COLOUR=WMSHurricane,Gray,Lawn_Green,Slate_Gray,Dark_Orange,Dark_Blue,Medium_Blue,Cyan,Orange_Red,Papaya_Whip
GAME_COLOUR=WMSRedAndTedRoadShow,Yellow,Orange,Orange_Red,Forest_Green,Yellow_Green,Blue,Navy,Magenta,White
GAME_COLOUR=WMSWhiteWater,Peru,Blue,Royal_Blue,Light_Steel_Blue,Sienna,Aqua,Turquoise,Yellow,Beige
GAME_COLOUR=WMSMonsterBash,Lime,Amber,Dark_Turquoise,Sky_Blue,Lawn_Green,Orchid,Deep_Pink,Thistle,Light_Sky_Blue
GAME_COLOUR=BallyCreatureBlackLagoon,Light_Pink,Green_Yellow,Medium_Sea_Green,Silver,Steel_Blue,Forest_Green,Golden_Rod,Light_Cyan,Orange_Red,Lawn_Green
GAME_COLOUR=WMSTalesoftheArabianNights,Red,Chart_Reuse,Dark_Turquoise,Gold,Silver,Orange,Medium_Violet_Red,Aqua
GAME_COLOUR=WMSCirqusVoltaire,Lime,Yellow,Blue,Red,Orange,Dark_Violet,Deep_Pink,Orchid,Lawn_Green,Gold
GAME_COLOUR=WMSNoGoodGofers,Forest_Green,Peru,Blue,Turquoise,Orange,White,Green_Yellow,Golden_Rod,Sienna
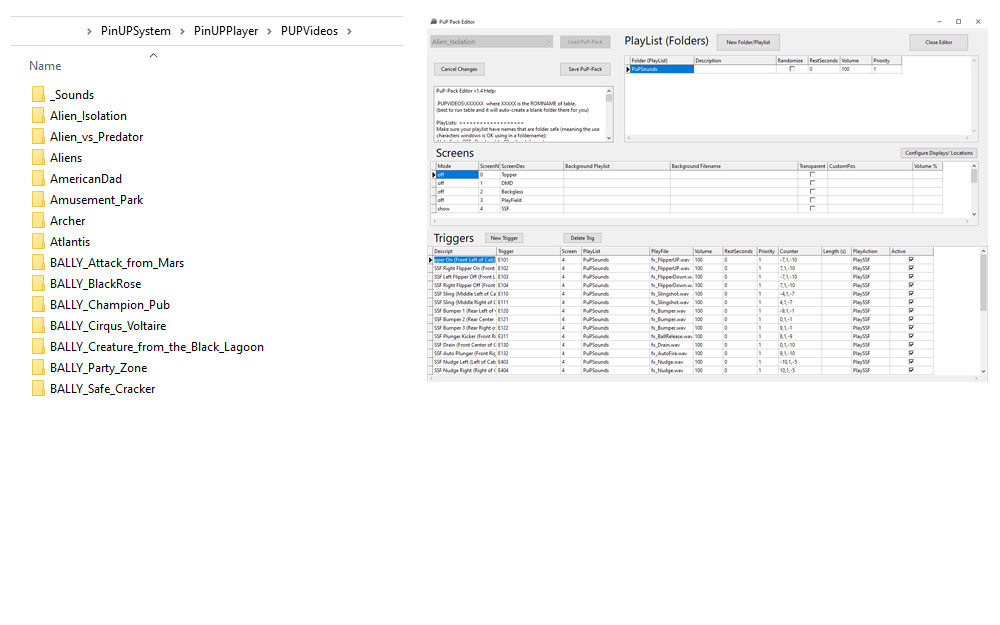
PUPplayer

Pinup Player
The Pinup Player is part of the PinUP system, which also includes another frontend called Pinup Popper.
I only use the Pinup Player to load so-called PuP-Packs (Pinup Player Packs) . in combination with Visual Pinball X these are e.g. videos & sounds which are displayed on DMD or backglass in the game, with Pinball FX3 I use this mainly for surround sound feedback.
Pinup Player: Install Guide & Download
I recommend the following path: (C:\PinUPSystem\)
- Installation
- Setting up the monitors
Since I have a portrait screen setup, and also use PinballY as frontend… there is relatively little setup (see INI).
You can now simply go to the folder „C:\PinUPSystem\PinUPPlayer\PUPVideos“ for:
- Visual Pinball X to store the corresponding PUP Packs (same name as the ROM name)
- Pinball FX3 the corresponding SSF sounds (e.g. from my fR33Stylers-Pinball-FX3-SSF-PUP-Pack)
Alternatively, you can also customize it with the PUP Pack Editor.
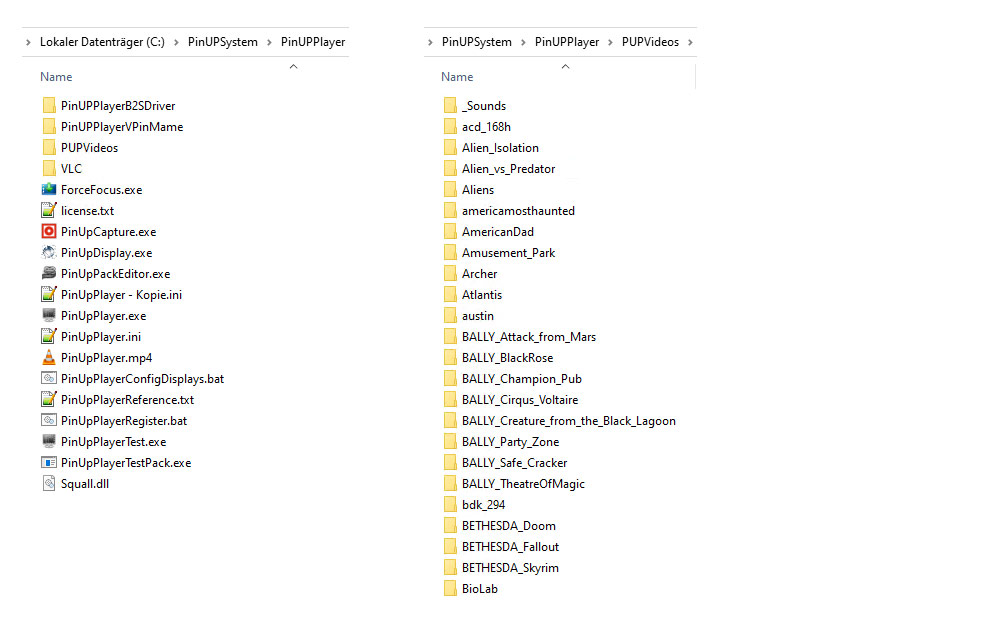
PUP-Player
[INFO]
ScreenXPos=0
ScreenYPos=0
ScreenWidth=1920
ScreenHeight=1080
volume=100
hidestopped=3
AspectWide=0
AspectHigh=0
fitToWindow=1
ScreenRotation=0
DebugMode=0
VideoDriver=4
FirstRun=0
[INFO1]
ScreenXPos=-7
ScreenYPos=-937
ScreenWidth=1290
ScreenHeight=360
volume=100
hidestopped=3
AspectWide=0
AspectHigh=0
fitToWindow=1
ScreenRotation=0
DebugMode=0
VideoDriver=0
FirstRun=0
[INFO2]
ScreenXPos=-395
ScreenYPos=-2112
ScreenWidth=1920
ScreenHeight=1080
volume=100
hidestopped=0
AspectWide=0
AspectHigh=0
fitToWindow=1
ScreenRotation=0
DebugMode=0
VideoDriver=0
FirstRun=0
[INFO3]
ScreenXPos=0
ScreenYPos=0
ScreenWidth=1080
ScreenHeight=1920
volume=100
hidestopped=3
AspectWide=0
AspectHigh=0
fitToWindow=1
ScreenRotation=0
DebugMode=0
VideoDriver=0
FirstRun=0
[INFO4]
ScreenXPos=0
ScreenYPos=0
ScreenWidth=1080
ScreenHeight=1100
volume=100
hidestopped=2
AspectWide=0
AspectHigh=0
fitToWindow=1
ScreenRotation=0
DebugMode=0
VideoDriver=0
FirstRun=0
[INFO5]
ScreenXPos=50
ScreenYPos=57
ScreenWidth=800
ScreenHeight=600
volume=100
hidestopped=3
AspectWide=0
AspectHigh=0
fitToWindow=1
ScreenRotation=0
DebugMode=0
VideoDriver=0
FirstRun=0
[INFO6]
ScreenXPos=60
ScreenYPos=67
ScreenWidth=800
ScreenHeight=600
volume=100
hidestopped=3
AspectWide=0
AspectHigh=0
fitToWindow=1
ScreenRotation=0
DebugMode=0
VideoDriver=0
FirstRun=0
[INFO7]
ScreenXPos=-395
ScreenYPos=-2112
ScreenWidth=1936
ScreenHeight=1096
volume=100
hidestopped=0
AspectWide=0
AspectHigh=0
fitToWindow=1
ScreenRotation=0
DebugMode=0
VideoDriver=0
FirstRun=0
[INFO8]
ScreenXPos=80
ScreenYPos=87
ScreenWidth=800
ScreenHeight=600
volume=100
hidestopped=3
AspectWide=0
AspectHigh=0
fitToWindow=1
ScreenRotation=0
DebugMode=0
VideoDriver=0
FirstRun=0
[INFO9]
ScreenXPos=90
ScreenYPos=97
ScreenWidth=800
ScreenHeight=600
volume=100
hidestopped=3
AspectWide=0
AspectHigh=0
fitToWindow=1
ScreenRotation=0
DebugMode=0
VideoDriver=0
FirstRun=0
[INFO10]
ScreenXPos=100
ScreenYPos=107
ScreenWidth=800
ScreenHeight=600
volume=100
hidestopped=3
AspectWide=0
AspectHigh=0
fitToWindow=1
ScreenRotation=0
DebugMode=0
VideoDriver=0
FirstRun=0
fR33Styler´s Pinball FX3 SSF PUP Pack
fR33Styler´s Pinball FX3 SSF PUP Pack
Here you can download my SSF (Surrond Sound Feedback) Pinup Player Sound Pack for Pinball FX3 and DOFLinx
Simply unpack it: C:\PinUPSystem\PinUPPlayer\PUPVideos\
Enjoy it.
It is recommended to turn down the volume of the game mechanics in Pinball FX3 a bit… (see PinballFX3).. but the best way is „play and try“.
PUP-Pack
Tools
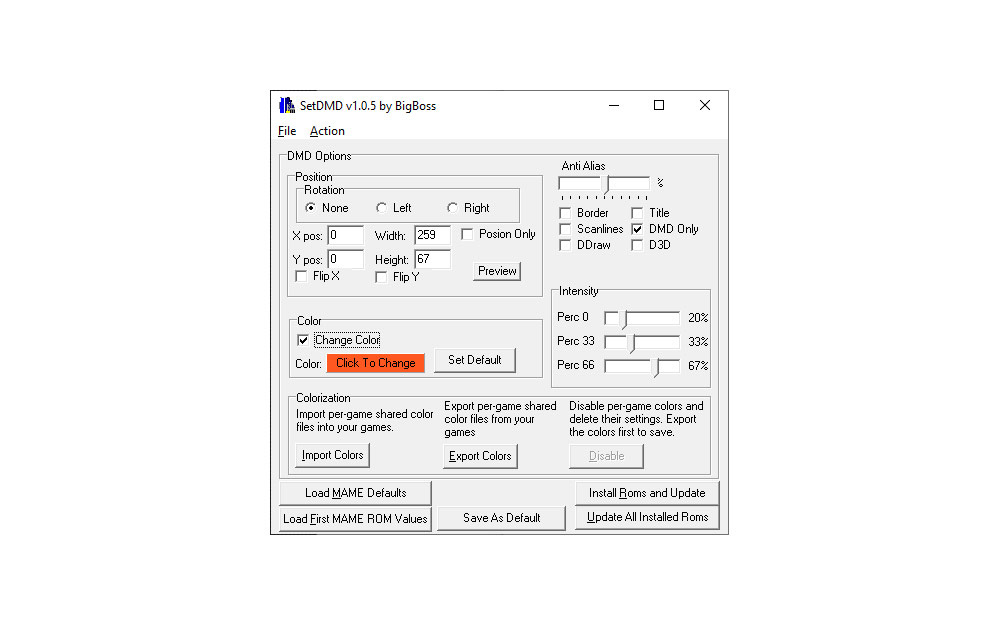
Set DMD
SetDMD is a tool with which you can set your DMD position and a few more parameters in the DMD for all installed ROMs in the system at once.
Link: pinballbulbs.com
Set DMD
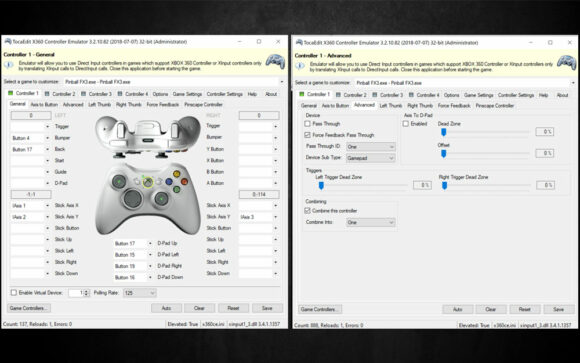
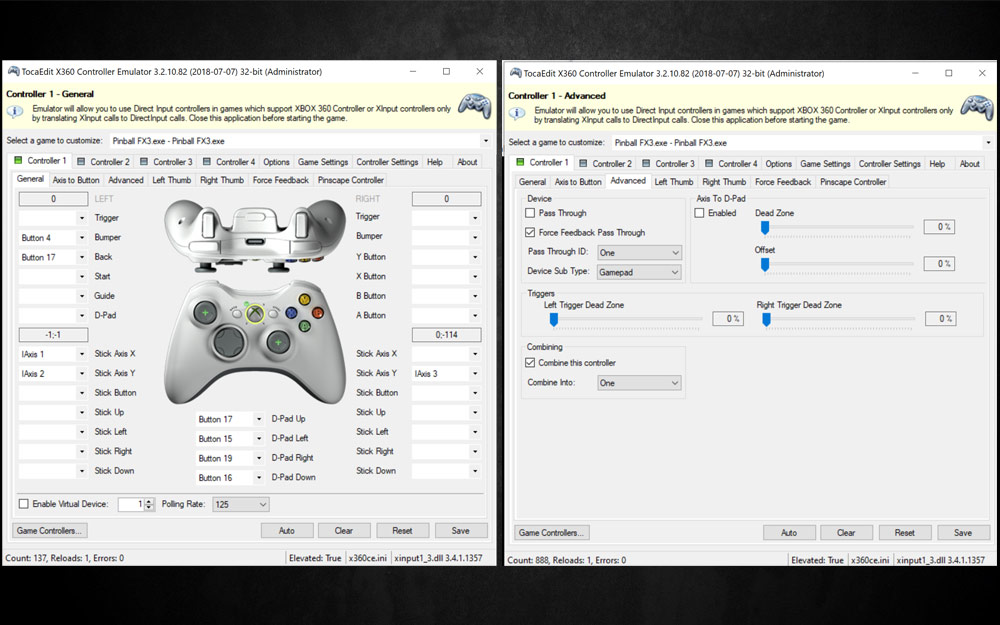
X360ce
X360ce is very powerful, but I use it to control the plunger with my pinscape controller and the analog plunger (poti) and the nudging in Pinball FX3.
Pinball FX3 is a bit ‚arcade-heavy’… so you can control the plunger and nudging with a joystick (e.g. on X-Box/PC…)… X360ce is the bridge and makes this possible with the Pinscape.
- copy x360ce.exe into C:\Steam\teamapps\common\Pinball FX3\
- execute
- adjust
- for details see picture on the right, important are the „sliders & settings“ on the pictures
- left stick: test Y- & X-axis
- right stick: test Y-axis
- save
So a „xinput1_3.dll“ should be generated… then check in Pinball FX3 in the settings at ‚controller‘ briefly whether the controller fits.
As „tunning“ you can adjust the two values (see pictures) in the generated ini-file to -195 (or any value in between, of course)… this changes the nudge effect.
Link: github.com/x360ce
VPIN x360ce general - advanced 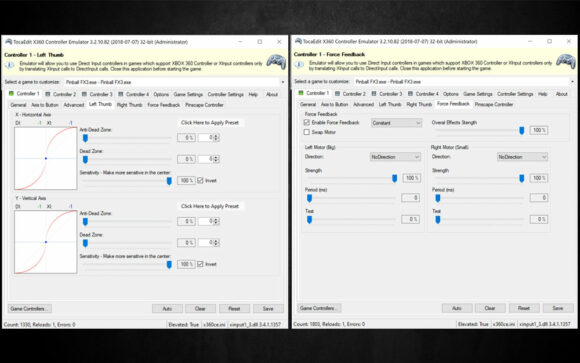
VPIN x360ce left thumb - force feedback 
VPIN x360ce Pinscape - tuning (nudge) 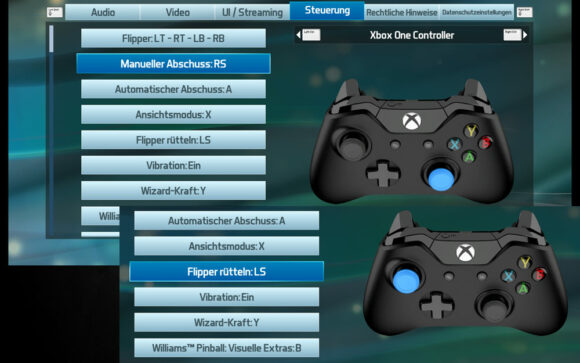
VPIN x360ce Plunger and Nudge @ FX3


pbfx2dotmatrix
pbfx2dotmatrix is a tool with which you can find out your DMD pixel position and DMD pixel size very easily and comfortably. Helpful for all INI files and settings… just position the window where you want it to be and drag it as big as you want it to be… done.
Link: pinballbulbs.com
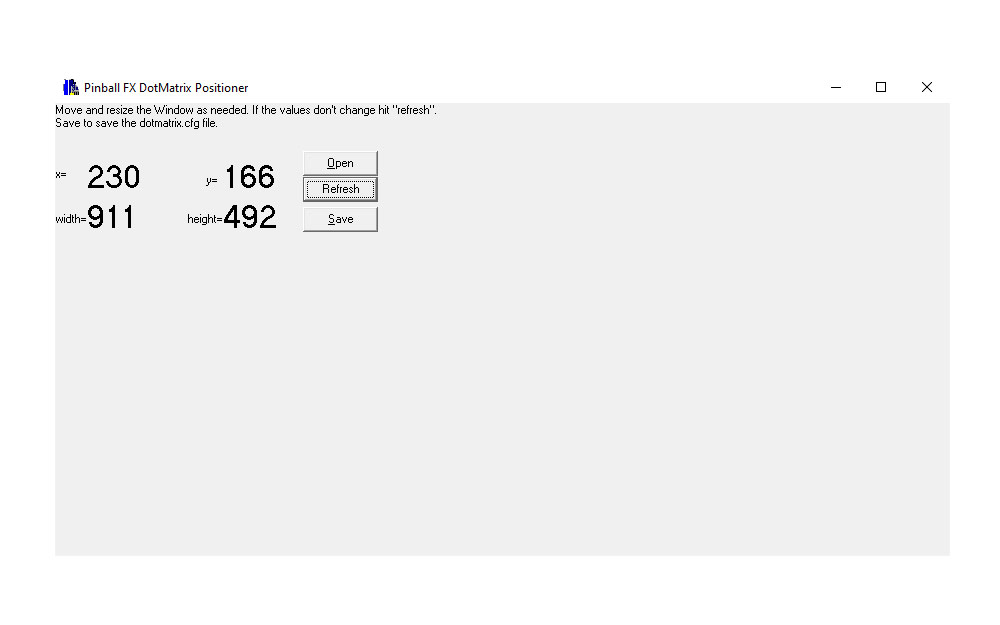
pbfx2dotmatrix
PINvol
PinVol is an open source program that adjusts the audio volume control on pinball tables to compensate for volume differences. In principle, the volume is stored for „each table“ (individually adjustable) and loaded when the table is played.
Super helpful to adjust the different volume levels of old/new tables… Soundpacks/ROMs etc.
Link: mjrnet.org
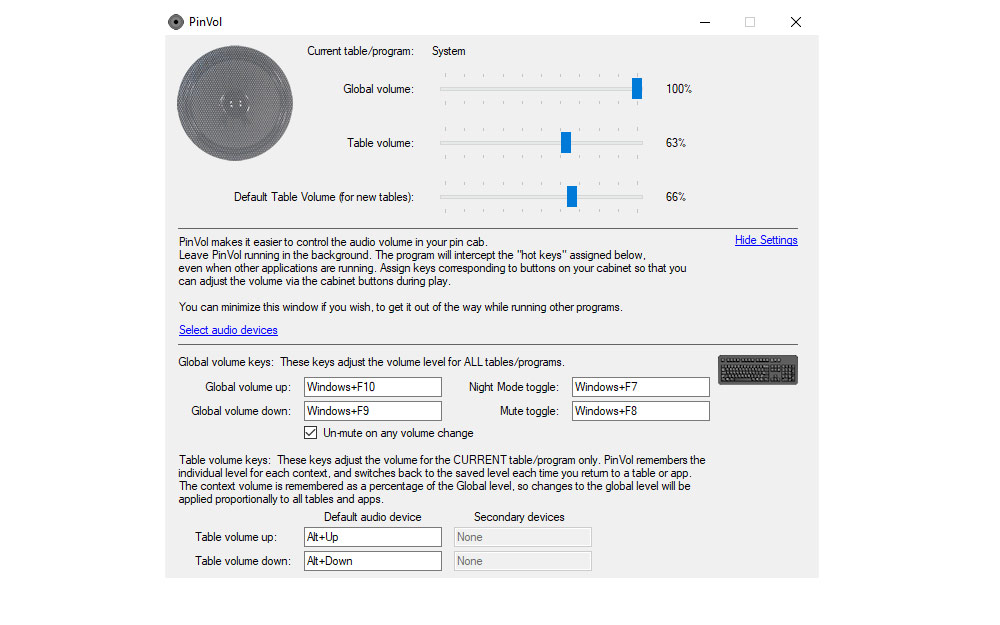
PinVol
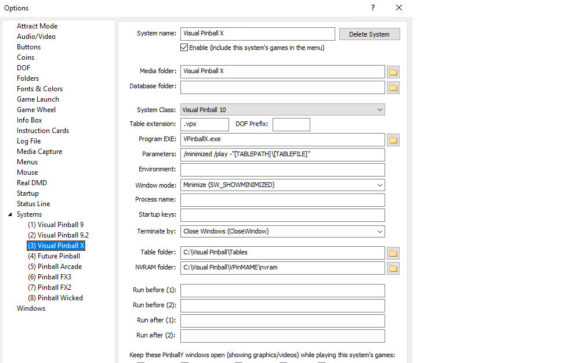
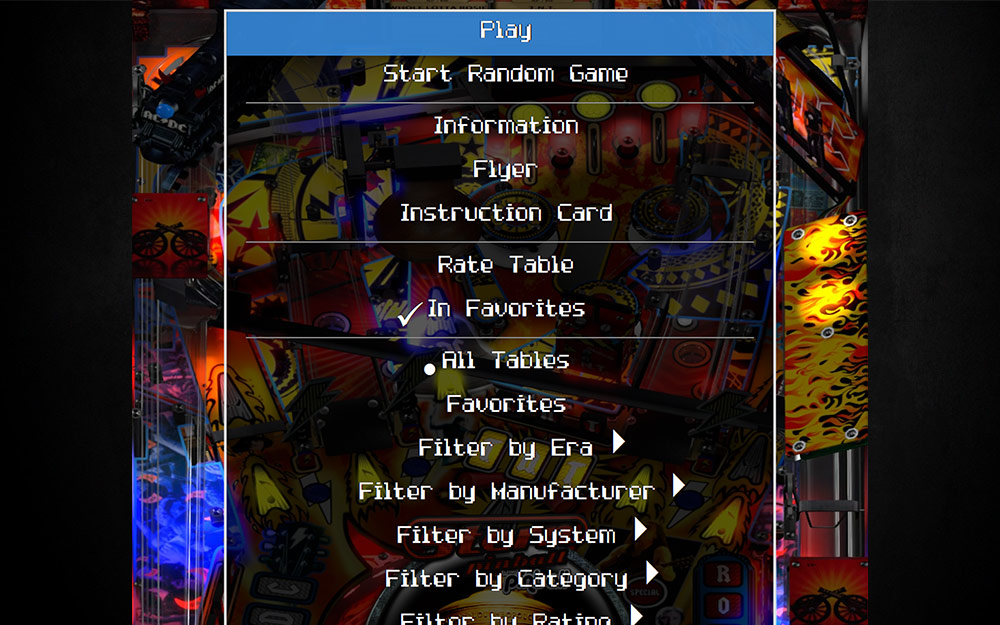
PinballY (Frontend)
PinballY is a game browser and starting program for the VPIN in arcade look. I operate the complete pinball machine starting with overview, over videos up to the game start and end.
PinballY has an excellent documentation and is completely „open-source“… the download can be found here: http://mjrnet.org/pinscape/PinballY.php
Again, I recommend:
Installation on „C:\PinballY„
You can see some of the settings in the gallery. In the folder „Scripts“ you can put a „main.js“ with your own java-scripts… you can find the content of mine on the right.
Extentions:
PinballY Frontend 
PinballY Keys 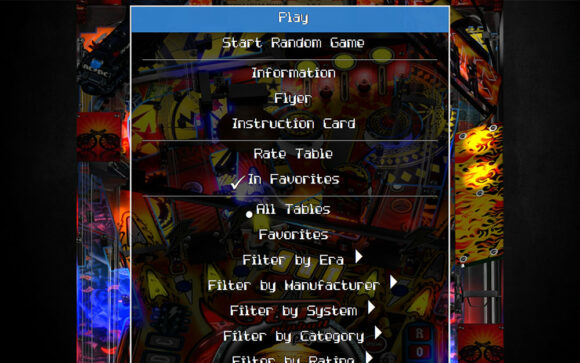
PinballY Scripts


Author: MJR – Link
Code:
//-----------------------------------------------------------------------------------------------//
// Check for a new version of PinballY on each launch (default is false to limit the load on PinballY's servers)
let checkPinballYUpdate = false;


// Check for new release of PinballY (taken from http://mjrnet.org/pinscape/downloads/PinballY/Help/UpdateCheckExample.html)
if (checkPinballYUpdate) {
let request = new HttpRequest();
request.open("GET", "http://mjrnet.org/pinscape/downloads/PinballY/VersionHistory.txt", true);
request.send().then(reply =>
{
if (/^(\d\d)-(\d\d)-(\d\d\d\d) \(\d+\.\d+\.\d+ .+\)$/mi.test(reply))
{
let mm = +RegExp.$1 - 1, dd = +RegExp.$2, yyyy = +RegExp.$3;
let onlineDate = new Date(Date.UTC(yyyy, mm, dd));
if (onlineDate > systemInfo.version.buildDate)
mainWindow.statusLines.upper.add("A new version of PinballY is available!");
}
}).catch(error => {
logfile.log(
"The Javascript version update checker ran into a problem!\nJavascript error: %s\nStack:\n%s",
error.message, error.stack);
});
}


// For debugging purposes
function getMethods(obj) {
var result = [];
for (var id in obj) {
try {
result.push(id + ": " + obj[id].toString() + " / frozen=" + Object.isFrozen(obj[id]) + " / sealed=" + Object.isSealed(obj[id]) + " / type=" + typeof(obj[id]));
} catch (err) {
result.push(id + ": inaccessible");
}
}
return result;
}


Number.prototype.toHHMMSS = function () {
var sec_num = this;
var hours = Math.floor(sec_num / 3600);
var minutes = Math.floor((sec_num - (hours * 3600)) / 60);
var seconds = sec_num - (hours * 3600) - (minutes * 60);
if (hours < 10) {hours = "0"+hours;}
if (minutes < 10) {minutes = "0"+minutes;}
if (seconds < 10) {seconds = "0"+seconds;}
return hours+':'+minutes+':'+seconds;
}


Number.prototype.toDDHHMMSS = function () {
var sec_num = this;
var days = Math.floor(sec_num / 86400);
var hours = Math.floor((sec_num - (days * 86400))/ 3600);
var minutes = Math.floor((sec_num - (days * 86400) - (hours * 3600)) / 60);
var seconds = sec_num - (days * 86400) - (hours * 3600) - (minutes * 60);
if (hours < 10) {hours = "0"+hours;}
if (minutes < 10) {minutes = "0"+minutes;}
if (seconds < 10) {seconds = "0"+seconds;}
return days+"d "+hours+':'+minutes+':'+seconds;
}
Author: vbousquet – Link
Animation and extention: fR33Styler
Details: The table name, logo animation, game statistics, HighScore are displayed in PinballY in the DMD according to the table in combination with flexdmd and the following entry in DMDdevices.ini:
[PinballY]
virtualdmd left = 358
virtualdmd top = -369
virtualdmd width = 703
virtualdmd height = 337
Code (modified) see also download of main.js regarding subfolders & logo animations:
//-----------------------------------------------------------------------------------------------//
// Handle DMD updates
let dmd = null;
let udmd = null;
let hiscores = {};
let info = null;
let shownInfo = null;
let loopCount = 0;
let fso = createAutomationObject("Scripting.FileSystemObject");
let updater;
let manufacturers = {
	"Aliens vs Pinball": ["./Scripts/dmds/manufacturers/Aliens vs Pinball.gif"],
	"Alvin G.": ["./Scripts/dmds/manufacturers/Alvin G..gif"],
	"Bally": ["./Scripts/dmds/manufacturers/bally.gif"],
	"Bethesda Pinball": ["./Scripts/dmds/manufacturers/Bethesda Pinball.gif"],
	"Capcom": ["./Scripts/dmds/manufacturers/capcom.gif"],
	"Data East": ["./Scripts/dmds/manufacturers/dataeast-1.gif", "./Scripts/dmds/manufacturers/dataeast-2.gif"],
	"Foxnext Games": ["./Scripts/dmds/manufacturers/Foxnext Games.gif"],
	"Gottlieb": ["./Scripts/dmds/manufacturers/gottlieb.gif"],
	"Jurassic Pinball": ["./Scripts/dmds/manufacturers/Jurassic Pinball.gif"],
	"Marvel": ["./Scripts/dmds/manufacturers/Marvel.gif"],
	"Midway": ["./Scripts/dmds/manufacturers/bally.gif"],
	"Peyper": ["./Scripts/dmds/manufacturers/peyper.gif"],
	"Premier": ["./Scripts/dmds/manufacturers/premier.gif"],
	"Rowamet": ["./Scripts/dmds/manufacturers/Rowamet.gif"],
	"Sega": ["./Scripts/dmds/manufacturers/sega.gif"],
	"Spooky": ["./Scripts/dmds/manufacturers/Spooky.gif"],
	"Star Wars Pinball": ["./Scripts/dmds/manufacturers/Star Wars Pinball.gif"],
	"Stern": ["./Scripts/dmds/manufacturers/stern.gif"],
	"Taito": ["./Scripts/dmds/manufacturers/Taito.gif"],
	"The Walking Dead": ["./Scripts/dmds/manufacturers/The Walking Dead.gif"],
	"Universal Pinball": ["./Scripts/dmds/manufacturers/Universal Pinball.gif"],
	"Williams": ["./Scripts/dmds/manufacturers/williams.gif"],
	"WilliamsFX3Pinball": ["./Scripts/dmds/manufacturers/williams.gif"],
	"VPX": ["./Scripts/dmds/manufacturers/VPX.gif"],
	"VALVe": ["./Scripts/dmds/manufacturers/VALVe.gif"],
	"Zaccaria": ["./Scripts/dmds/manufacturers/Zaccaria.gif"],
	"Zen Studios": ["./Scripts/dmds/manufacturers/Zen Studios.gif"]
}
// logfile.log(getMethods(dmd).join("\n"));
function TestMarshalling() {
	dmd.LockRenderThread();
	let video = dmd.NewVideo("Manufacturer", "./Scripts/dmds/manufacturers/bally.gif");
	logfile.log(getMethods(video).join("\n"));
	// This will fail due to a marshalling problem
	dmd.Stage.AddActor(video);
	dmd.UnlockRenderThread();
}
function UpdateDMD() {
	if (updater !== undefined) clearTimeout(updater);
	updater = undefined;

	if (dmd == null) {
		dmd = createAutomationObject("FlexDMD.FlexDMD");
		dmd.GameName = "PinballY";
		dmd.RenderMode = 2; // 0 = Gray 4 shades, 1 = Gray 16 shades, 2 = Full color
//		dmd.Size = false;
		dmd.Width = 128; // normal:128 - high-res: 896
		dmd.Height = 32; // normal:32 - high-res: 224
		dmd.Show = true;
		dmd.Run = true;
		udmd = dmd.NewUltraDMD();
	}

	if (dmd.Run == false) return;

	if (info == null) return;

	if (udmd.IsRendering() && shownInfo != null && info.id == shownInfo.id) {
		// Add a timeout later for when the render queue will be finished
		updater = setTimeout(UpdateDMD, 1000);
		return;
	}

	dmd.LockRenderThread();

	if (shownInfo == null || info.id != shownInfo.id) {
		loopCount = 0;
		shownInfo = info;
	} else {
		loopCount++;
	}

	udmd.CancelRendering();

	if (loopCount == 0) {
		/*let rom = info.resolveROM();
		logfile.log("> Update DMD for:");
		logfile.log("> rom: '".concat(rom.vpmRom, "'"));
		logfile.log("> manufacturer:", info.manufacturer);
		logfile.log("> title:", info.title);
		logfile.log("> year:", info.year);
		logfile.log("> Table type: ", info.tableType);
		logfile.log("> Highscore style: ", info.highScoreStyle);
		if (rom.vpmRom == null) {
			dmd.GameName = "";
		} else {
			dmd.GameName = rom.vpmRom.toString();
		}*/
	}


	// Title
	var hasTitle = false;
	if (info.mediaName != null) {
		var extensions = [".gif", ".avi", ".png"];
		for (var i = 0; i < extensions.length; i++) { if (fso.FileExists("./Scripts/dmds/titles/" + info.mediaName + extensions[i])) { queueVideo("./Scripts/dmds/titles/" + info.mediaName + extensions[i], 0, 8, transitionMargin); hasTitle = true; break; } } } if (!hasTitle) { var name = info.title.trim(); var subname = ""; if (name.indexOf('(') != -1) { var sep = info.title.indexOf('('); name = info.title.slice(0, sep - 1).trim(); } if (name.length >= 16) {
			var split = 16;
			for (var i = 15; i > 0; i--) {
				if (name.charCodeAt(i) == 32) {
					subname = name.slice(i).trim();
					name = name.slice(0, i).trim();
					break;
				}
			}
		}
		udmd.DisplayScene00("FlexDMD.Resources.dmds.black.png", name, 15, subname, 15, 0, 5000, 8);
	}

	// Manufacturer
	/*
	let transitionMargin = (20 * 1000) / 60;
	if (info.manufacturer in manufacturers) {
		var medias = manufacturers[info.manufacturer];
		var media = medias[Math.floor(Math.random() * medias.length)];
		queueVideo(media, 10, 8, transitionMargin);
	} else if (info.manufacturer !== undefined) {
		udmd.DisplayScene00("FlexDMD.Resources.dmds.black.png", info.manufacturer, 15, "", 15, 10, 3000, 8);
	}
	*/


// Manufacturer (incl. Workarround for Pinball FX3 Williams Logo)
    let transitionMargin = (20 * 1000) / 60;
    //kleine Workaround -Erweiterung für Williams "TM" Pinball Problem aus FX3
    let manufacturer_temp = info.manufacturer;

    // Wenn Manufacturer mit Williams anfängt, aber mehr als 8 Zeichen hat
    if ((manufacturer_temp.substr(0,8) == "Williams") && (manufacturer_temp.length > 8)){
        manufacturer_temp = "WilliamsFX3Pinball";
    }
    if (manufacturer_temp in manufacturers) {
        var medias = manufacturers[manufacturer_temp];
        var media = medias[Math.floor(Math.random() * medias.length)];
        queueVideo(media, 10, 8, transitionMargin);
    } else if (info.manufacturer !== undefined) {
        udmd.DisplayScene00("FlexDMD.Resources.dmds.black.png", info.manufacturer, 15, "", 15, 10, 3000, 8);
    }


	// Stats
	if (info.rating >= 0)
		udmd.DisplayScene00("FlexDMD.Resources.dmds.black.png", "Played " + info.playCount + " Rating " + info.rating, 15, "Play time: " + info.playTime.toHHMMSS(), 15, 10, 3000, 8);
	else
		udmd.DisplayScene00("FlexDMD.Resources.dmds.black.png", "Played " + info.playCount + " times", 15, "Playtime " + info.playTime.toHHMMSS(), 15, 10, 3000, 8);

	// Insert Coin
	if (((loopCount + 0) & 1) == 0) {
		udmd.DisplayScene00("./Scripts/dmds/misc/insert-coin_c.gif", "", 15, "", 15, 10, 3000, 8);
	}

	// Drink'n drive
	if (((loopCount + 0) & 1) == 0) {
		udmd.DisplayScene00("./Scripts/dmds/misc/drink-n-drive_c.gif", "", 15, "", 15, 10, 3000, 8);
	}

	// Global stats (every 4 loops)
	if (((loopCount + 1) & 3) == 0) {
		var totalCount = 0;
		var totalTime = 0;
		var nGames = gameList.getGameCount();
		for (var i = 0; i < nGames; i++) {
			var inf = gameList.getGame(i);
			totalCount += inf.playCount;
			totalTime += inf.playTime;
		}
		udmd.DisplayScene00("FlexDMD.Resources.dmds.black.png", "Total play count:" , 15, "" + totalCount, 15, 10, 1500, 8);
		udmd.DisplayScene00("FlexDMD.Resources.dmds.black.png", "Total play time:" , 15, "" + totalTime.toDDHHMMSS(), 15, 10, 1500, 8);
	}

	// Highscores
	if (hiscores[info.id] != null) {
		udmd.ScrollingCredits("", hiscores[info.id].join("|"), 15, 14, 2800 + hiscores[info.id].length * 400, 14);
	}

	// Digital Stereo
	if (((loopCount + 0) & 1) == 0) {
		udmd.DisplayScene00("./Scripts/dmds/misc/digital-stereo_c.gif", "", 15, "", 15, 10, 3000, 8);
	}

	dmd.UnlockRenderThread();
	logfile.log("< Update DMD done"); // Add a timeout for when the queue will be finished updater = setTimeout(UpdateDMD, 10000); } gameList.on("gameselect", event => {
	logfile.log("> gameselect");
	info = event.game;
	UpdateDMD();
});

gameList.on("highscoresready", event => {
	logfile.log("> highscoresready");
	if (event.success && event.game != null) {
		logfile.log("> scores received");
		for (var i = 0; i < event.scores.length; i++) { event.scores[i] = event.scores[i].replace(/\u00FF/g, ','); } hiscores[event.game.id] = event.scores; if (shownInfo != null && event.game.id == shownInfo.id) { udmd.ScrollingCredits("", hiscores[shownInfo.id].join("|"), 15, 14, 2800 + hiscores[shownInfo.id].length * 400, 14); } } }); mainWindow.on("prelaunch", event => {
	logfile.log("> launch");
	if (dmd != null) {
		udmd.CancelRendering();
		dmd.Run = false;
	}
});

mainWindow.on("postlaunch", event => {
	logfile.log("> postlaunch");
	if (dmd != null) dmd.Run = true;
	UpdateDMD();
});
Author: fR33Styler
Code:
//-----------------------------------------------------------------------------------------------//
// Show image overlay
mainWindow.on("launchoverlayshow", ev => {
let animation = gameList.resolveMedia("Images", "launch-image.jpg");
mainWindow.showWheel(false);
mainWindow.setUnderlay("");
mainWindow.launchOverlay.bg.loadImage(animation);
ev.preventDefault();
});
Author: fR33Styler
Code:
// hide the animated overlay Video as soon as the game has finished loading
mainWindow.on("gamestarted", ev => {
mainWindow.launchOverlay.bg.clear(0xff404040);
mainWindow.showWheel(true);
});
Author: GSadventure – Link
Code: siehe Git-Hub.
//-----------------------------------------------------------------------------------------------//
// Choose a random game from current selection
import "start_random_table.js";
Author: fR33Styler
Code:
//-----------------------------------------------------------------------------------------------//
// Add Hotseat Modes to below Play on menu

// in the main menu, add Hotseat Modes after the
// Play command
let setPlayHotseatModeCommand = command.allocate("PlayHotseatMode");
mainWindow.on("menuopen", ev => {
if (ev.id == "main") {
// main menu - check the current game's system
let game = gameList.getWheelGame(0) || { };
let sys = game.system || { };
if (/pinball fx3\.exe$/i.test(sys.processName)) {
// it's FX3 - add the Hotseat Play Mode command
ev.addMenuItem({ after: command.PlayGame },
{ title: "Play Hotseat Mode", cmd: setPlayHotseatModeCommand });
}
}
});


// Show the mode selection menu when the Play Hotseat Mode command
// is used, and process the commands in that menu.
let Hotseat2ModeCommand = command.allocate("Hotseat2Mode");
let Hotseat3ModeCommand = command.allocate("Hotseat3Mode");
let Hotseat4ModeCommand = command.allocate("Hotseat4Mode");


mainWindow.on("command", ev => {
if (ev.id == setPlayHotseatModeCommand) {
let game = gameList.getWheelGame(0) || { };
let sys = game.system || { };
if (/pinball fx3\.exe$/i.test(sys.processName)) {
mainWindow.showMenu("custom.hotseatmode.fx3", [
{
title: "Hotseat: 2 Players",
cmd: Hotseat2ModeCommand,
},
{
title: "Hotseat: 3 Players",
cmd: Hotseat3ModeCommand,
},
{
title: "Hotseat: 4 Players",
cmd: Hotseat4ModeCommand,
},
{ cmd: -1 }, // separator
{ title: "Cancel", cmd: command.MenuReturn }
]);


// tell the system not to launch the game yet
ev.preventDefault();
}
}


else if (ev.id == command.Hotseat2Mode) {
let game = gameList.getWheelGame(0) || { };
let sys = game.system || { };
if (/pinball fx3\.exe$/i.test(sys.processName)) {
// figure out the hotseatmode options based on the current mode
// launch it with the hotseatmode 2 Players
mainWindow.playGame(game, {
overrides: {
params: "-applaunch 442120 -hotseat_2 -table_[TABLEFILEBASE]"
}
});
// skip the default action, since we did the launch here instead
ev.preventDefault();
}
}


else if (ev.id == command.Hotseat3Mode) {
let game = gameList.getWheelGame(0) || { };
let sys = game.system || { };
if (/pinball fx3\.exe$/i.test(sys.processName)) {
// figure out the hotseatmode options based on the current mode
// launch it with the hotseatmode 3 Players
mainWindow.playGame(game, {
overrides: {
params: "-applaunch 442120 -hotseat_3 -table_[TABLEFILEBASE]"
}
});
// skip the default action, since we did the launch here instead
ev.preventDefault();
}
}


else if (ev.id == command.Hotseat4Mode) {
let game = gameList.getWheelGame(0) || { };
let sys = game.system || { };
if (/pinball fx3\.exe$/i.test(sys.processName)) {
// figure out the hotseatmode options based on the current mode
// launch it with the hotseatmode 4 Players
mainWindow.playGame(game, {
overrides: {
params: "-applaunch 442120 -hotseat_4 -table_[TABLEFILEBASE]"
}
});
// skip the default action, since we did the launch here instead
ev.preventDefault();
}
}


});
Author: MJR » Link
Code:
// -------------------------------------------------------------------------------
// Global variable for keeping track of the current FX3 play
// mode. We'll use the strings "classic" and "new" to represent
// the modes. Initially, we'll restore the saved value from the
// settings file.
let currentFX3ModeKey = "custom.fx3.playMode";
let currentFX3Mode = optionSettings.get(currentFX3ModeKey, "classic");

// in the main menu, add our new Set Play Mode command after the
// Play command
let setPlayModeCommand = command.allocate("SetPlayMode");
mainWindow.on("menuopen", ev => {
if (ev.id == "main") {
// main menu - check the current game's system
let game = gameList.getWheelGame(0) || { };
let sys = game.system || { };
if (/pinball fx3\.exe$/i.test(sys.processName)) {
// it's FX3 - add the Set Play Mode command
ev.addMenuItem({ after: command.PlayHotseatMode },
{ title: "Set Play Mode", cmd: setPlayModeCommand });
}
}
});

//-----------------------------------------------------------------------------------------------//
// Show the mode selection menu when the Set Play Mode command
// is used, and process the commands in that menu.
let classicPhysicsModeCommand = command.allocate("ClassicPhysicsMode");
let newPhysicsModeCommand = command.allocate("NewPhysicsMode");
mainWindow.on("command", ev => {
if (ev.id == setPlayModeCommand) {
let game = gameList.getWheelGame(0) || { };
let sys = game.system || { };
if (/pinball fx3\.exe$/i.test(sys.processName)) {
mainWindow.showMenu("custom.playmode.fx3", [
{
title: "Classic Physics Mode",
cmd: classicPhysicsModeCommand,
radio: currentFX3Mode == "classic"
},
{
title: "New Physics Mode",
cmd: newPhysicsModeCommand,
radio: currentFX3Mode == "new"
},
{ cmd: -1 }, // separator
{ title: "Cancel", cmd: command.MenuReturn }
]);

// tell the system not to launch the game yet
ev.preventDefault();
}
}
else if (ev.id == classicPhysicsModeCommand) {
// set the new mode and save to the settings
optionSettings.set(currentFX3ModeKey, currentFX3Mode = "classic");
}
else if (ev.id == newPhysicsModeCommand) {
// set the new mode and save to the settings
optionSettings.set(currentFX3ModeKey, currentFX3Mode = "new");
}
else if (ev.id == command.PlayGame) {
let game = gameList.getWheelGame(0) || { };
let sys = game.system || { };
if (/pinball fx3\.exe$/i.test(sys.processName)) {
// figure out the extra options based on the current mode
let extra = "";
if (currentFX3Mode == "classic")
extra = "-class ";
else if (currentFX3Mode == "new")
extra = "";

// launch it with the extra options
mainWindow.playGame(game, {
overrides: { params: extra + sys.params }
});

// skip the default action, since we did the launch here instead
ev.preventDefault();
}
}
});
The frontend offers a lot of great possibilities (starting with filter possibilities up to statistics and ratings etc.)… best you start (after setting it up) to configure a table (actually only name it briefly) and then you can already arrange the appropriate media files (next part in the documentation)… and it looks like the one in my video above.
Backup
Here is my backup story very briefly…
I realized this with a batch-file, which in turn runs via the „task planner“ in WIN on the last day of every month.
I copy the DELTA of the (for me) relevant files to a second SSD hard drive.
@echo off

ECHO Datensicherung wird gestartet...
ECHO .
ECHO ..
ECHO ...
ECHO ========================================================

ECHO === sichere Install ====================================
xcopy C:\_HDD-Install D:\_Backup\_HDD-Install /D /E /Y /I
ECHO =
ECHO ===== sichere _Backup ==================================
xcopy C:\_Backup D:\_Backup\_Backup /D /E /Y /I
ECHO =
ECHO ======= sichere Users (Roaming) ========================
xcopy C:\Users\VPIN\AppData\Roaming D:\_Backup\Users\VPIN\AppData\Roaming /D /E /Y /I
ECHO =
ECHO ========= sichere DirectOuptut =========================
xcopy C:\DirectOutput D:\_Backup\DirectOutput /D /E /Y /I
ECHO =
ECHO =========== sichere DOFConfigtoolClient ================
xcopy C:\DOFConfigtoolClient D:\_Backup\DOFConfigtoolClient /D /E /Y /I
ECHO =
ECHO ============= sichere Steam (Games) ====================
xcopy C:\Games\Steam\steamapps\common D:\_Backup\Games\Steam\steamapps\common /D /E /Y /I
ECHO =
ECHO =============== sichere PinAffinity64 ==================
xcopy C:\PinAffinity64 D:\_Backup\PinAffinity64 /D /E /Y /I
ECHO =
ECHO ================= sichere PinballY =====================
xcopy C:\PinballY D:\_Backup\PinballY /D /E /Y /I
ECHO =
ECHO =================== sichere PinSoundStudio =============
xcopy C:\PinSoundStudio D:\_Backup\PinSoundStudio /D /E /Y /I
ECHO =
ECHO ===================== sichere PinUPSystem ==============
xcopy C:\PinUPSystem D:\_Backup\PinUPSystem /D /E /Y /I
ECHO =
ECHO ======================= sichere PinVol =================
xcopy C:\PinVol D:\_Backup\PinVol /D /E /Y /I
ECHO =
ECHO ========================= sichere VPX ==================
xcopy C:\"Visual Pinball" D:\_Backup\"Visual Pinball" /D /E /Y /I

ECHO ...
ECHO ..
ECHO .
ECHO  ----- Dietle VPIN Datensicherung abgeschlossen! -----
ECHO ========================================================

pause
fR33Styler´s VPIN Frontend Media
So and finally there is a link to „fR33Styler’s VPIN Frontend Media“… here you find my
- Backglass-Videos
- DMD-Videos
- Playfield-Videos
- Wheel-Images
- Launch- & Table-Audios
which I use in PinballY… …to navigate the pinball tables.
fR33Styler´s VPIN Frontend Media
I hope that some of you could take something from this documentary for your stuff… or dive into the topic of virtual pinball (VPIN)… but most of all i hope you had fun with it.
Ralf Dietle